Java Code Table Time Lights
-
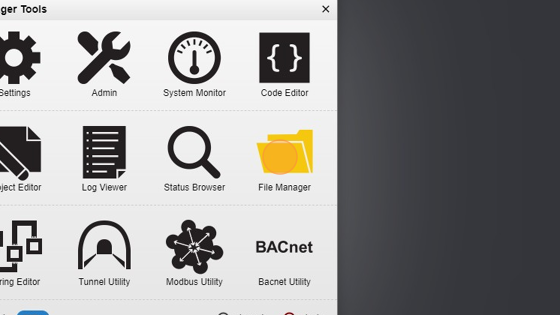
Navigate to HSYCO Manager
-
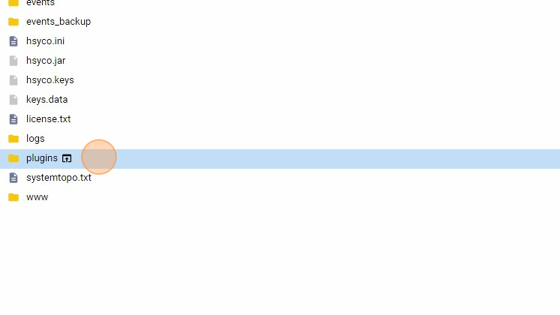
Click on "File Manager"
- Navigate to "plugins" or create this folder if inexistent by clicking "New folder" in the left upper-side of the file manager.
Tip: Now we will download from the GitHub Repository the folder that contains the Java code and the project.
-
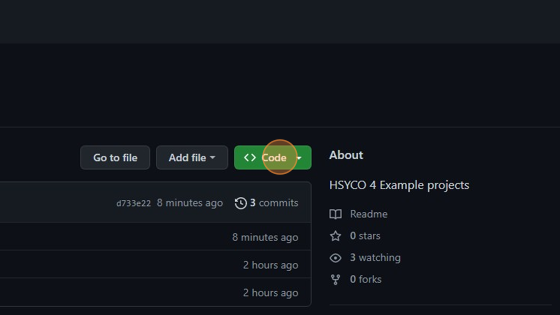
Navigate to https://github.com/hsyco/hsyco4-examples
-
Click "Code"
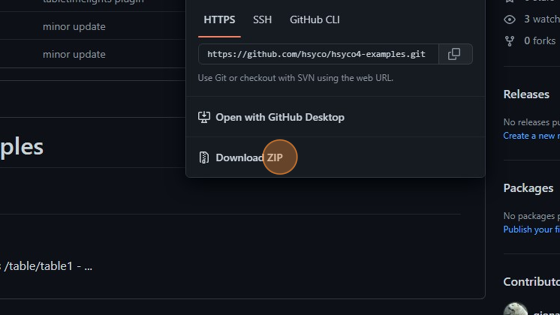
- Click "Download ZIP"
-
Extract the hsyco4-examples.zip and navigate into "/table" to find the folder named "tabletimelights". Make that folder a .zip file.
-
Click "Upload Files"

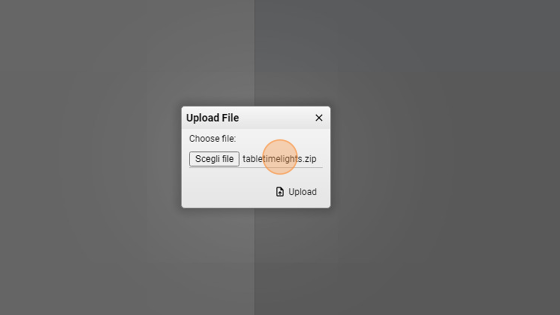
- Click "Select file" and select from your computer the tabletimelights.zip file that we just created.
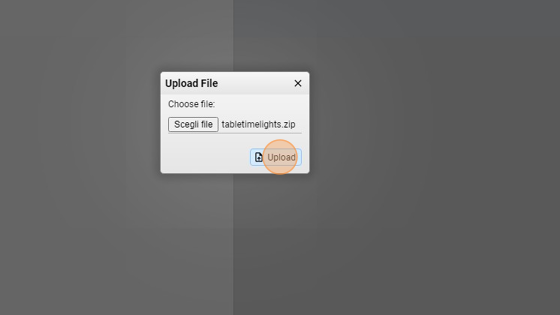
- Click "Upload"
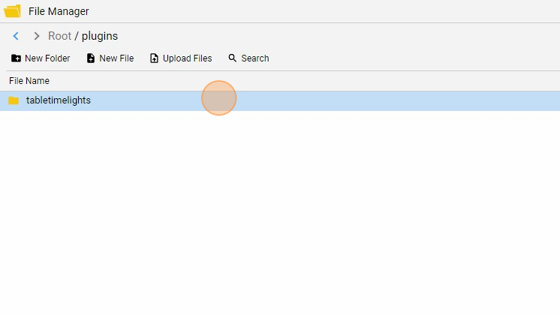
- As you can see, we have just imported the plugin successfully into our /plugin folder in HSYCO.
Tip: Now we have our plugin "tabletimelights" that contains the .java file and also a "www" folder. Inside this folder there is the "projects" folder, and inside this a folder with the actual name of the project with a .xml file inside that specifies all the pages and object in this project. This method of having the project folder inside the main plugin folder is good if your plugin has associated interfaces. In our case, the project has a table object in a page associated to the code, so it is a good idea to make it as a plugin instead of just having the project folder in the root directory and all the java code in the "com" folder. This would make the main user.java file unreadable with all the code inside of it. If you want to make your own plugin, follow this guide on the wiki page: https://wiki.hsyco.com/3.8/index.php/Plugins_Applications You can create the project in the project editor like you would do normally and then move that folder under "/plugins/'ProjectName'/www/projects/" (like the image in step 11 https://scribehow.com/shared/Java_Code__JtDNcJicRe-axiN2z012uA#37de2c74)
Tip: Good! Now I'll go in detail about the code
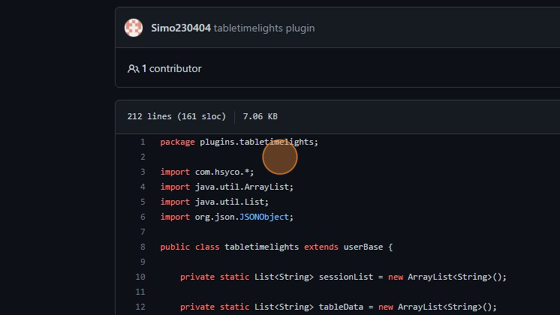
12. The first part of the code is: imports and packages. A package in Java is used to group related classes, like a folder in a file directory. In this case, the plugins.tabletimelights package is used. The import statement is used to bring certain classes into visibility. As soon as imported, a class can be referred to directly by using only its name. Here we use ArrayList and List to store the table content, and JSONObject to manipulate JSON strings.
13. Here we define 2 variables: sessionList and tableData. sessionList will contain all the active sessions, while tableData will contain the data stored in the table object.
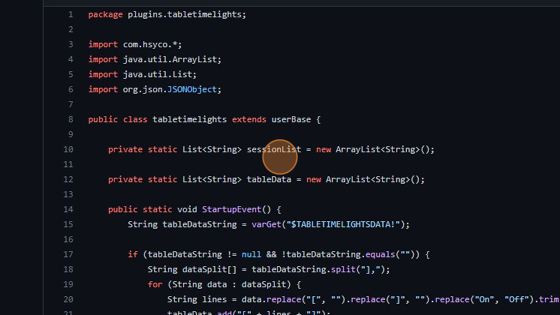
- The first method used is StartupEvent, called only once when HSYCO starts, after the initialization and HTTP server start-up. In this method, we call another method, varGet(), which returns the value of "$TABLETIMELIGHTSDATA!", a persistent variable that stores in hsyco the content of the table. When we launch HSYCO for the first time, this call will return "null", because the variable, in this case, isn't created yet, but after we insert some data in the table, it will return a String, which is the JSON representation of the table. With this String, we split it and add it line per line to tableData. Now we can work with the data that we have in the table, in Java!
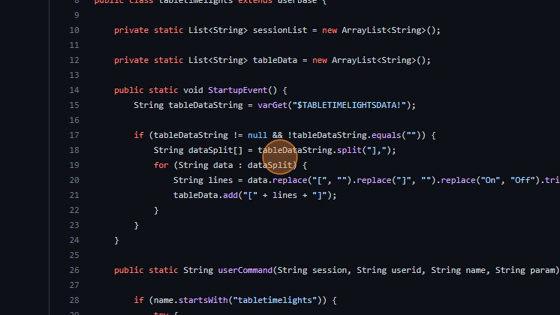
15. The second method that we use is userCommand, called by user clicks on buttons or, in our case, when we successfully insert data in the table. This method returns a string. Any returned string causes the log of an [OK] status. This is very important because now we have to analyze what the userCommand called by the table returns. To do so, follow the next steps:
-
Open the project where the table object is stored
-
Click the "edit" button on the table

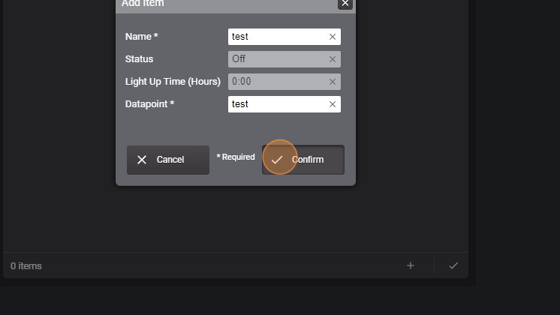
- Click the "add" button

- Insert in the "Name" field some data ("test" for example)
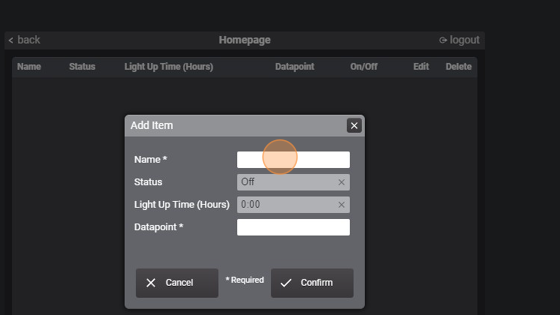
- Do the same with the "datapoint" field
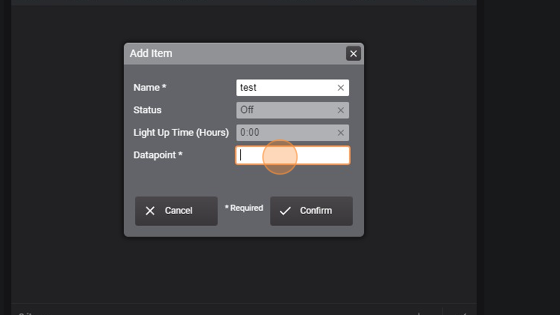
- Click on "Confirm"
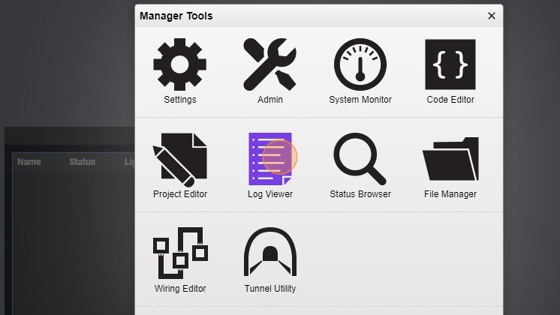
- Now go back to the manager and open the "Log Viewer"
- Click the "Filter" field and type "table". This will filter all the logs and show only those who have "table" in their message.

24. This is the command that the table called and the string that it returned. The action is "insert" and the data is a JSON object populated with our input.
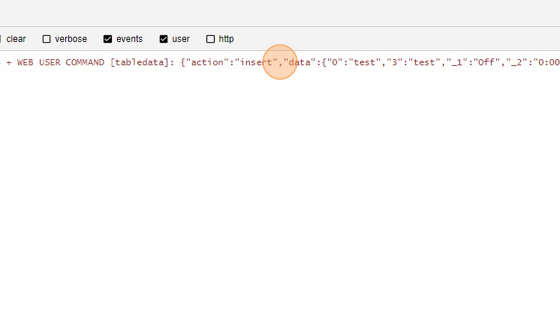
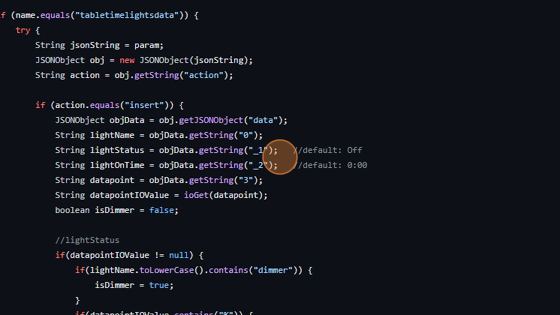
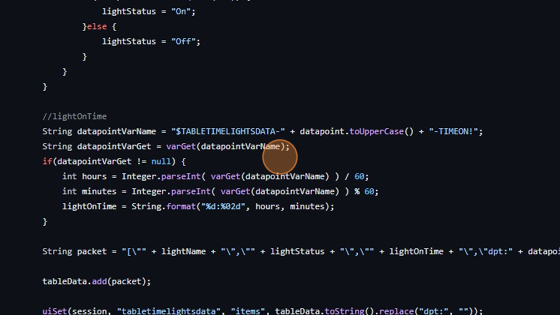
Alert: Now it's really important to check YOUR column headers returned in the log, like in the screenshot shown in the step before. In our code, to get the content of every row we add, we call a method, getString(), with a parameter, which is the column header. This parameter is a String and represents one of the 4 column headers of our table. In my case, these 4 headers are "0", "_1", "_2" and "3". You can see yours in the log as shown in the step before. Yours, for example, could be without the underscore.
25. Now, if those values are different from ours, modify the objData.getString() parameter with your column headers. Pay attention to the indexes. "0" should be the Name field, "1" should be the lightStatus field and so on. What we are doing in the userCommand is an if statement based on the action value which could be "insert", "update", "delete" or "move". In the "insert" case, we get the values that the table returned as a parameter of the userCommand and add them to our tableData List. We check if the values of the datapoint changed over time and, if it's the case, we update its status.
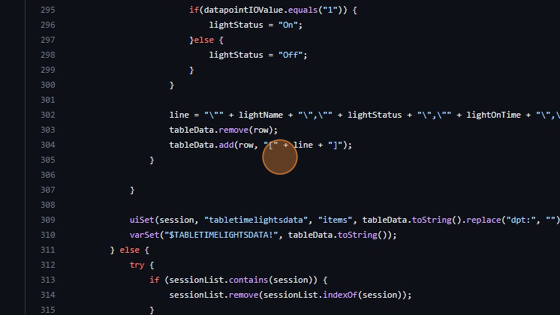
26. We do the sime for the lightOnTime, which, if changed, is updated. Then, the uiSessionSet() method sets up the table graphically so that it show the content of our List and we also update the "$TABLETIMELIGHTSDATA!" persistent variable to the new value.
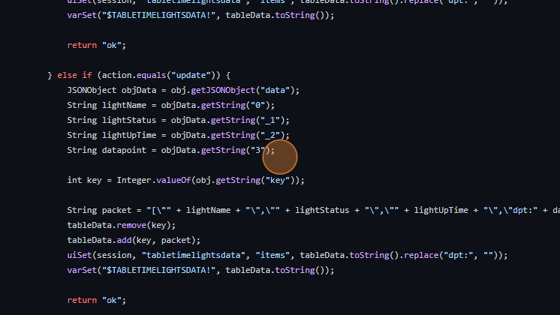
27. Now, in the "update" case, we repeat the same steps done in the step before so make sure to change the objData.getString() parameter with your column headers. All we do here is get the key, which is the row that is being updated, remove that row from our List and, after creating the packet with the new values, add those packet in the List at the same index as the row we removed. Then update the "$TABLETIMELIGHTSDATA!" variable and show graphically the updated table.
- In the "delete" case, we simply remove from our List the row that we deleted from the table.
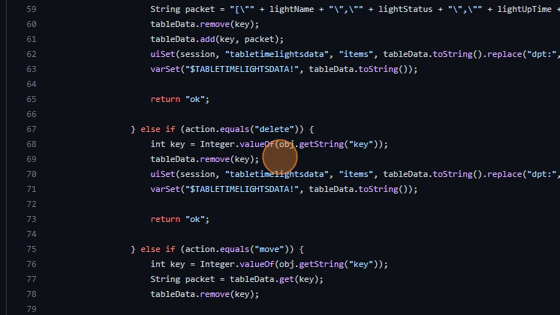
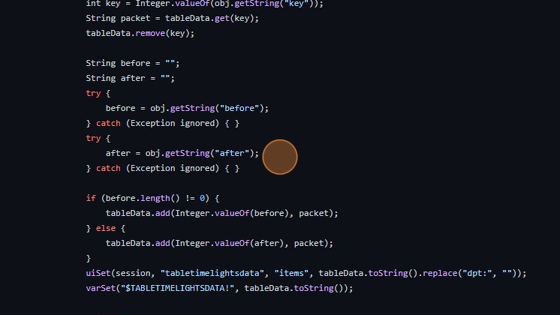
**29. The last case is "move" . We get the key which represents the row that we want to move, remove that from our List, and also the "before" or "after" key . In the JSONObject there will be only one of them : if we are trying to move up, "before" key, if we are moving down, "after" key. Then, as usual, add the row in the new position and update graphic and variable. **
Alert: Now we need to go back a little when we created our table in the project editor, exactly here: https://scribehow.com/shared/Creating_a_Table_with_Columns_and_Buttons__2gba51GiSauvHnD3UDkcpA#743462c6 In this case, in step 46, we used the "tabletimelights.light" command. If you wish to change that, change it in the project editor like in the step attached, but remember to do so also in the code, where the name.equals("tabletimelights.light") check is done.
**30. When we press the on/off button, a "tabledatalights.light" command is sent by the button, and with the code below we can capture that. In this case, we split the packet to get the datapoint which is linked to the light, his name and his status. Then, with the help of the ioGet() method, we retrieve the actual value of that datapoint. **
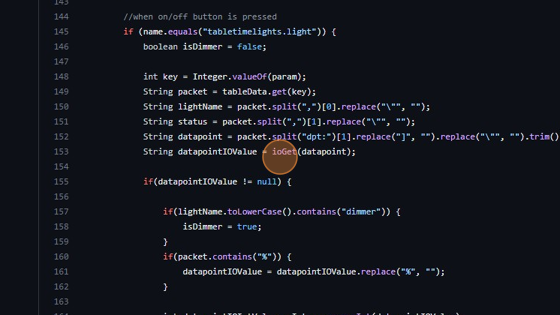
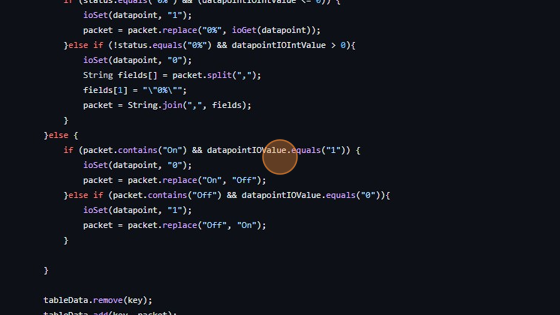
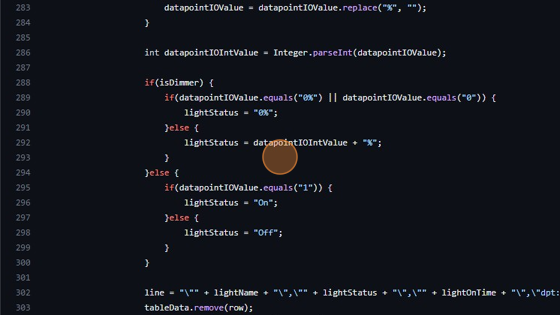
31. Then, if the light is a dimmer, we set his value in percentage, otherwise a simple On or Off state. Then, as usual, update the row in our local List and also update graphics and persistent variable. At the end of our code we return null, because we have to return something. If this function doesn't return a value, an [ERROR] status is logged in the log file, while any other string causes the log of an [OK] status. This can be seen in step 24 (https://scribehow.com/shared/Java_Code__JtDNcJicRe-axiN2z012uA#3467e850) here in this guide, where there is an error log because we don't return a String but null.
- Navigate to https://github.com/hsyco/hsyco4-examples/blob/main/table/tabletimelights/tabletimelights.java
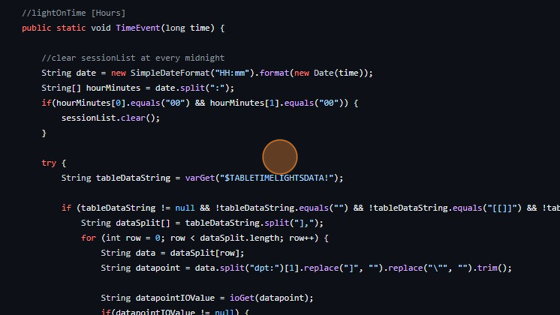
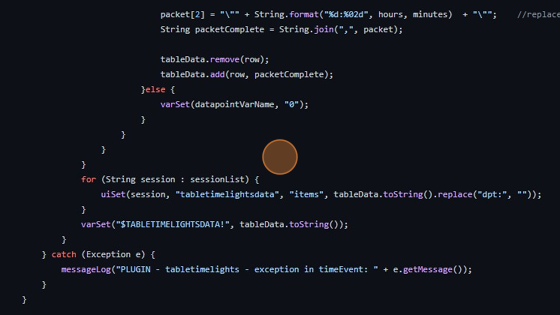
33. Now we have another method, TimeEvent. This method is called every 60 seconds; HSYCO tries to synchronize the execution at the beginning of the minute, executing this method at seconds 0 of every minute. The first thing that we do is check if the time is "00:00", so every midnight. If that's the case, we clear the sessionList so that unactive sessions are removed from the list. Then, we get the content of the persistent variable "$TABLETIMELIGHTSDATA!" and, if is not empty, we split it to get the rows of our table and extract the datapoint like we did before.
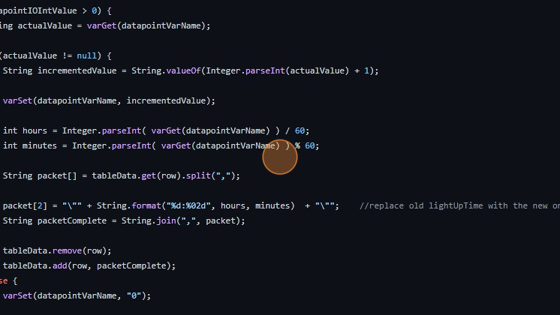
34. We then create another persistent value called "$TABLETIMELIGHTSDATA-'datapointName'-TIMEON!" that will contain the time (HH:MM) that light has been on. Now we check if that light is currently on, and if so, we retrieve the current lightOnTime of that light and increase that by one. Then we set the new value for the variable. As usual, update our local List. Otherwise, if we are not able to retrieve the current lightUpTime, that means that the variable isn't created yet, so we set the value for our variable to "0" only for the first time.
- Then, last thing to do, update the graphics for every active session in our sessionList and update also the persistent variable.
Alert: Now we need to get the project's name and also the page name where our table object is. In Step 4 (https://scribehow.com/shared/Creating_a_Table_with_Columns_and_Buttons__2gba51GiSauvHnD3UDkcpA#f096e753) of the last guide we created a project named "tabletimelights" and in Step 5 (https://scribehow.com/shared/Creating_a_Table_with_Columns_and_Buttons__2gba51GiSauvHnD3UDkcpA#fe50f92d) we added the table to the homepage, which is named "home", as you can see in the left hand-side of the screenshot. When you know yours project and page names, follow the next step.
36. Here we have the pageEvent method that is called when a Web client initially loads a project and when navigating between pages. If the project is named "office" and the page "lights", in my case, add the session to the sessionList, update the graphics for that session and update the variable. Otherwise, remove that session from the List. Modify the if statement with yours project name and page name retrieved the step before.
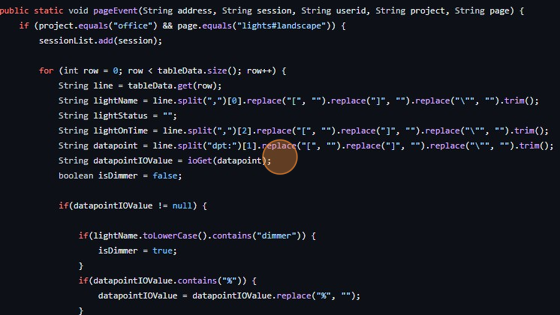
- Here we retrieve the values of the datapoint like we did in the "insert" case of the userCommand and update the tableData List.
- Then, add the rows back to the List and set graphic and variable.
Tip: Remember that, if the page has distinct orientation versions in the project, its name will be followed by the suffixes #landscape or #portrait.
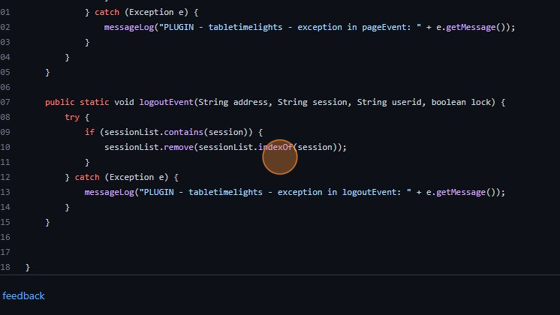
39. Lastly, the logoutEvent is called when a user logs out or locks the user interface. If it does so, remove his session from the sessionList.
Tip: Great! You can now manage tables in project editor and Java!