Installation Guide
HSYCO SERVER ships pre-installed with the latest version of the HSYCO software, on a Linux Debian distribution stripped of all not-essential services.
The OPEN JDK Java version 8 (OPEN JDK 11 Adoptium on the latest models) is also installed. No other software is required.
Legacy HSYCO SERVER units had Linux Ubuntu 12.04 LTS Server and Oracle Java SE Runtime Environment version 7 installed.
The servers portfolio
HSYCO SERVER is available with different hardware configurations. Each version presents minor differences in its software configuration.
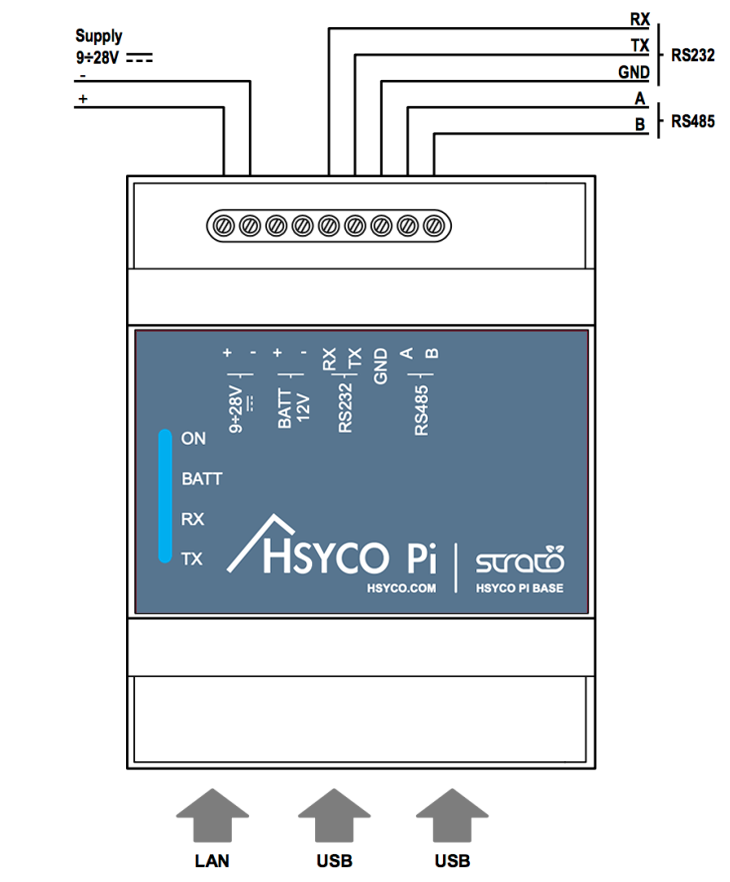
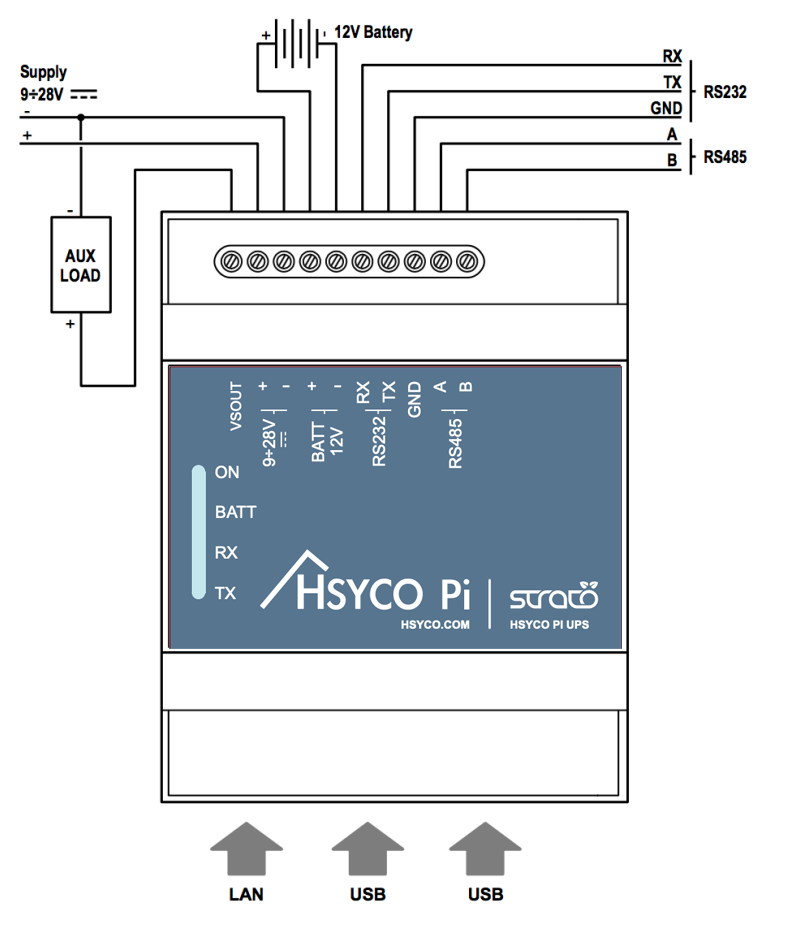
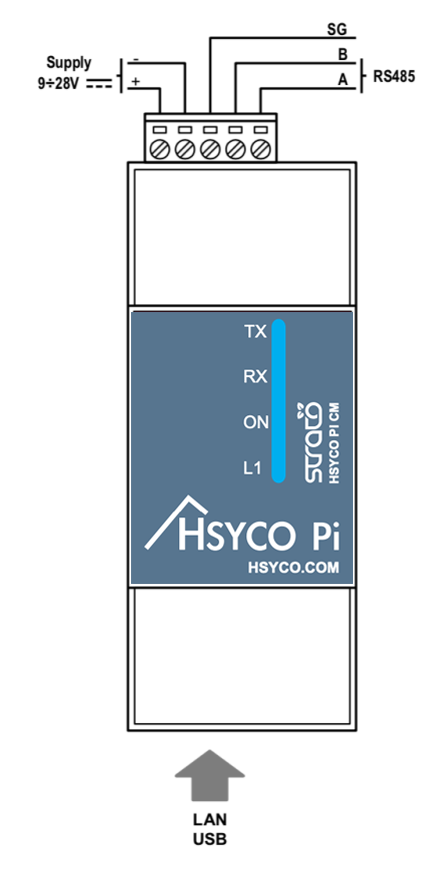
HSYCO PI
The Pi version is installed on a Strato Pi Base/UPS/CM/CM Duo Server, with Raspberry Pi 3 Model B+ 1GB RAM or Raspberry Pi 4 Model B with 2/4/8 GB RAM with and a 4GB SLC industrial microSD card with pre-installed software. The operating system is Raspbian Stretch/Buster Lite or Raspberry Pi OS depending on the Raspberry Pi version.
Links to the HSYCO PI Servers Data Sheets:
BASE SERVER
https://hsyco.com/wp-content/uploads/2024/05/HSYCO-Pi-Base-datasheet-en-029.pdf
UPS SERVER
https://hsyco.com/wp-content/uploads/2024/05/HSYCO-Pi-UPS-datasheet-en-030.pdf
CM SERVER
https://hsyco.com/wp-content/uploads/2024/05/HSYCO-Pi-CM-en-030.pdf
CM DUO SERVER
https://hsyco.com/wp-content/uploads/2024/05/HSYCO-Pi-CM-Duo-datasheet-en-030.pdf
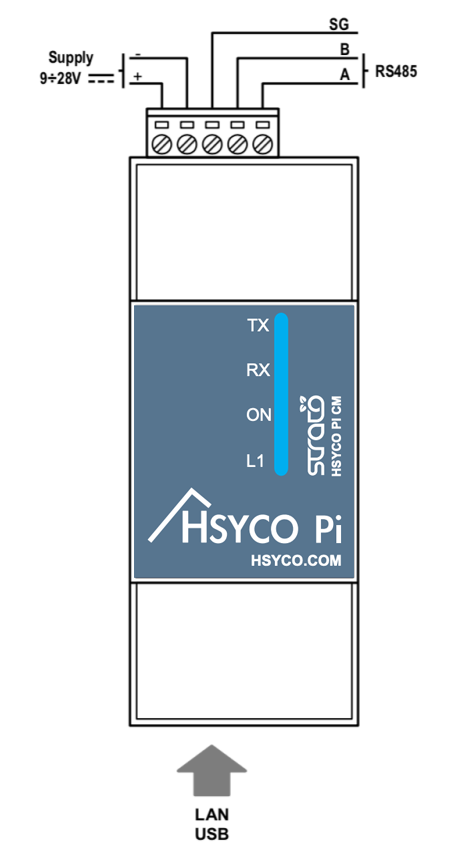
To start the server simply plug the power supply. HSYCO automatically starts, the execution of HSYCO is signalled by three consecutive high-pitch beeps.
HSYCO PI is configured with the following default network configuration:
- IP address (eth0): 192.168.1.50
- Net mask: 255.255.255.0
- Default Gateway: 192.168.1.1
- DNS: 192.168.1.1
The RS-232 / RS-485 port system id is /dev/ttyAMA0
You can only use either the RS-232 or the RS-485 port, not both at the same time, as they are connected to the same UART interface of the Raspberry Pi CPU.
Raspberry Pi 4 Models
If you have FTDI USB to serial adapters connected to the USB ports, use the following system ids, that are based on the physical USB port used:
- bottom right port: /dev/ftdi-1-1.3
- top right port: /dev/ftdi-1-1.1
- bottom left port: /dev/ftdi-1-1.4
- top left port: /dev/ftdi-1-1.2
Raspberry Pi 3 Models
If you have FTDI USB to serial adapters connected to the USB ports, use the following system ids, that are based on the physical USB port used:
- bottom right port: /dev/ftdi-1-1.2
- top right port: /dev/ftdi-1-1.3
- bottom left port: /dev/ftdi-1-1.1.3
- top left port: /dev/ftdi-1-1.1
HSYCO PRO AND CORE SERVER
Based on Strato Pi Max XS and XL
PRO SERVER
https://hsyco.com/wp-content/uploads/2024/05/HSYCO-Pro-datasheet-en-003.pdf
CORE SERVER
https://hsyco.com/wp-content/uploads/2024/05/HSYCO-Core-datasheet-en-003.pdf
The Pro / Core version is installed on a Strato Pi Max Server, with Raspberry Pi 4 Cm with 8 GB RAM / 32 GB eMMc with and a 480GB NVMe with pre-installed software. The operating system is Raspberry Pi OS.
To start the server simply plug the power supply and the ethernet cable in the LAN1 port. HSYCO automatically starts, the execution of HSYCO is signalled by three consecutive high-pitch beeps. USR LED blinks green when running from PCIe, blinks red from CM's eMMC.
HSYCO PI is configured with the following default network configuration:
- IP address (eth0): 192.168.1.50
- Net mask: 255.255.255.0
- Default Gateway: 192.168.1.1
- DNS: 192.168.1.1
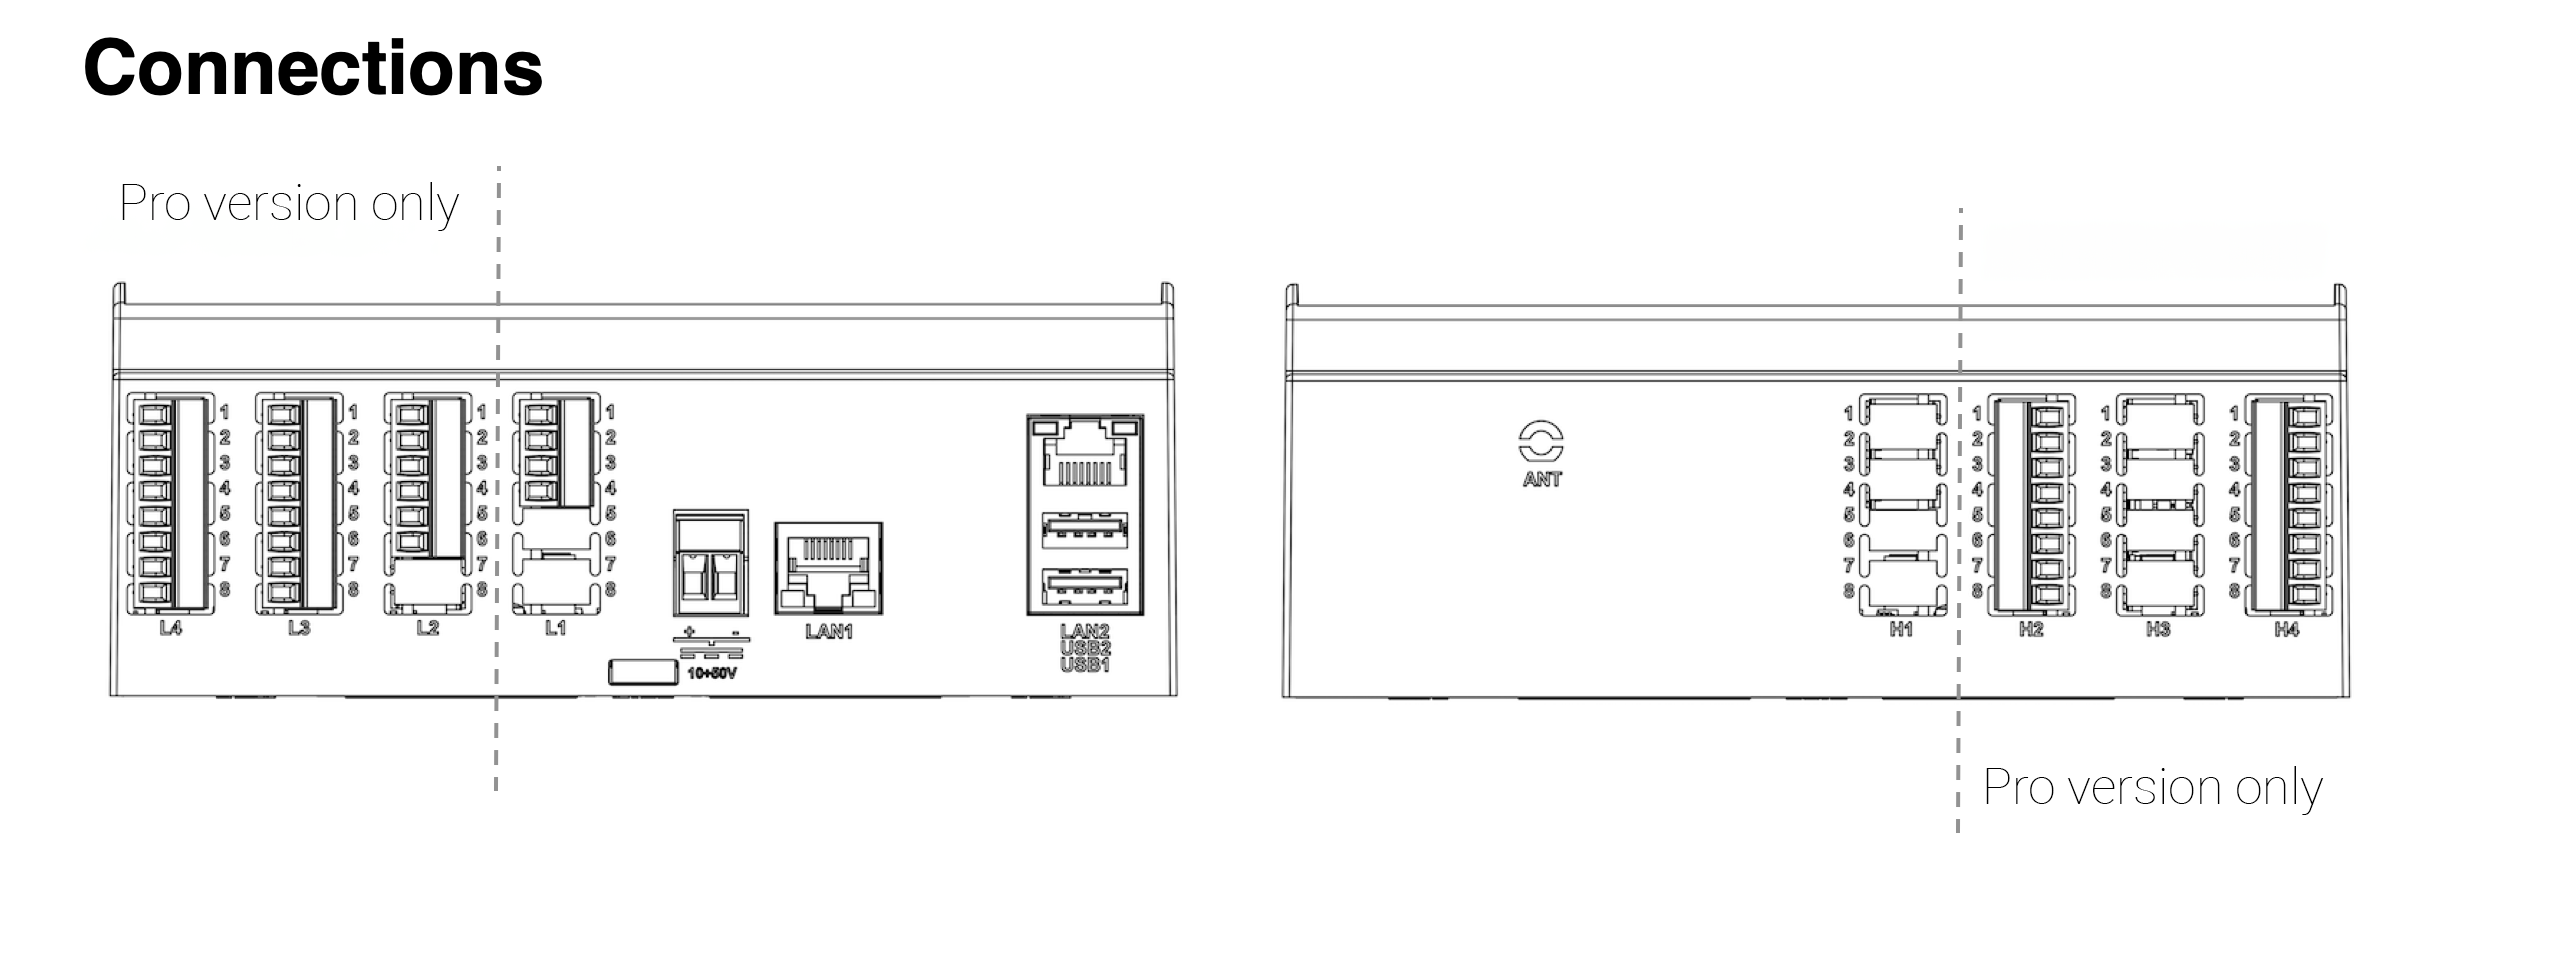
X2-Series RS-232 and RS-485 Expansion Board
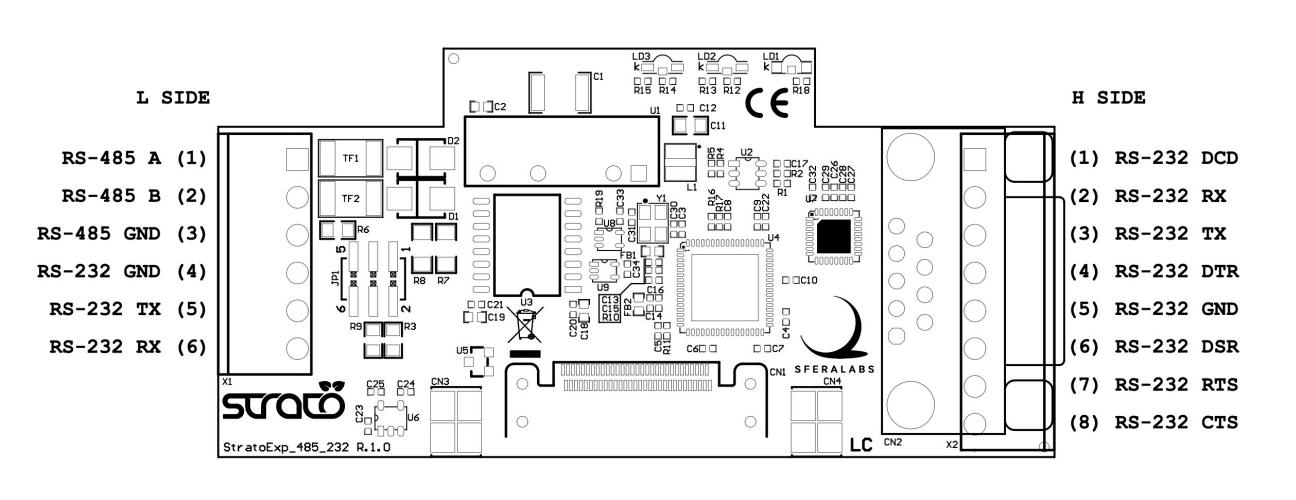
If the X2 RS232-RS485 expansion is installed in the last slot the serial ports have the following names:
- /dev/x2-rs485-1-1.5.1:1.0
- /dev/x2-rs232-1-1.5.1:1.1
Naming convention with 4 installed X2 RS232-RS485 modules:
Expansion slot 1:
- /dev/x2-rs485n1-1-5.4:1.0
- /dev/x2-rs232-1-1.5.4:1.1
Expansion slot 2:
- /dev/x2-rs485-1-1.5.3:1.0
- /dev/x2-rs232-1-1.5.3:1.1
Expansion slot 3:
- /dev/x2-rs485-1-1.5.2:1.0
- /dev/x2-rs232-1-1.5.2:1.1
Expansion slot 4:
- /dev/x2-rs485-1-1.5.1:1.0
- /dev/x2-rs232-1-1.5.1:1.1
X2-Series Dual RS-485 Expansion Board
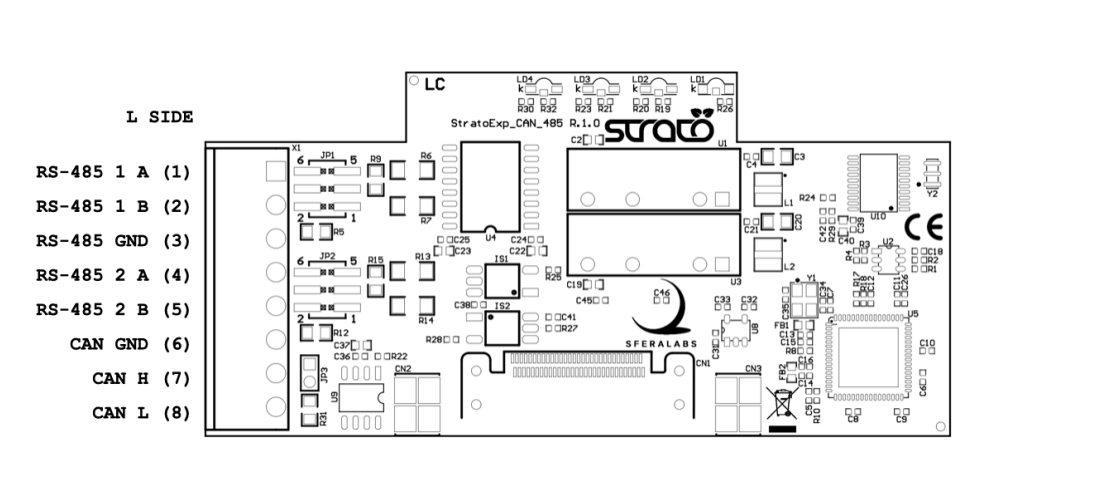
If the X2 Dual RS485 expansion is installed in the last slot the serial ports have the following names:
- /dev/x2-rs485-1-1.5.1:1.0
- /dev/x2-rs485-1-1.5.1:1.1
Naming convention with 4 installed X2 RS232-RS485 modules:
Expansion slot 1:
- /dev/x2-rs485-1-1.5.4:1.0
- /dev/x2-rs485-1-1.5.4:1.1
Expansion slot 2:
- /dev/x2-rs485-1-1.5.3:1.0
- /dev/x2-rs485-1-1.5.3:1.1
Expansion slot 3:
- /dev/x2-rs485-1-1.5.2:1.0
- /dev/x2-rs485-1-1.5.2:1.1
Expansion slot 4:
- /dev/x2-rs485-1-1.5.1:1.0
- /dev/x2-rs485-1-1.5.1:1.1
The Strato Pi Max I/O Server must be specified to ensure that the HSYCO PRO server is fully operational and all built-in hardware features are available. Do not downgrade HSYCO PRO Strato Pi Max to version 3.8 or older, as this will disable the automatic heartbeat to the watchdog, forcing the server to restart. The HSYCO Strato Pi Max server must run on version 3.9, 3.10 or 4.x.
I/O SERVER
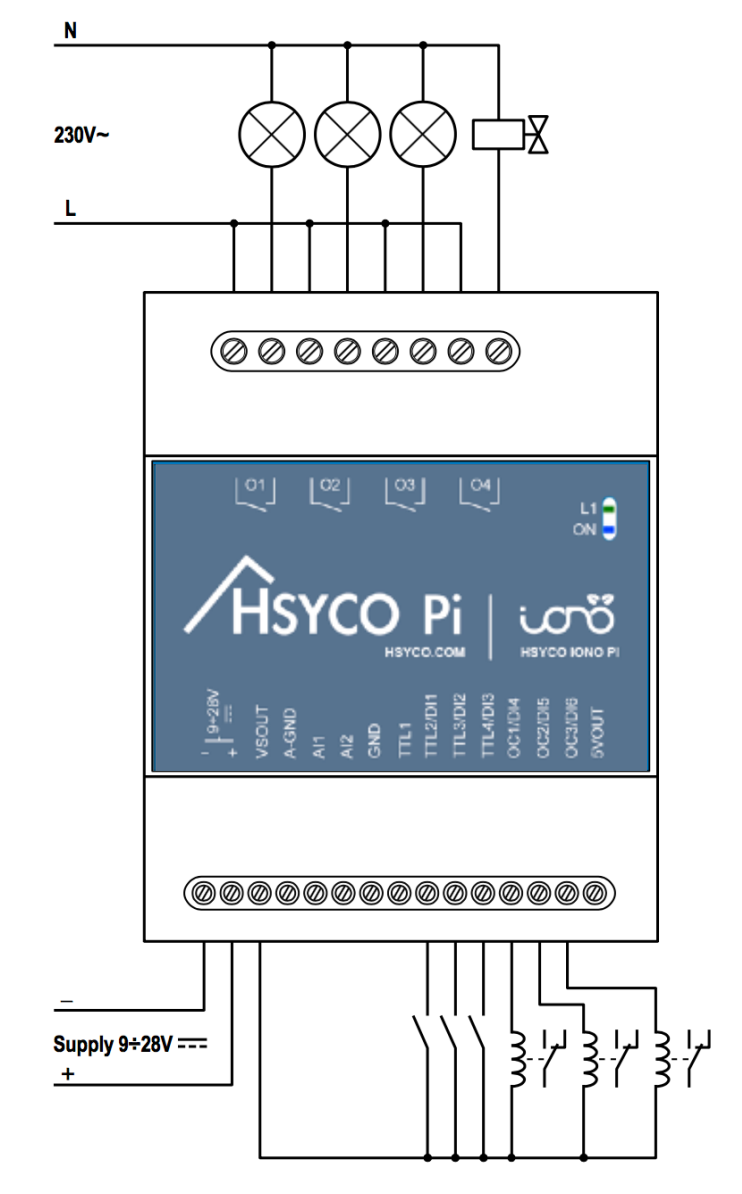
I/O Base
HSYCO I/O Base comes pre-installed on an industrial I/O module (PLC), CE/FCC/IC compliant, with wide-range power supply, RTC, Ethernet, digital and analog inputs, power relays, open collector outputs, and TTL I/O lines for 1-Wire, Wiegand and other digital protocols.
https://hsyco.com/wp-content/uploads/2024/05/HSYCO-I_O-Base-datasheet-en-018.pdf
I/O Max
HSYCO I/O Max comes pre-installed on an industrial I/O module (PLC), CE/FCC/IC compliant, with wide-range power supply, RTC, Ethernet, digital and analog inputs and outputs, NO/NC relays, UPS, RS-232, RS-485 (Modbus), CAN, dual SD card, RTC, UPS, watchdog, secure element chip.
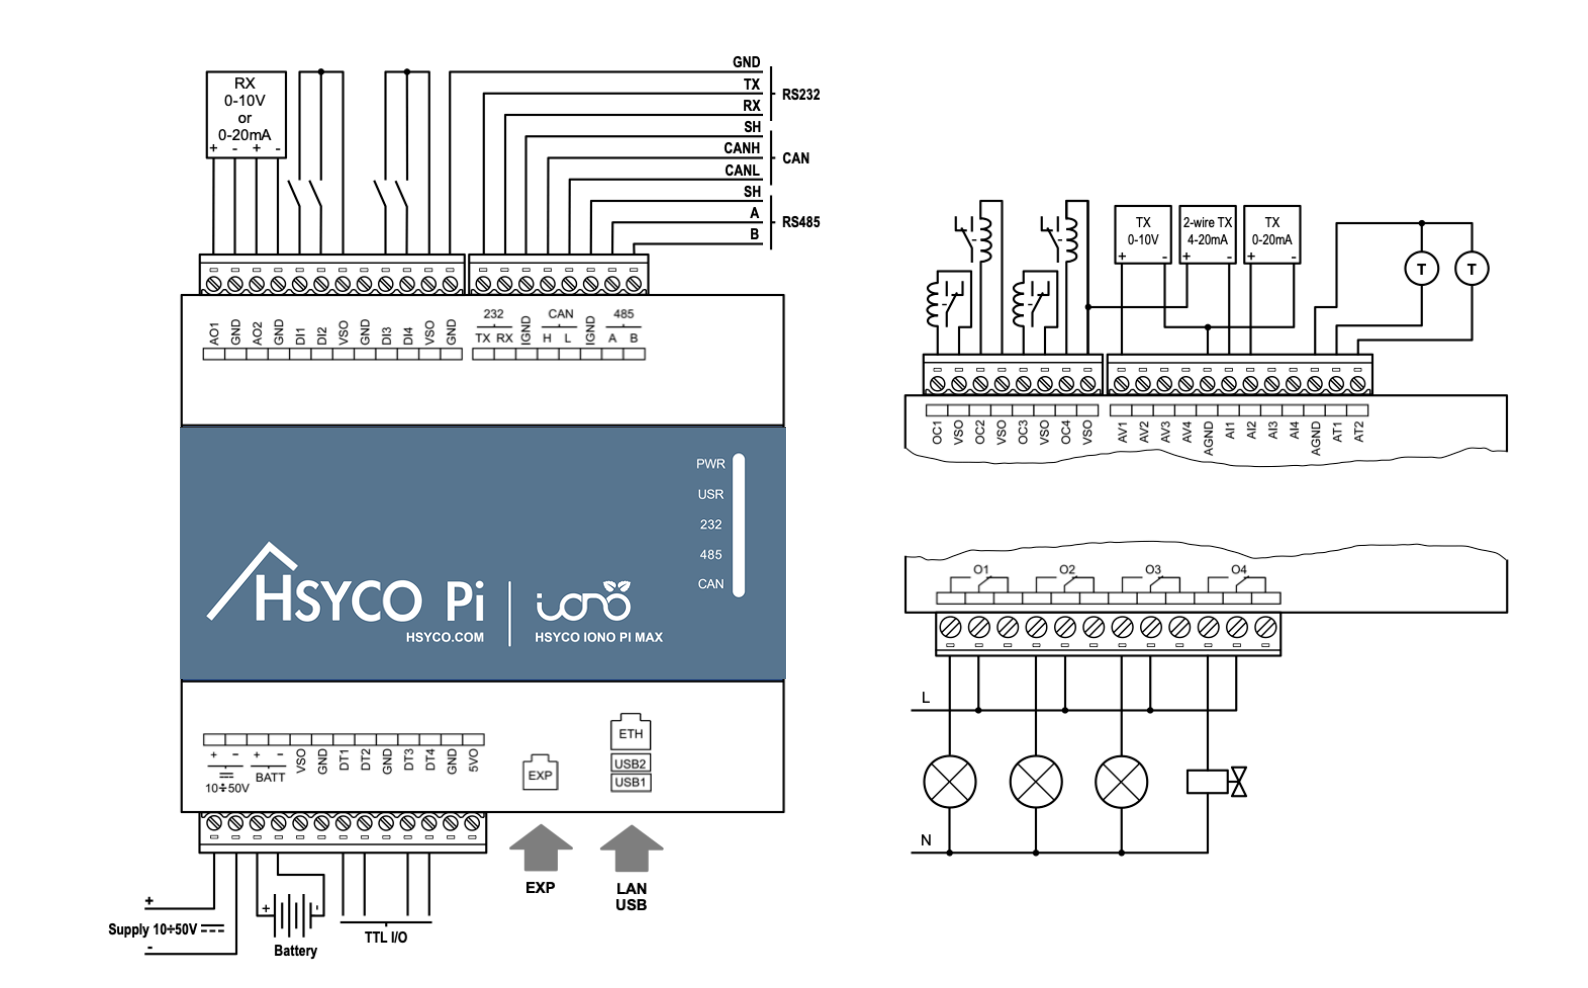
https://hsyco.com/wp-content/uploads/2024/05/HSYCO-I_O-Max-datasheet-en-024.pdf
HSYCO MINI - ARK-1123 / ARK-1124
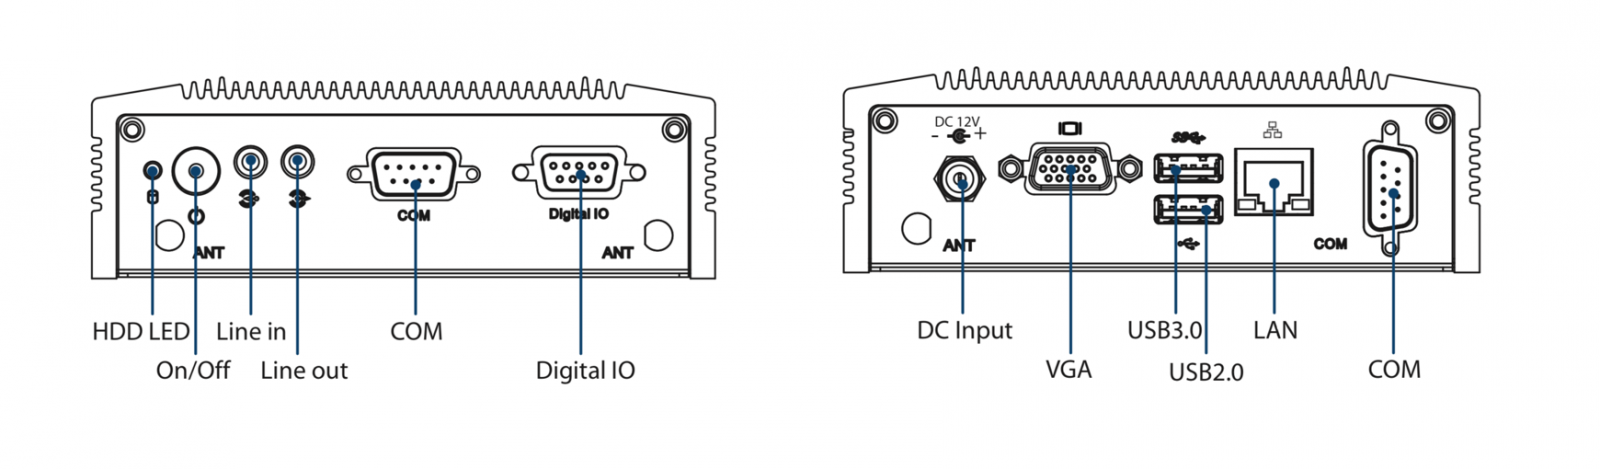
This version is installed on an Advantech ARK-1123L (ARK-1123L-S3A1E), with 1.33 GHz Intel Atom E3825 dual core processor, 2GB RAM and a 500GB hard-disk with pre-installed software or Advantech ARL-1124C (ARK-1124C-S1A3) with 1.1 GHz Intel Celeron N3350 Dual Core SoC, 2GB RAM and 500GB hard-disk with pre-installed software. Alternative storage configurations are also available. The operating system is Debian 10 (Buster).
To start the server simply plug the power supply. HSYCO automatically starts, the execution of HSYCO is signalled by three consecutive high-pitch beeps.
HSYCO MINI is configured with the following default network configuration:
- IP address (eth0): 192.168.1.50
- Net mask: 255.255.255.0
- Default Gateway: 192.168.1.1
- DNS: 192.168.1.1
HSYCO MINI has two RS-232 serial ports with standard DB-9 female connectors, on both sides of the chassis.
- the system id of the port (COM) next to the Ethernet (LAN) socket is /dev/ttyS1
- the system id of the port (COM1) on the opposite side (power button side) is /dev/ttyS0.
HSYCO PRO - ARK-2121
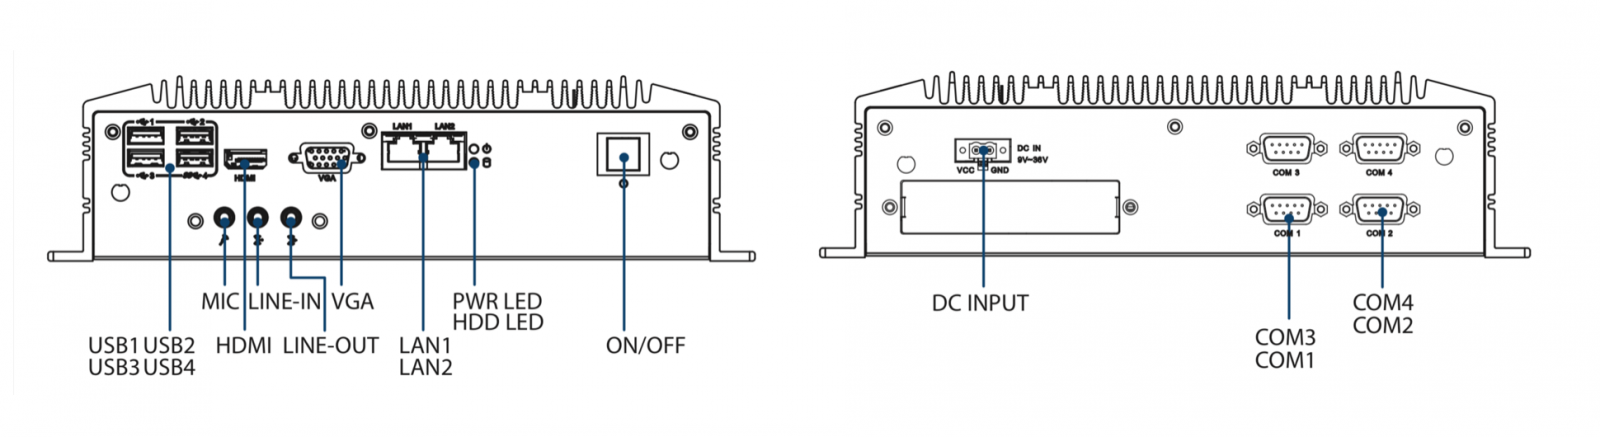
This version is installed on an Advantech ARK-2121L (ARK-2121L-U0A1E or ARK-2121L-U0A2E), with 2.0 GHz Intel J1900 quad core processor, 4GB RAM and a 500GB hard-disk with pre-installed software. Alternative storage configurations are also available. The operating system is Debian 10 (Buster).
To start the server simply plug the power supply. HSYCO automatically starts, the execution of HSYCO is signalled by three consecutive high-pitch beeps.
HSYCO PRO is configured with the following default network configuration:
- IP address (eth0): 192.168.1.50
- Net mask: 255.255.255.0
- Default Gateway: 192.168.1.1
- DNS: 192.168.1.1
The LAN1 port (left) is eth1. This port is not configured with factory default settings. The LAN2 port (right) is eth0. This is the default LAN port. On a system with factory default settings, you should connect the Ethernet cable to LAN2.
HSYCO PRO has four RS-232 serial ports with standard DB-9 female connectors.
- the system id of COM1 is /dev/ttyS0
- the system id of COM2 is /dev/ttyS1
- the system id of COM3 is /dev/ttyS2
- the system id of COM4 is /dev/ttyS3
HSYCO ENTERPRISE - ARK-2250
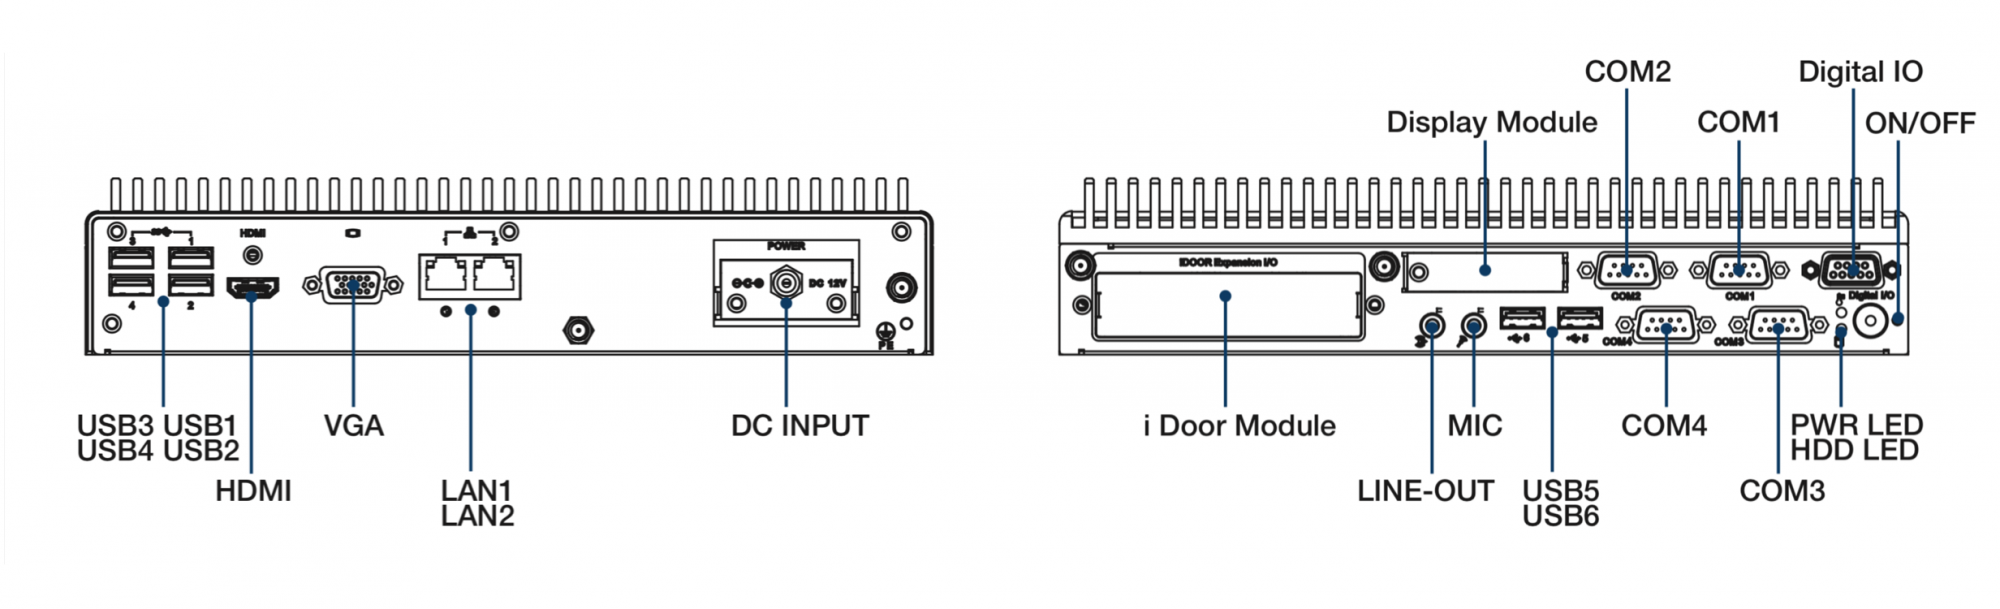
This version is installed on an Advantech ARK-2250L (ARK-2250L-U6A1E), with 2.6 GHz Intel i7 dual core processor, 8GB RAM and a 500GB hard-disk or SSD with pre-installed software. HSYCO ENTERPRISE can also be configured with an additional high speed mSATA SLC solid state drive. In this case the SLC drive becomes the main drive, while the hard-disk is configured to store HSYCO logs and cameras' motion recording files. The operating system is Debian 10 (Buster).
To start the server simply plug the power supply. HSYCO automatically starts, the execution of HSYCO is signalled by three consecutive high-pitch beeps.
HSYCO ENTERPRISE is configured with the following default network configuration:
- IP address (eth0): 192.168.1.50
- Net mask: 255.255.255.0
- Default Gateway: 192.168.1.1
- DNS: 192.168.1.1
The ARK-2250 dynamically allocates the Ethernet ports. If only one port (eth0) is configured at the operating system level, then eth0 is assigned to LAN1 if this port is connected. If LAN2 is connected and LAN1 is not, then eth0 is assigned to LAN2. This dynamic setup offers an automatic failover configuration where eth0 is automatically switched from LAN1 to LAN2 in case of a physical link failure on LAN1. If both ports (eth0 and eth1) are configured at the operating system level, and both LAN1 and LAN2 are connected, eth0 is assigned to LAN1, and eth1 to LAN2. But, if LAN1 is not connected, eth0 will be assigned to LAN2, leaving eth1 down.
HSYCO ENTERPRISE has four RS-232 serial ports with standard DB-9 female connectors.
- the system id of COM1 is /dev/ttyS0
- the system id of COM2 is /dev/ttyS1
- the system id of COM3 is /dev/ttyS2
- the system id of COM4 is /dev/ttyS3.
The Configuration Console
HSYCO Server provides a simple low-level maintenance console, used to reboot the system, reset its settings or restore the whole system to the original factory configuration.
This console is not used for normal operations.
The console is available using a keyboard and a monitor connected to the VGA/DVI/HDMI video out connector.
Server Configuration Console
1) Reboot the system
2) Halt the system
3) Stop HSYCO Server
4) Start HSYCO Server
5) Restore network configuration to factory defaults (192.168.1.50)
6) Delete all PINs and file server password and restore default values
7) Restore database to factory defaults. All data will be lost
8) Restore system software to factory defaults. All data will be lost
Type a function number and press Enter [1, 2, 3, 4, 5, 6, 7, 8]:
Type the desired function number and Enter, then press Y to confirm after the beeps (the system will sound a number of beeps, corresponding to the function number; this should allow you to access the console functions using the keyboard and audio feedback only, without a monitor).
Function 1 performs the operating system shutdown, followed by a reboot.
Function 2 performs the operating system shutdown and halts the system. You should turn it off then back on to restart.
Function 3 and 4 are used to temporarily stop the HSYCO Server process, and to restart it.
Use functions 5 to 8 with caution. These function will delete configuration settings, user data, and security settings of the system. They could allow a local user with physical access to the server, unrestricted access to your data.
Function 5 restores the factory default network configuration. If you make a mistake while setting the network parameters, preventing access to the server via the network connection, you can use this function to reset the configuration and regain access to the server.
Function 6 removes all users’ PIN and PUK codes, restoring the default 00000 administrator enabled PIN. It also reset the operating system password to its default.
Function 7 deletes all data in the HSYCO database, including persistent variables.
Function 8 performs a full factory reset, returning the system to the HSYCO version and settings as shipped, removing all custom data, configuration and programs.
SSH Access to the Operating System
The configuration of the operating system only needs one administrator user, whose login is hsyco.
The password initially configured for the hsyco user is hsycoserver.
In order to guarantee the system safety and to prevent any unauthorized access it is essential to modify the access password of the HSYCO user before installing the system onto any not-secure LAN network.
The SSH secure protocol is used to access the operating system’s console and, if needed, to manage files. The SSH protocol encrypts all traffic and can be safely used for remote management. If the network has a firewall it might be necessary to open port TCP 22 and configure traffic forwarding towards the HSYCO SERVER IP address.
HSYCO is installed in the home directory of the hsyco user, /home/hsyco.
In this directory, the subdirectory ./hsyco contains the software, the configuration files, custom Java programs, logs and recorded images from cameras.
Several software programs are available for the SSH access on Microsoft Windows, in particular Putty to access the console or WinSCP to access files through SFTP.
On Apple Mac OS X the SSH access is integrated in the operating system and directly usable through Terminal, while Cyberduck is one of the most widespread utilities to manage files through SFTP.
On Ubuntu OS the SSH access is integrated in the operating system and accessible through Terminal, while Filezilla is a good solution for managing file through SFTP.
Start and Stop the HSYCO Server (HSYCO version 3.6.0 or later)
HSYCO starts automatically with the operating system when the server is turned on. The execution of HSYCO is signaled by three consecutive high-pitch beeps.
HSYCO also restarts automatically with every change to the hsyco.ini, hsyco.jar and com/hsyco/user.class files. In this case the restart is also signaled by three beeps.
The following commands should be used for all HSYCO Server units shipped with HSYCO 3.6.0 pre-installed. For servers shipped with an older version, use the commands listed in the next chapter.
To manually stop HSYCO, access the console via SSH:
ssh hsyco@192.168.1.50
and execute the command:
sudo systemctl stop hsyco.service
To start HSYCO, execute:
sudo systemctl start hsyco.service
Finally, to verify the current state of HSYCO execute:
sudo systemctl status hsyco.service
If HSYCO is running, the answer to the command will be something like:
hsyco.service - HSYCO Server service
   Loaded: loaded (/etc/systemd/system/hsyco.service; enabled)
   Active: active (running) ...
Start and Stop the HSYCO Server (HSYCO version 3.5.x or older)
HSYCO starts automatically with the operating system when the server is turned on. The execution of HSYCO is signaled by three consecutive high-pitch beeps.
HSYCO also restarts automatically with every change to the hsyco.ini, hsyco.jar and com/hsyco/user.class files. In this case the restart is also signaled by three beeps.
To manually stop HSYCO, access the console via SSH:
ssh hsyco@192.168.1.50
and execute the command:
sudo stop hsyco
To start HSYCO, execute:
sudo start hsyco
Finally, to verify the current state of HSYCO execute:
sudo status hsyco
If HSYCO is running, the answer to the command will be something like:
hsyco (start) running, process ...