Chapter 12: Catalog
Every I/O Server you configure in HSYCO exposes a set of datapoints, the individual values and states that HSYCO reads from and writes to your devices. A dimmer's current level, a shutter's position, a switch's on/off state: these are all datapoints.
The Catalog is where you collect and organize those datapoints. It gives each one a meaningful identity, a function, a type, a description, and lets you arrange them into groups. Once a device is in the Catalog, the rest of HSYCO can reference it by name, display it in a user interface, use it in automations, and monitor it in real time.
Think of the Catalog as your project's device registry. Without it, HSYCO knows about raw datapoints. With it, HSYCO knows about your lights, your shutters, your dimmers, and where they are.
12.1 Accessing the Catalog
The Catalog is available in the Manager interface. Open the Manager and select Catalog from the navigation. The interface is divided into two tabs at the top: Devices and Groups.
A language selector in the top-right corner lets you choose which language's descriptions you are currently editing or viewing. This is useful when your installation needs to support multiple languages.
12.2 The Devices Tab
The Devices tab shows a table listing every device currently registered in the Catalog. At the bottom of the list, HSYCO tells you the total number of devices, for example, "437 devices".
Each row in the table represents one device. A search field at the top-left lets you filter the list by I/O Server name (Figure 47).
12.2.1 Device Fields
Each device in the Catalog has the following fields:
| Field | What it means |
|---|---|
| ID | The full unique identifier for the device in HSYCO: the I/O Server name, a dot, and the device's own identifier, for example dummy.dimmer.1. Assembled automatically from the two fields below it, and read-only. |
| I/O Server | The name of the I/O Server this device belongs to. |
| ID (device) | The device identifier within that I/O Server, for example dimmer.1. |
| Function | What kind of device it is: LIGHT for lighting, AUTOM for automation devices such as shutters and blinds, DIMMER for dimmable lighting, or BINARY for generic two-state devices. |
| Type | The specific behaviour type, for example DIMMER for dimmable lights or VSHUT for vertical shutters. |
| Image | A static image or a camera feed. For images, the filename (with extension) of a file in www/img. For cameras, cam:N, where N is the camera index (starting from 1) in the order listed in the Cameras parameter in hsyco.ini. |
| Descr. (EN) | A description label for the device, in the selected language. Descriptions can be provided in multiple languages. |
| Groups | The groups this device belongs to. A device can belong to more than one group. |
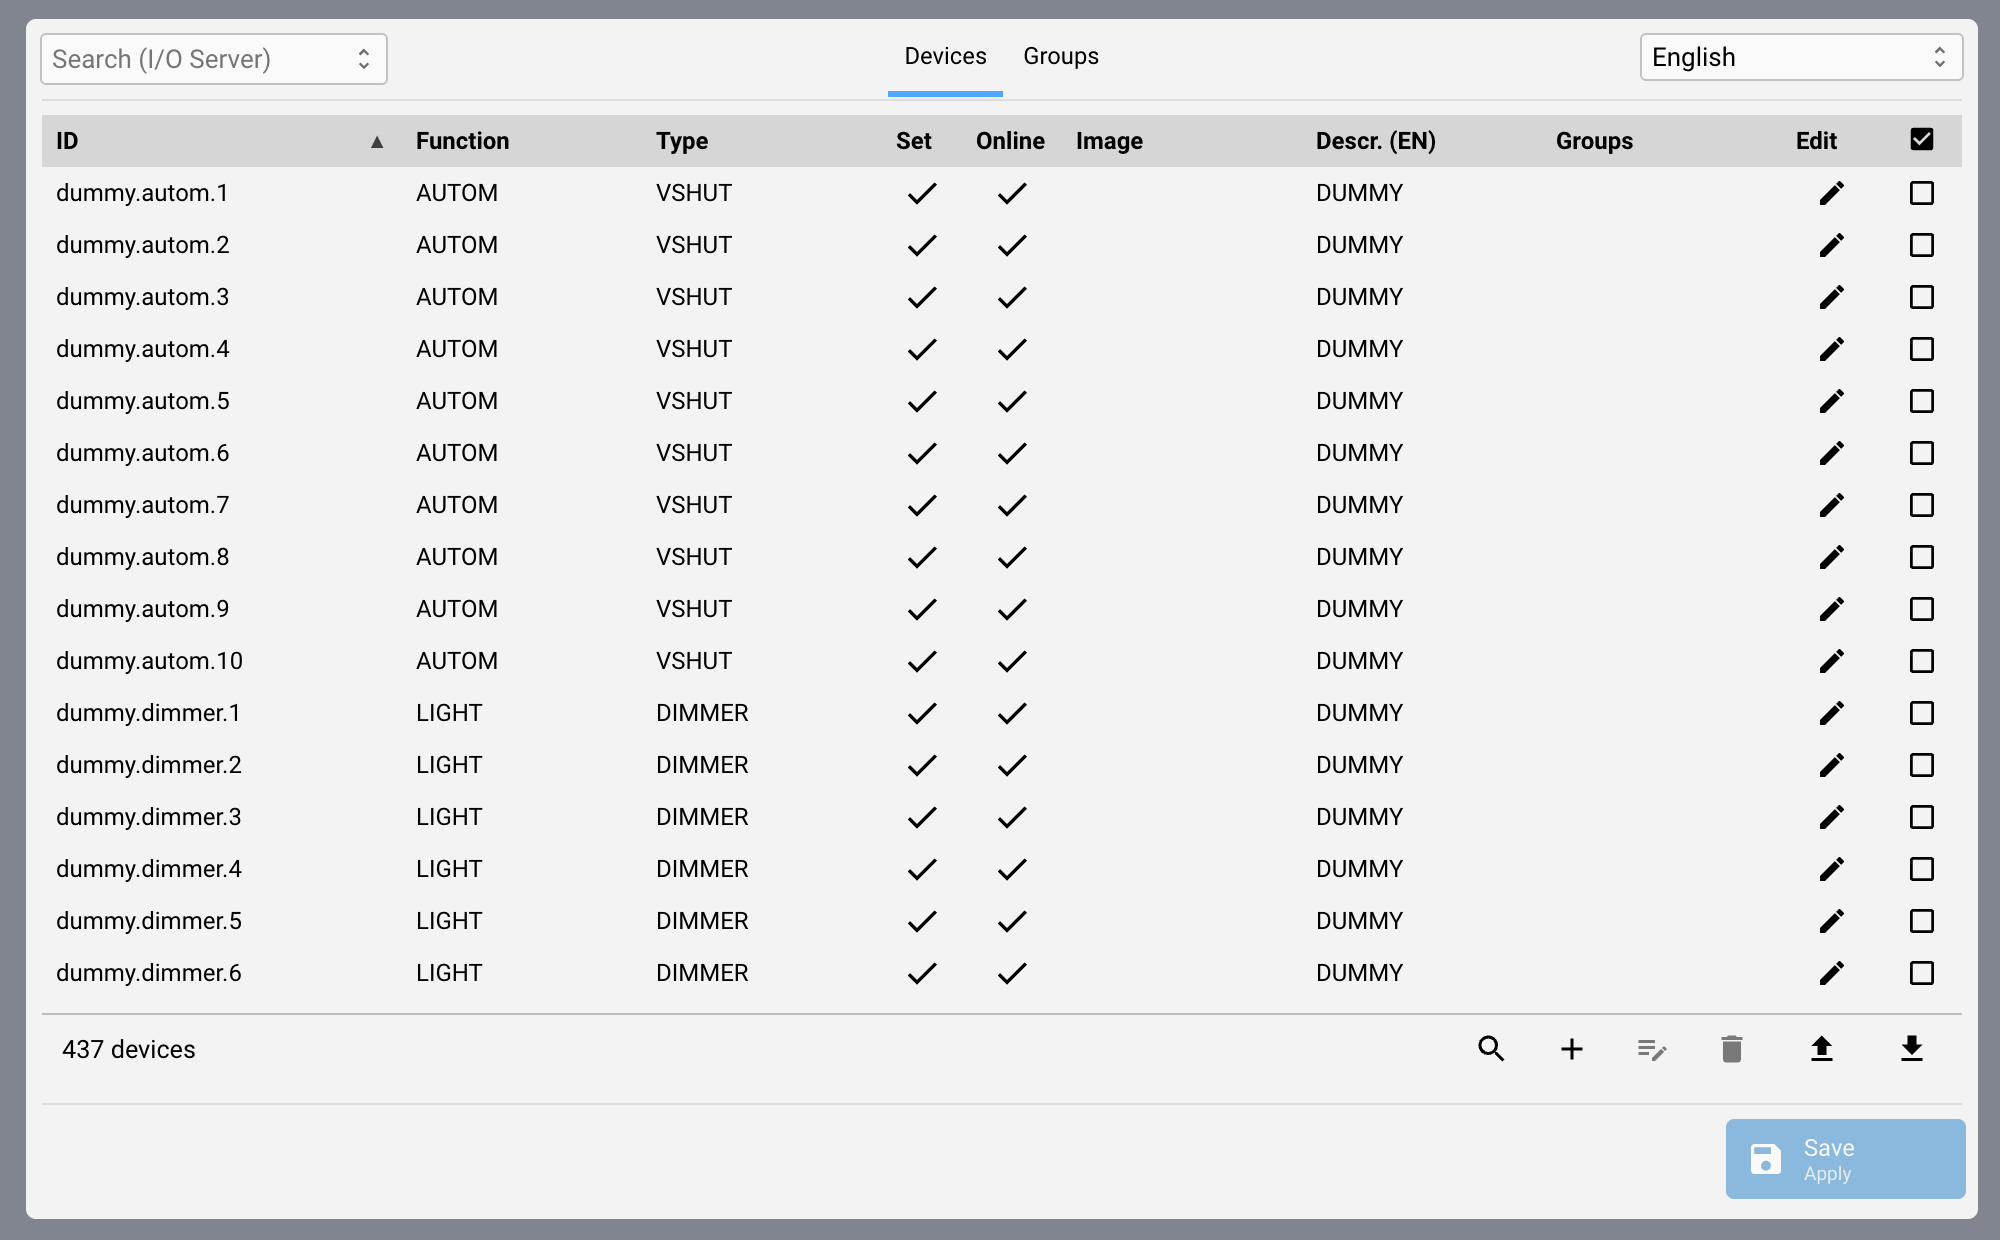
The Devices tab of the Catalog
12.2.2 Status Columns
Two columns in the device list give you live status at a glance:
-
Set:A checkmark appears here after you pressSave. Devices that have not been saved yet are not written to the file. Every time new devices are created, for example after adding a new I/O Server, theSavebutton becomes enabled automatically, so you don't lose any information between restarts. -
Online:A checkmark appears here when HSYCO has received at least one update from this device. If there is no checkmark, HSYCO has not yet heard from the device.
Note: The Online column is particularly useful during commissioning. If a device shows no checkmark there, it means HSYCO has not received any data from it yet, which may indicate a configuration issue or a device that is not yet powered on.
12.2.3 Adding and Editing Devices
To add a new device, click the + button in the toolbar at the bottom of the device list. To edit an existing device, click the pencil icon on its row. Both actions open the same popup.
The Edit device panel shows all the fields described above. The full ID at the top is read-only and is assembled automatically from the I/O Server and device ID fields below it. Fill in the fields and click Confirm to apply your changes.
Once you are done making changes, click Save in the bottom-right corner of the Catalog to save all your work. The Save button is normally disabled. It becomes enabled only after you make a change, whether that is editing, adding, or deleting a device or group, or when a new device has been automatically added to the Catalog by an I/O Server. Click Save in the bottom-right corner to write all pending changes to the file.
12.2.4 Toolbar Actions
The toolbar at the bottom of the device list provides several actions:
-
Search: filter the device list
-
+: add a new device
-
Edit selected: edit multiple selected devices at once
-
Delete: remove selected devices
-
Upload: import devices from a file
-
Download: export the device list to a file
12.3 The Groups Tab
Groups let you organize your devices into logical collections with a hierarchical structure. You might create groups for physical areas, floors, systems, functions, types, Warehouse, Entrance, IT Area, or any other categorization that makes sense for your project. Groups can contain sub-groups, allowing you to build a tree that mirrors your installation.
The Groups tab shows a panel on the left with the list of all groups (Figure 48). Clicking a group opens its details on the right side of the screen, where you can edit its properties and assign devices to it.
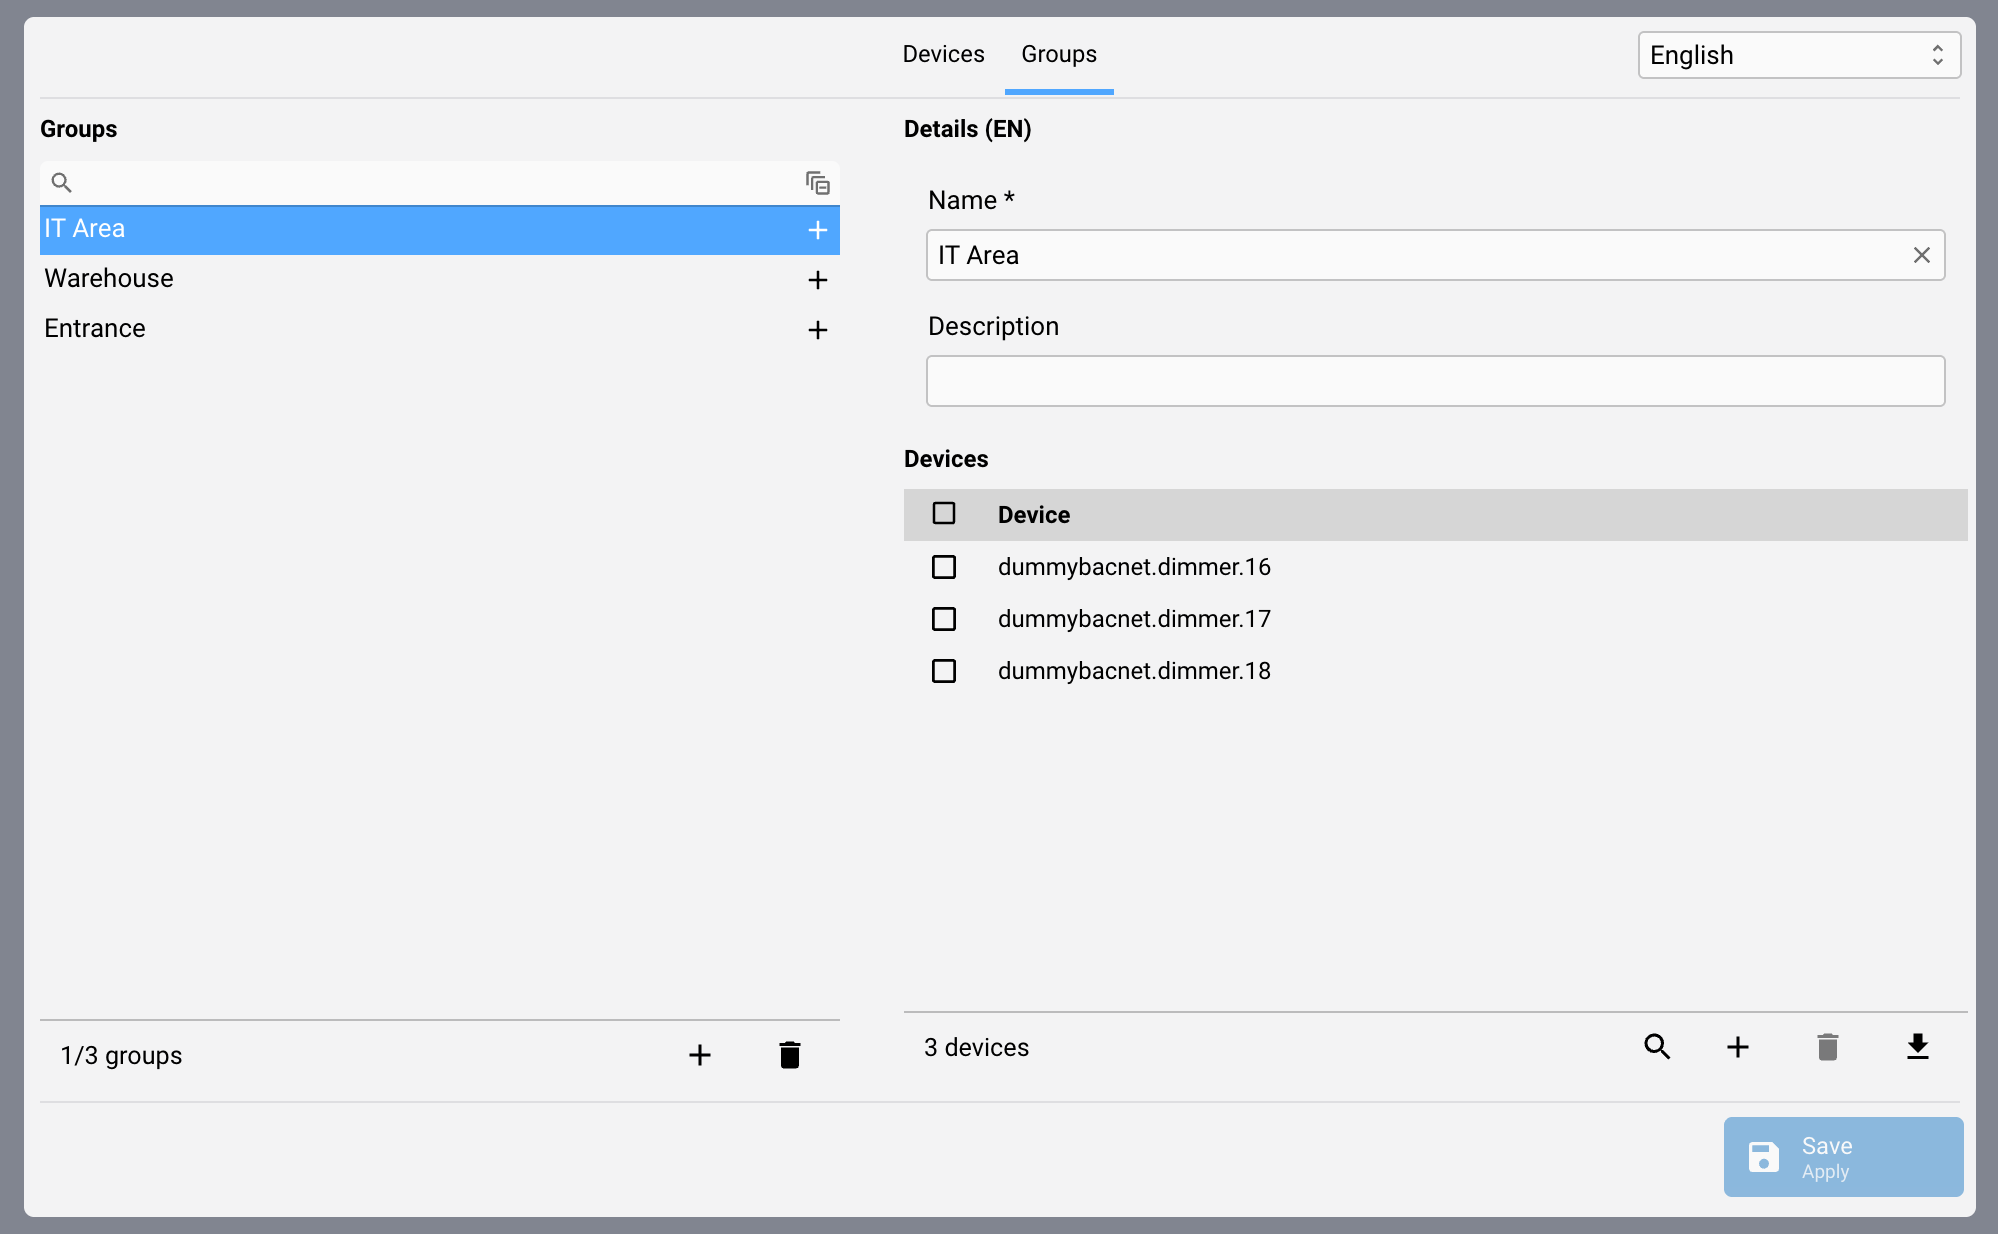
The Groups tab of the Catalog
12.3.1 Group Fields
Each group has the following fields:
| Field | What it does |
|---|---|
| Name (ID) | The internal identifier of the group, for example warehouse. Not shown in the user interface, but saved to catalog.json and used by HSYCO internally. |
| Display Name | The human-readable name shown in the interface, for example Warehouse. |
| Description | An optional description for the group. |
| Devices | The devices assigned to this group. Click + in the table footer to add one. The checkbox beside each device is used for selection, for example when exporting. |
Note: A device can belong to more than one group. Simply add the same device in multiple groups as needed.
12.3.2 Managing Groups
The group list works as a tree. At the bottom of the tree there is a global + button that adds a new group at the root of the hierarchy, and a delete button that removes the selected group.
On each group item in the tree there is an additional + button that adds a new nested group with the selected one as its parent.
To edit a group, simply click on it. The form on the right will fill with the selected group's name and description in the current language. If those values are not set in the selected language, the fields will show a fallback value from another language where that value is defined.
To move a group, simply drag and drop it to the desired position in the tree.
12.4 Behind the Scenes: catalog.json
Everything you enter in the Catalog is stored in a file called catalog.json inside your HSYCO project. This is a plain text file that you can open and edit manually if you prefer, for example, to make bulk changes or to copy a configuration from one project to another.
When HSYCO starts, it reads this file. If you edit it manually while HSYCO is running, HSYCO will detect the changes in the file and apply them automatically.
Note: If you choose to edit catalog.json manually, be careful with the file format. An incorrectly formatted file may prevent HSYCO from reading it correctly. When in doubt, make your changes through the Manager interface instead.
Note on group membership: in the raw file, group membership is stored on the device, not the group. A device object has a groups array listing the groups it belongs to; a group object has no devices array of its own. The Groups tab's Devices list (Section 12.3.1) is built live from that reverse relationship. To add a device to a group by hand, add the group's id to that device's groups array, not the other way around.
If you are upgrading from HSYCO v3.x or v4.0, you don't need to rebuild your device list from scratch. HSYCO automatically converts your existing systemtopo.txt file to the new catalog.json format, so all your devices carry over seamlessly to v4.1.