Chapter 9: The Scheduler
The Scheduler is a visual, calendar-based tool built directly into the HSYCO user interface. Think of it as a smart calendar for your building: you define time rules, when something should be ON and when it should be OFF, and HSYCO automatically fires the corresponding events at exactly the right moment.
The Scheduler is the visual companion to the TIMER event keyword. Instead of writing time rules in text, you configure them interactively in a graphical calendar widget on your project page. HSYCO then generates a TIMER event using the group name you assigned to the rule, which you catch in an EVENTS file to trigger any action: turning lights on, adjusting a thermostat, activating a relay.
9.1 What the Scheduler Does
9.1.1 The TIMER Event
When the current time matches a scheduler rule's date, time, and weekday conditions, HSYCO fires:
TIMER groupname = ON
at the start of the period, and:
TIMER groupname = OFF
at the end. These are stable events, they remain true for the entire duration of the time window. In trigger mode (covered below), only the ON event is generated, at the exact preset minute.
9.1.2 Wide and Compact Modes
The Scheduler object has two display modes: compact and wide, depending on the object's width. A width of 750 pixels or more activates wide mode, which shows both the rule list and the rule detail panel side by side.
Tip: For a comfortable editing experience, consider making your project page at least 1024 × 768 pixels when working with a Scheduler.
9.2 Creating a Scheduler
Step 1: Add the Scheduler Object to Your Page
Open your project in the Project Editor and navigate to the page where you want the Scheduler to appear. Tap Add, choose Scheduler from the object list, and place it on the page. Resize it horizontally to at least 750 px to enable the convenient wide layout.
Step 2: Configure the Key Attributes
In the properties panel, two attributes matter most:
-
Groups: Controls which rule groups this widget displays. Set to
*(or leave empty) for all groups, or enter a comma-separated list (e.g.officelights,hvac). Group names are case-sensitive. -
Trigger Mode: When false (default), rules have a start and end; they fire ON at the start and OFF at the end. When true, a rule fires only once at the exact preset minute, with no OFF event.
-
Enable Sunrise Sunset: when enabled, the time fields in rules accept
sunriseandsunsetas values in addition to specific times.
Step 3: Add Rules
Launch the project and click the + icon inside the Scheduler widget to add a new rule. Each rule has the following fields:
-
group: The name used to generate theTIMERevent. Multiple rules can share the same group, only the first matching rule in the group fires. -
Daily mode: When checked, the rule repeats every day (or on selected weekdays) rather than applying to a one-time date range.
-
Start Time / End Time: When the period begins and ends. If end time is earlier than start time, HSYCO treats it as extending into the next day. -
Weekdays: Checkboxes for Mon–Sun. Uncheck any day to skip that day.
-
mode: on — the rule activates normally. off — a "blocking rule"; prevents lower-priority rules in the same group from firing. interval — the rule pulses on and off repeatedly during the validity window. -
Repeat every year: When checked, the date interval automatically repeats on the same dates every subsequent year.
Note: Priority within a group: Rules are evaluated top to bottom. The first rule whose date, time, and weekday conditions all match will fire, rules below it in the same group are skipped. Place a blocking (off mode) rule at the top to suppress the group on specific days.
Note: Group names keep their case.
Scheduler group names are case-sensitive, and they stay case-sensitive when EVENTS reads them: officelights and OfficeLights are two different groups, in the Scheduler widget, in the Project Editor, and in TIMER rules. This is unlike datapoint IDs, which HSYCO lowercases when it loads EVENTS files (see Section 6.2.5). A TIMER OfficeLights = ON rule will never fire for a group named officelights. To avoid a silent mismatch, use all-lowercase group names everywhere.
9.3 Connecting the Scheduler to EVENTS
The Scheduler doesn't perform actions by itself. When a rule's time window starts, HSYCO fires a TIMER event using the rule's group name. When the window ends, HSYCO fires a TIMER = OFF event. You catch these in an EVENTS file.
9.3.1 The TIMER Event Syntax
TIMER <group> = ON : <action>
TIMER <group> = OFF : <action>
Replace groupname with the exact group name you assigned in the Scheduler widget.
9.3.2 Quick Example
If your scheduler rule has the group name officelights, add these two lines to any .txt file in the events/ folder:
TIMER officelights = ON : IO k.light.1 = 1
TIMER officelights = OFF : IO k.light.1 = 0
When the scheduled window opens, circuit k.light.1 turns on. When it closes, k.light.1 turns off. The Scheduler handles the calendar logic; EVENTS handles the action.
9.4 Recipe: Weekly Office Lighting
Goal: Turn office lights on Monday–Friday from 08:00 to 19:00, with a one-click override for holidays.
Every rule you add, in this recipe or any other, opens the same general editing form (Figure 35):
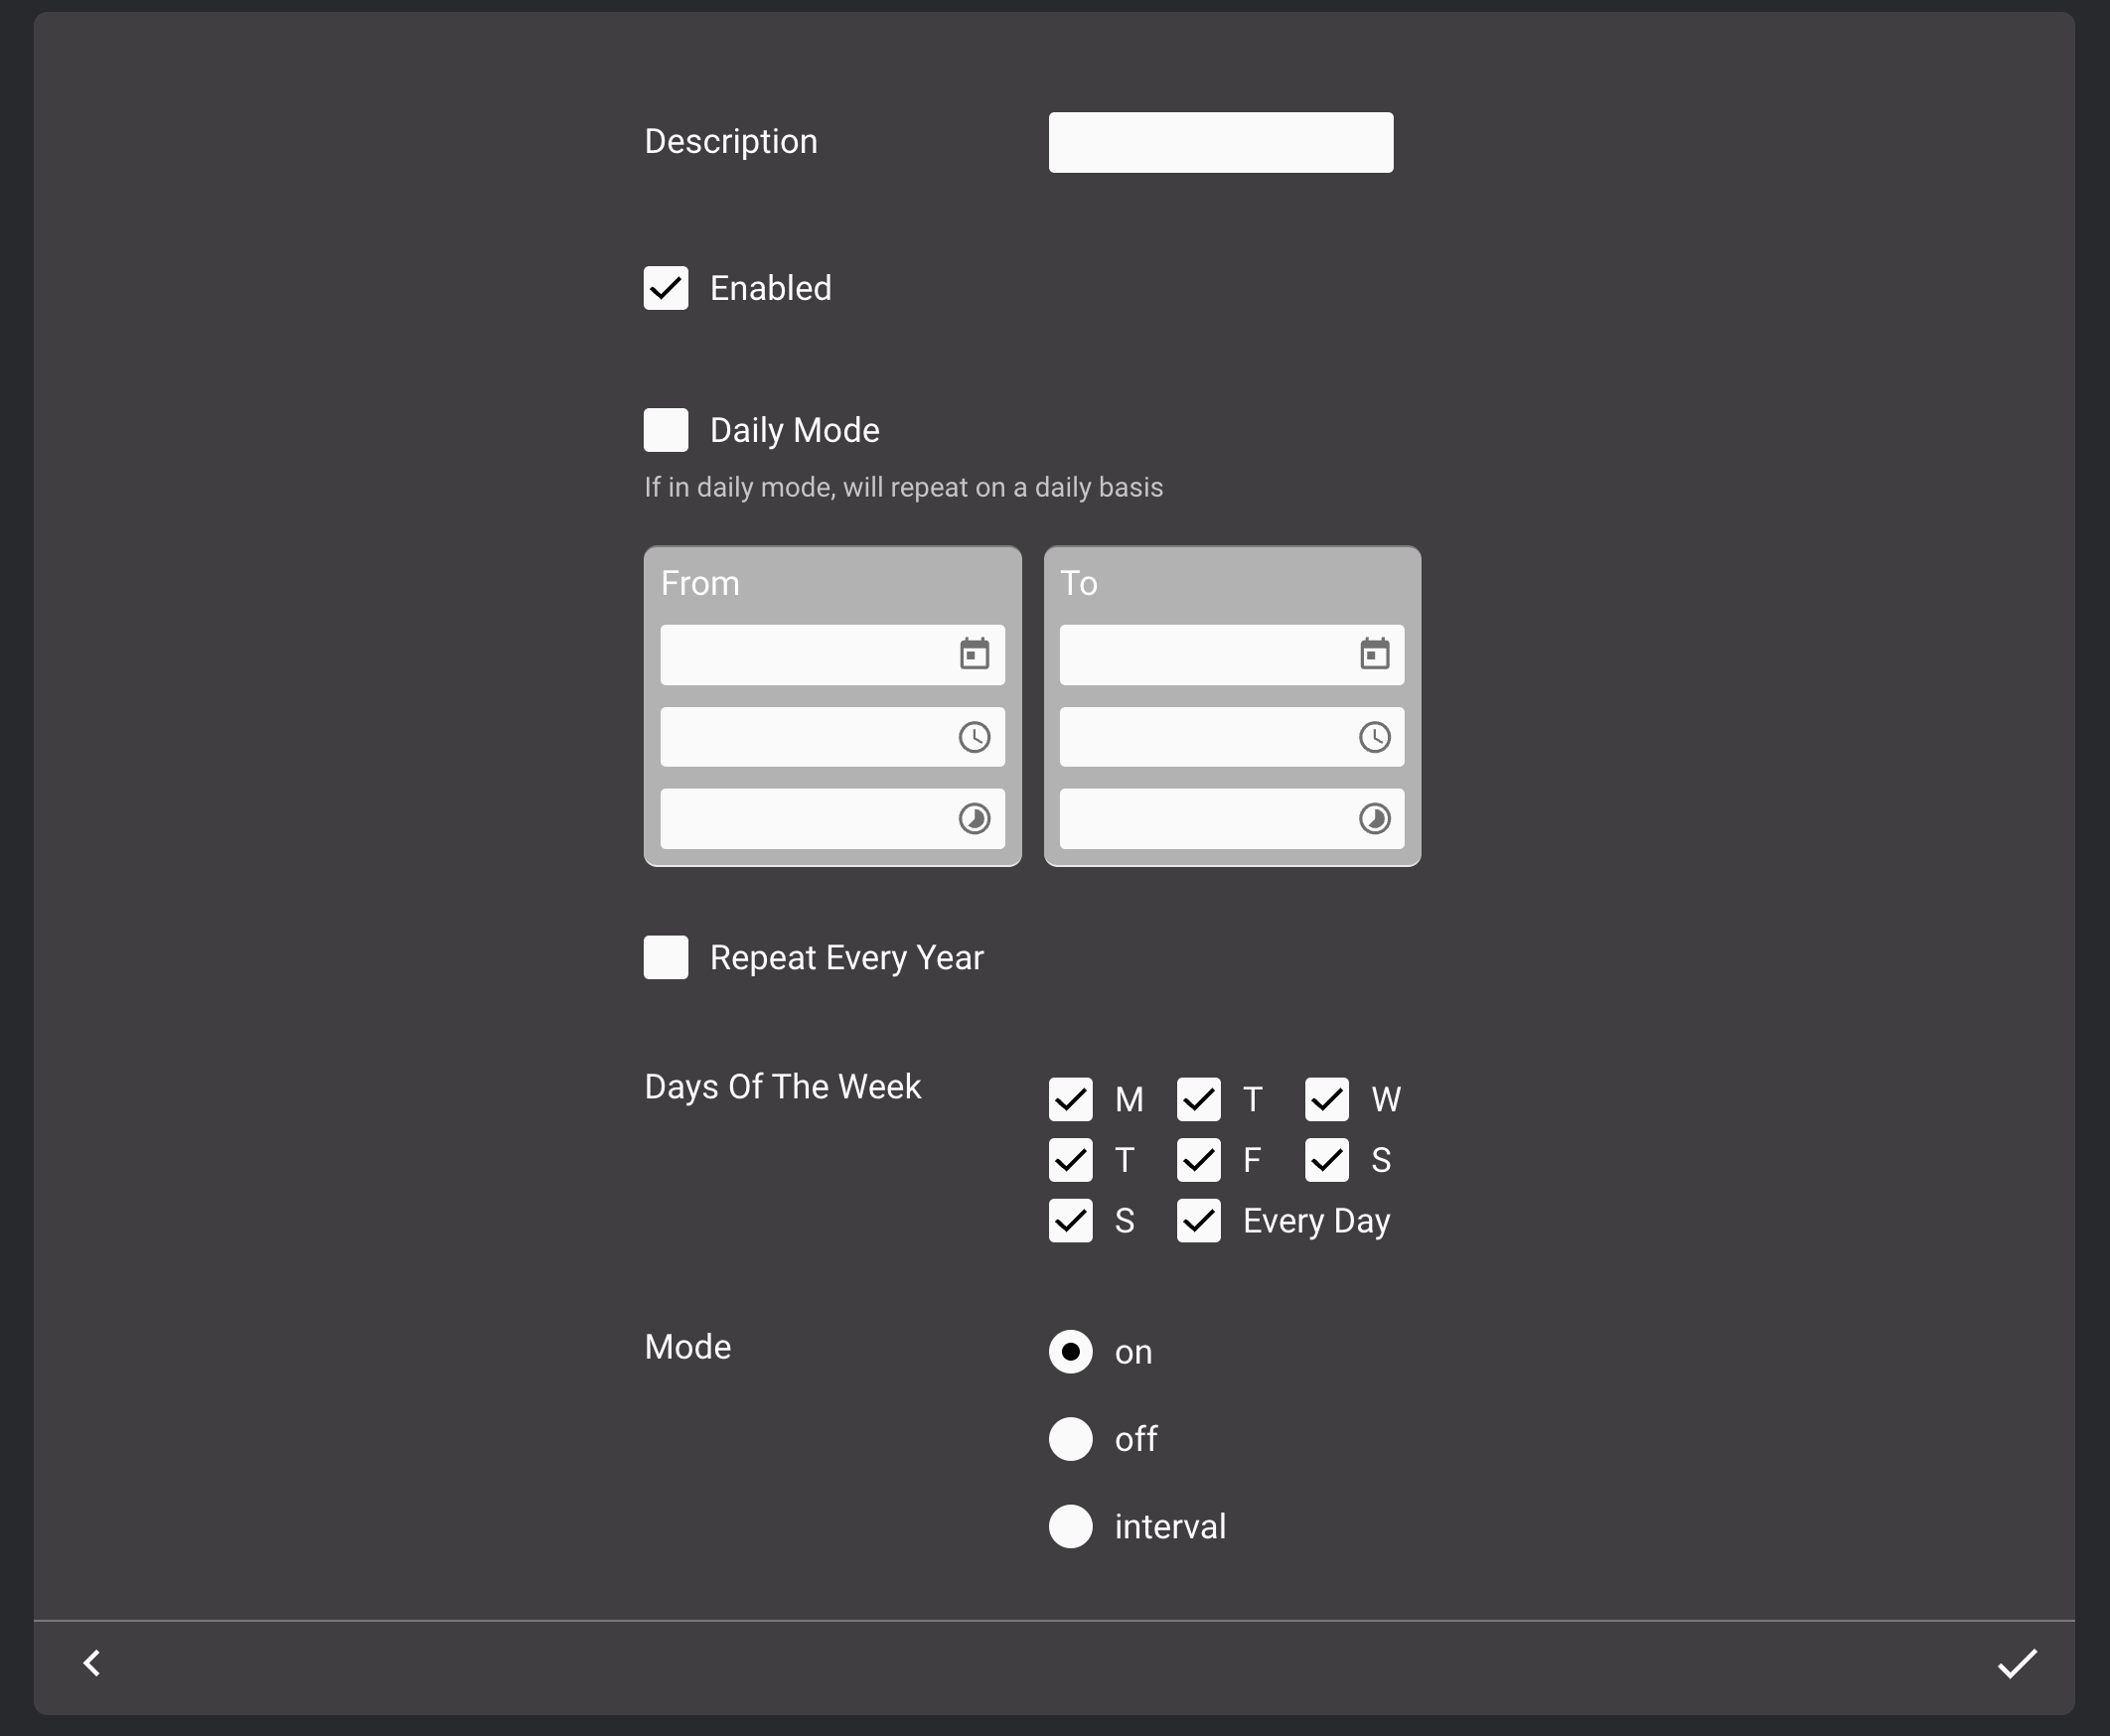
Editing a rule in the Scheduler
Part A — Add the Weekday Rule
-
Open your project in the Project Editor. Add a Scheduler object and resize it to at least 750 px wide.
-
In the properties panel, set Groups to
officelights. -
Launch the project (Run → Default) and click + inside the Scheduler widget.
-
Set
grouptoofficelights. -
Check Daily Mode.
-
Set
Start Timeto08:00andEnd Timeto19:00. -
Under Weekdays, uncheck Saturday and Sunday. Leave Mon–Fri checked.
-
Leave
modeaton. Confirm the rule.
Part B — Add the Holiday Blocking Rule
When you need to suppress the schedule on a specific day (public holiday, office closed), add a second rule in the same group with mode set to off. Because it sits above the weekday rule in the list, it wins on the days it is active.
-
Click + again inside the Scheduler.
-
Set
grouptoofficelights(same group as before). -
Check Daily Mode.
-
Set the same time range:
Start Time08:00,End Time19:00. -
Set the date range to cover only the holiday, or leave blank so it can be manually enabled when needed.
-
Set
modetooff. -
Confirm. Make sure this rule appears above the weekday rule in the list (drag it if needed).
Part C — Write the EVENTS Code
In HSYCO Manager, open File Manager, navigate to the events/ folder, and create a new file (e.g. lighting.txt). Add these two lines:
TIMER officelights = ON : IO k.light.10 k.light.11 k.light.12 = 1
TIMER officelights = OFF : IO k.light.10 k.light.11 k.light.12 = 0
Replace k.light.10 k.light.11 k.light.12 with the actual data point addresses of your office lighting circuits. Save the file.
The same holiday-blocking pattern from Part B isn't limited to lighting. Figure 36 shows a holiday list configured for a different group entirely, one used to schedule when the office's security system arms and disarms on non-working days:
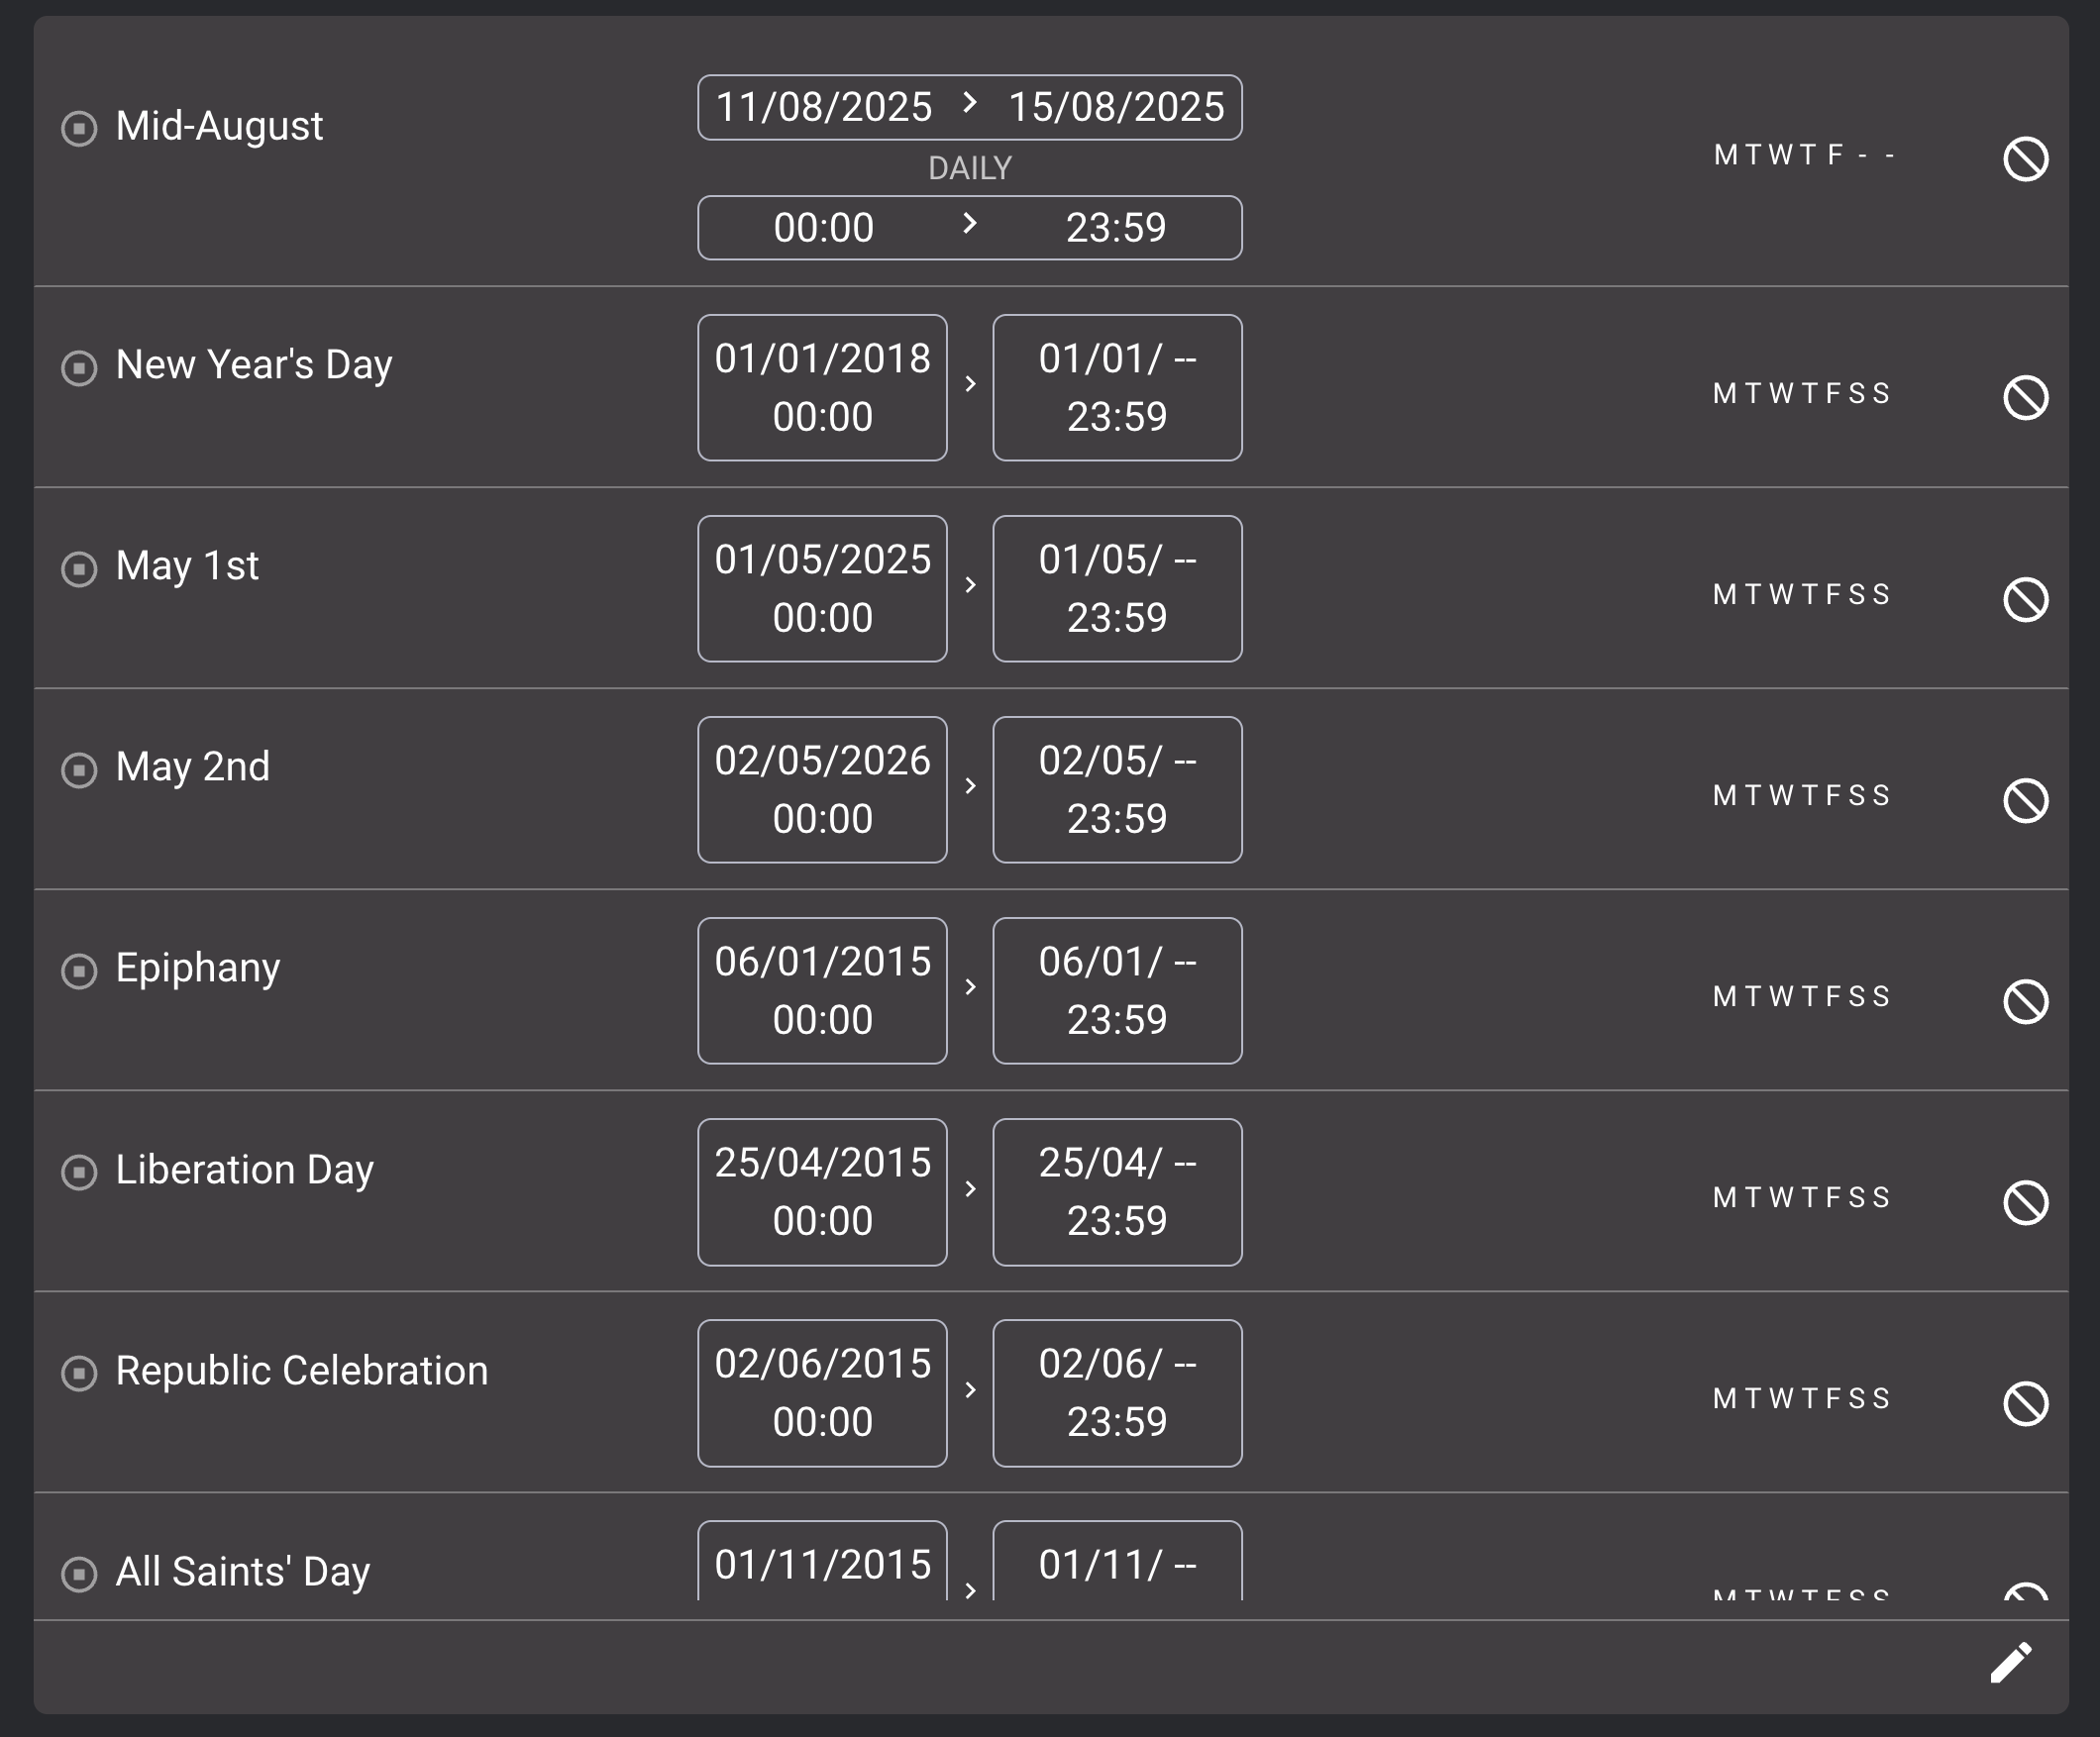
A holiday list used to schedule the office's security-arming group
9.5 Recipe: Using Sunrise and Sunset
By default, the Scheduler uses clock times (22:00, 08:00, etc.). For more flexible automation, you can enable Sunrise/Sunset-based scheduling in the Project Editor.
To enable it:
-
In the Project Editor, open the Scheduler settings.
-
Enable the "Enable Sunrise Sunset" option.
-
Once enabled, the time fields in your Scheduler rules will accept "sunrise" or "sunset" as values, in addition to clock times.
Example: To turn on lights at 22:00 every night and turn them off 20 minutes after sunrise:
-
Set
Start Timeto 22:00. -
Set
End Timeto sunrise, setOffsetto +20 minutes (Figure 37).
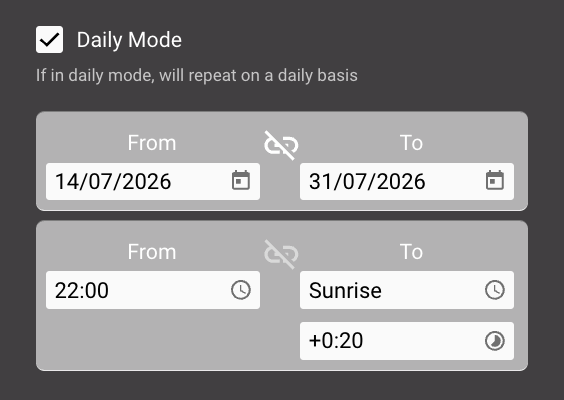
Adding a temperature scheduling rule in the Scheduler
9.6 Recipe: Temperature Scheduling
Goal: Automatically switch between a Comfort temperature (07:00–22:00) and a Setback temperature (22:00–07:00) every day.
Part A — Add the Comfort Rule (07:00 to 22:00)
-
Add a Scheduler object to your project page (or reuse an existing one).
-
Set Groups to
*or tocomfort,setback. -
Launch the project and click + inside the Scheduler.
-
Set
grouptocomfort. -
Check Daily Mode. Leave all weekdays checked.
-
Set
Start Timeto07:00,End Timeto21:59. -
Leave
modeaton. Confirm.
Part B — Add the Setback Rule (22:00 to 07:00)
-
Click + again.
-
Set
grouptosetback. -
Check Daily Mode. Leave all weekdays checked.
-
Set
Start Timeto22:00,End Timeto06:59. -
Because the end time (07:00) is earlier than the start time (22:00), HSYCO automatically treats this as spanning midnight; no special configuration required.
-
Leave
modeaton. Confirm.
Part C — Write the EVENTS Code
Create or open an events file (e.g. hvac.txt) and add:
TIMER comfort = ON : IO thermostat.setpoint = 210
TIMER comfort = OFF : IO thermostat.setpoint = 160
TIMER setback = ON : IO thermostat.setpoint = 160
TIMER setback = OFF : IO thermostat.setpoint = 210
Note: The datapoint address thermostat.setpoint and the value format are illustrative, replace them with the actual datapoint address and value format for your thermostat I/O Server. The values shown here (210, 160) assume the thermostat accepts tenths of a degree Celsius (210 = 21.0 °C, 160 = 16.0 °C), which is common for KNX DPT 9.x, but verify against your specific device's documentation.