Chapter 7: User Interface Integration
In the previous chapter you learned how EVENTS automation rules respond to device states, schedules, and timers. Those rules can sense a motion detector, react at sunset, or fire after a delay, but all of that happens invisibly in the background. This chapter adds the missing piece: the connection between your automation and the people who use it.
HSYCO's user interface is not just a display. Buttons on screen can trigger automation rules, and automation rules can update what those buttons and labels show. This two-way conversation between the UI and the EVENTS engine is built on two tools: the USER event and the UISET action.
By the end of this chapter you will know how to make a button on the touchscreen start an EVENTS rule, and how to make an EVENTS rule update the text, color, or visibility of anything on screen. You do not need to build the full user interface here; that is the Project Editor's job, covered in Chapter 5. For now you are learning the EVENTS side of the conversation: the syntax, the patterns, and the logic.
7.1 USER Events: When a Button Calls Your Automation
When you place a button in an HSYCO project, you choose its Action. The Button object supports several actions: navigating to a page or popup (link), toggling a datapoint directly (datapoint), submitting a form (submit), sending a named command to the server (command), and many more. This section focuses on command, the action that connects a Button object to your EVENTS rules.
Watch-type objects, Watch Light, Watch Onoff, Watch Slider, Watch Shutter, and others, use a different action name for the same purpose: user. Both command on a Button and user on a Watch-type object send a named command to the server, which arrives in EVENTS as a USER event: a transient event that carries a name and an optional parameter.
7.1.1 How a Button Generates a USER Event
On a Button object, set Action to command. Then set the Name attribute to the command name you want to send, and optionally set Parameter to an additional value. When the button is tapped, HSYCO sends the command to the server.
On Watch-type objects, set Action to user. Set the Name and Param attributes the same way.
In both cases, the Name attribute becomes the name part of the USER event, and the Param attribute becomes the optional parameter. So if a button has its Name set to lights.scene and its Param set to evening, pressing it fires the event USER lights.scene = evening.
The USER event is transient; it fires once when the button is pressed and does not have an ongoing state. This is different from a stable event like IO k.light.33 = 1, which remains true for as long as the datapoint holds that value.
7.1.2 USER Event Syntax
The USER event has two forms. The first matches on name only:
USER name
This fires whenever any command with that name arrives, regardless of what parameter was sent. The second form matches on both name and parameter:
USER name = param
This fires only when both the name and the parameter match exactly. Both are transient events.
The two-part form with = param gives you more precision: you can have one button named scene with multiple parameter values (morning, evening, night) and write a separate EVENTS rule for each.
Examples
The simplest use is a button that triggers a delayed action. A button with Name set to timer starts a 10-second countdown and then turns on light k.light.33:
USER timer : PROGRAMTIMER test = SET 10
PROGRAMTIMER test : IO k.light.33 = 1
When you want one name to cover several different actions, add a parameter. Two buttons share the same Name hometheater but carry different Param values, on and off, each triggering a separate rule:
USER hometheater = on : IO projector.power = 1,
IO amplifier.power = 1
USER hometheater = off : IO projector.power = 0,
IO amplifier.power = 0
7.1.3 USER as an Action: Firing USER Events from EVENTS
The USER keyword works in both directions. It is not only an event you receive from the UI, it is also an action you can fire from within EVENTS. When used as an action, USER triggers the same event as if a button had been pressed, allowing one EVENTS rule to call another or to pass a computed value as a parameter.
Either name or param can be omitted, but not both. You can use multiple unquoted words, quoted strings, and variables; they are concatenated to form the final name or parameter:
<EVENT> : USER hometheater = "changed" $newvalue
Note: <EVENT> can be any event type; you can fire a USER action from TIME events, IO events, DAY/NIGHT events, or any other condition.
7.1.4 Recipe: Simple Button Command
This recipe shows the minimum setup needed to make a UI button trigger an EVENTS action (Figure 26).
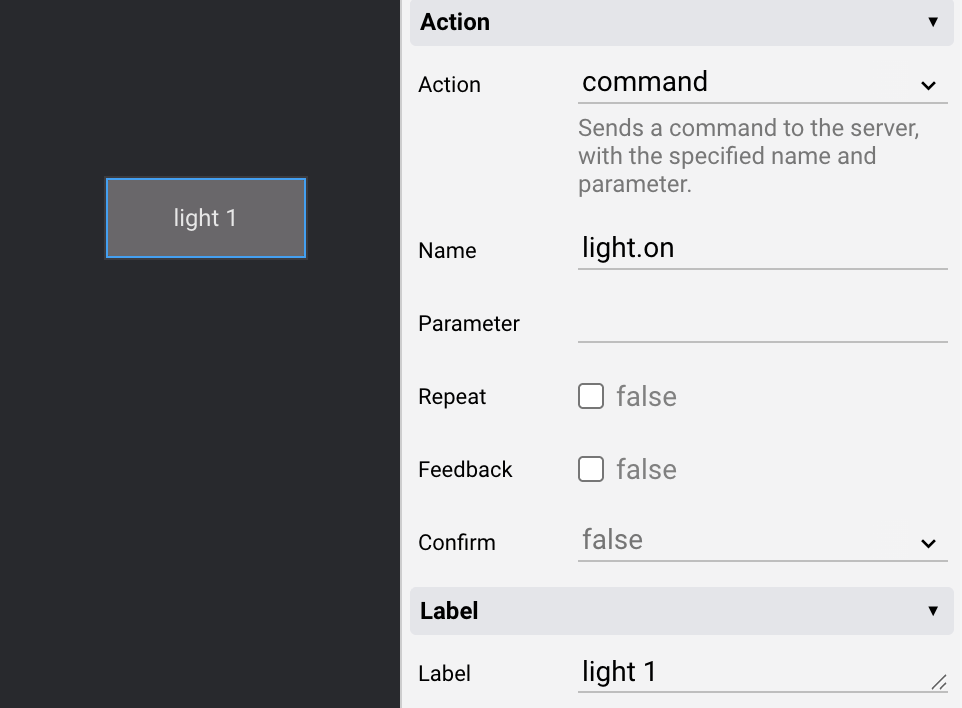
Configuring a Button object with Action set to command
Step 1: Configure the button in the Project Editor
Add a Button object to your page. Set its Action to command (this is the default). Set its Name to light.on. Leave Param empty.
Step 2: Write the EVENTS rule
Open your EVENTS file and add:
USER light.on : IO dummy.light.1 = 1
Step 3: Test
Save the EVENTS file. Open your project in a browser and press the button. Open Status Browser and verify that dummy.light.1 changed to 1.
7.1.5 Recipe: Button with Parameter: Multiple Actions from One Button Group
This recipe shows how two buttons can share a command name but trigger different actions through different parameters.
Step 1: Configure the first button
Set Action to command. Set Name to blind.control. Set Parameter to up.
Step 2: Configure the second button
Set Action to command. Set Name to blind.control. Set Parameter to down.
Step 3: Write the EVENTS rules
USER blind.control = up : IO knx.autom.1 = UP
USER blind.control = down : IO knx.autom.1 = DOWN
Step 4: Test
Press each button in turn and verify in Status Browser that knx.autom.1 receives the correct command. You can extend this pattern by adding a third button with Parameter set to stop and a matching rule, without changing the name structure.
7.1.6 Recipe: Button-Triggered Scene
This recipe shows a single button press that triggers multiple actions at once, a scene.
Step 1: Configure the button
Set Action to command. Set Name to scene.goodnight. Leave Parameter empty.
Step 2: Write the EVENTS rule
USER scene.goodnight : IO knx.light.1 knx.light.2 knx.light.3 = 0,
IO knx.autom.1 = DOWN,
LOG = "Good Night scene activated"
Step 3: Test
Press the button and verify in Status Browser that all three datapoints updated. Check the log viewer to confirm the log entry appeared.
A single button press triggers three actions in one rule. The comma separates each action; they all execute as part of the same rule response.
The LOG action at the end writes a record to the system log so you can confirm the scene fired.
7.2 UISET Actions: When Automation Updates the Screen
Section 7.1 covered one direction of the conversation: a button on screen sends a command that triggers an EVENTS rule. This section covers the other direction: an EVENTS rule reaches into the user interface and changes what is displayed.
The tool for this is the UISET action. When an EVENTS rule fires, it can use UISET to change any dynamic attribute of any identified UI object, its label text, its color, whether it is visible or hidden, and more. The change happens on every connected client immediately.
7.2.1 The UISET Syntax
The syntax is:
UISET id.attr = value
id is the ID you assigned to the object in the Project Editor. attr is the name of the attribute you want to change. value is what you want to set it to. You can use multiple unquoted words, quoted strings, and variables; they are concatenated to form the final value.
For example, to set the italic style of a text object with ID mytext to true:
UISET mytext.italic = true
To set the bar color of a chart object with ID mychart:
UISET mychart.barcolor = "#000000"
The ID of a UI object is set in the Project Editor. It is not unique; multiple objects can share the same ID. This is intentional: if you give the same ID to several objects, a single UISET changes all of them at once (Figure 27).
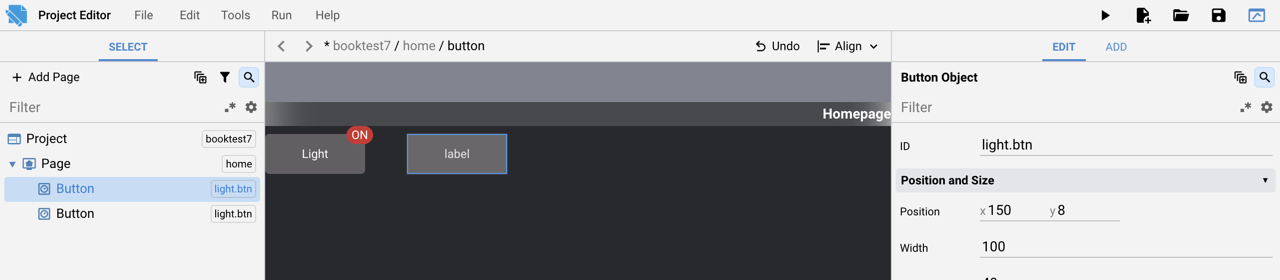
Two Button objects sharing the same ID, visible in the Select tree
You can also target all objects of a given type by using the type name in parentheses as the ID. For example, this relabels every Button object on screen:
UISET (button).label = "Alert"
And this sets the font weight of every Button object to bold:
UISET (button).fontweight = bold
A gotcha with competing rules: a type-wide UISET and an ID-specific UISET can target the same attribute on the same object from two different rules. Because UISET changes persist until HSYCO restarts, whichever rule ran most recently wins, regardless of which rule is more specific. If a type-wide rule appears to have no effect on one particular object, check whether another rule sets that same attribute by ID on the same event, most commonly INIT, since that rule reruns on every EVENTS reload and can silently overwrite the type-wide change moments later.
7.2.2 What UISET Can and Cannot Change
Not every attribute of every object can be changed with UISET. The documentation marks each attribute with one of two notes:
-
static: the attribute cannot be changed dynamically with a
UISET. It can only be set in the Project Editor when building the interface. -
live: the attribute can only be set dynamically with a
UISET. It cannot be set from the Project Editor at all.
All other attributes, those with neither note, can be changed with UISET at any time. When writing EVENTS rules, always check the attribute documentation for the specific object you are targeting to confirm whether UISET can change it.
7.2.3 UISET Changes All Connected Clients
A UISET action in EVENTS is global. When it fires, the change is sent to every client currently viewing the project, every browser, every tablet, every phone. A UISET set this way lasts until HSYCO is restarted.
If you need to change an attribute only for the specific client that triggered an action, for example, showing a confirmation message only to the person who pressed a button, use UISESSIONSET instead. UISESSIONSET has the same syntax as UISET but affects only the client session that generated the current event. It can only be used inside USER and PAGE event rules.
USER mybutton = 1 : UISESSIONSET mytext.italic = true
When the client that pressed mybutton fires the event, only that client's mytext object becomes italic. Other clients are not affected.
Session-level changes override global ones. If UISET sets an attribute to one value and UISESSIONSET sets the same attribute to a different value for a specific client, that client sees the session value.
Examples
A motion sensor triggers and a status label updates to show that motion was detected:
IO motion.hallway = 1 : UISET status.label.text = "Motion detected"
IO motion.hallway = 0 : UISET status.label.text = "Clear"
A light turns on and a button's color changes to reflect the new state:
IO k.light.33 = 1 : UISET light.button.color = "success"
IO k.light.33 = 0 : UISET light.button.color = "default"
The time reaches 23:00 and a night-mode label appears while a daytime panel is hidden:
TIME = 2300 : UISET nightmode.label.visible = true,
UISET daytime.panel.visible = false
In each case the EVENTS rule reacts to a device or time event and immediately pushes a visual change to all connected clients.
7.2.4 Recipe: Status Label That Reflects a Device State
This recipe shows how to keep a text label on screen in sync with the current state of a device datapoint.
Step 1: Add a Text object in the Project Editor
Add a Text object to your page and set its ID to light.status. This is the ID you will target with UISET.
Step 2: Write the EVENTS rules
IO dummy.light.1 = 1 : UISET light.status.text = "Light is ON"
IO dummy.light.1 = 0 : UISET light.status.text = "Light is OFF"
Step 3: Handle the initial state
When HSYCO starts, the label shows whatever text was set at design time in the Project Editor. To ensure it reflects the actual device state from the moment the system starts, add an INIT rule:
INIT : UISET light.status.text = "Waiting for status…"
This sets a neutral starting text immediately on every EVENTS reload. As soon as dummy.light.1 reports its first value, one of the two IO rules above will update the label to the correct state.
Step 4: Test
Open your project in a browser. Manually set dummy.light.1 to 1 using Status Browser. The label on screen should immediately update to "Light is ON". Set it back to 0 and the label updates again. Every client viewing the project sees the same text.
7.2.5 Recipe: Show and Hide a Warning Panel
This recipe shows how to make a UI panel appear when a condition is active and disappear when it clears.
Step 1: Give the panel an ID
Set the panel's ID to alarm.panel in the Project Editor. Set its Visible attribute to false so it starts hidden.
Step 2: Write the EVENTS rules
IO alarm.sensor = 1 : UISET alarm.panel.visible = true
IO alarm.sensor = 0 : UISET alarm.panel.visible = false
Step 3: Test
Open the project in a browser. The panel should be invisible. Set alarm.sensor to 1 in Status Browser. The panel appears. Set it back to 0 and the panel disappears.
The Visible attribute is controlled entirely by EVENTS. No button press is needed, the panel responds automatically to the device state.
7.2.6 Recipe: Update a Label with a Variable Value
This recipe shows how to display a computed EVENTS variable value in a UI label.
Step 1: Add a Text object
In the Project Editor, add a Text object to the page where you want the readout.
Step 2: Give the object an ID
Set the Text object's ID to counter.display. This is the ID the UISET action will target.
Step 3: Write the rule
This example uses a variable $motion_count that increments each time a motion sensor fires. After each increment, the new value is pushed to the label immediately in the same rule:
IO motion.sensor = 1 : $motion_count + 1,
UISET counter.display.text = "Activations: " $motion_count
Step 4: Test
Each time the motion sensor fires, the label updates to show the current count. The value and the label text are concatenated directly in the UISET action, no separate step is needed to format the string.
The label now serves as a live readout of an EVENTS variable, visible to all connected clients.
7.3 Putting It Together: A Complete UI Integration Example
Sections 7.1 and 7.2 covered each direction of the UI–EVENTS conversation separately. This section combines them into a single working example that uses both USER events and UISET actions together.
The scenario: a button on screen controls a light. When the button is pressed, the light turns on or off through EVENTS. When the light's state changes, whether from the button, a physical switch, or any other source, the button itself updates to reflect the current state. The button both sends commands and receives feedback.
Step 1: Configure the Button
In the Project Editor, add a Button object. Set its attributes:
-
ID: light.btn
-
Action: command
-
Name: light.toggle
-
Label: Light
The ID light.btn is what EVENTS will target with UISET. The Name light.toggle is what EVENTS will receive as a USER event when the button is pressed.
Step 2: Write the EVENTS Rules
Open your EVENTS file and add the following three rules:
USER light.toggle : IO dummy.light.1 = FLIP
IO dummy.light.1 = 1 : UISET light.btn.color = "success",
UISET light.btn.label = "Light ON"
IO dummy.light.1 = 0 : UISET light.btn.color = "default",
UISET light.btn.label = "Light OFF"
Rule 1 handles the button press. The USER event fires when the button is tapped, and the IO action sets dummy.light.1 to FLIP, toggling it between 0 and 1.
Rules 2 and 3 watch the datapoint state. Whenever dummy.light.1 changes to 1, the button turns green and its label changes to "Light ON". Whenever it changes to 0, the button returns to its default color and the label reads "Light OFF".
The button press and the button appearance are completely separate rules. The button press causes a state change; the state change causes the visual update. This means the button stays accurate no matter what causes the light to change, the on-screen button, a physical wall switch, a timer, or any other EVENTS rule.
Step 3: Add an INIT Rule for Startup
When HSYCO starts, the button shows whatever label and color were set in the Project Editor. Add an INIT rule to set a neutral placeholder immediately at startup:
INIT : UISET light.btn.color = "default",
UISET light.btn.label = "Waiting..."
Once dummy.light.1 reports its actual value, Rules 2 or 3 will immediately replace this placeholder text with the real state.
Step 4: Test
Save the EVENTS file. Open the project in a browser. The button should show "Waiting..." briefly, then update to the current state of dummy.light.1. Press the button; the light toggles and the button color and label update immediately.
Open a second browser tab pointing to the same project. Press the button in one tab and watch both tabs update simultaneously; this is UISET working globally across all connected clients.
Complete Rules Reference for This Example
For clarity, here are all the rules for the main example together:
# Light toggle button — UI integration example
INIT : UISET light.btn.color = "default",
UISET light.btn.label = "Waiting..."
USER light.toggle : IO dummy.light.1 = FLIP
IO dummy.light.1 = 1 : UISET light.btn.color = "success",
UISET light.btn.label = "Light ON"
IO dummy.light.1 = 0 : UISET light.btn.color = "default",
UISET light.btn.label = "Light OFF"
The Button Badge Pattern
A variant of this pattern uses the Button object's Badge attribute, a small badge that appears in the corner of the button to signal a state, without changing the button's main label or color:
IO dummy.light.1 = 1 : UISET buttondummylight1.badge = true,
UISET buttondummylight1.badgelabel = "ON"
IO dummy.light.1 = 0 : UISET buttondummylight1.badge = false
When dummy.light.1 turns on, the badge appears with the label "ON". When it turns off, the badge is hidden. The badge, badgelabel, and badgecolor attributes of the Button object can all be targeted by UISET (Figure 28).
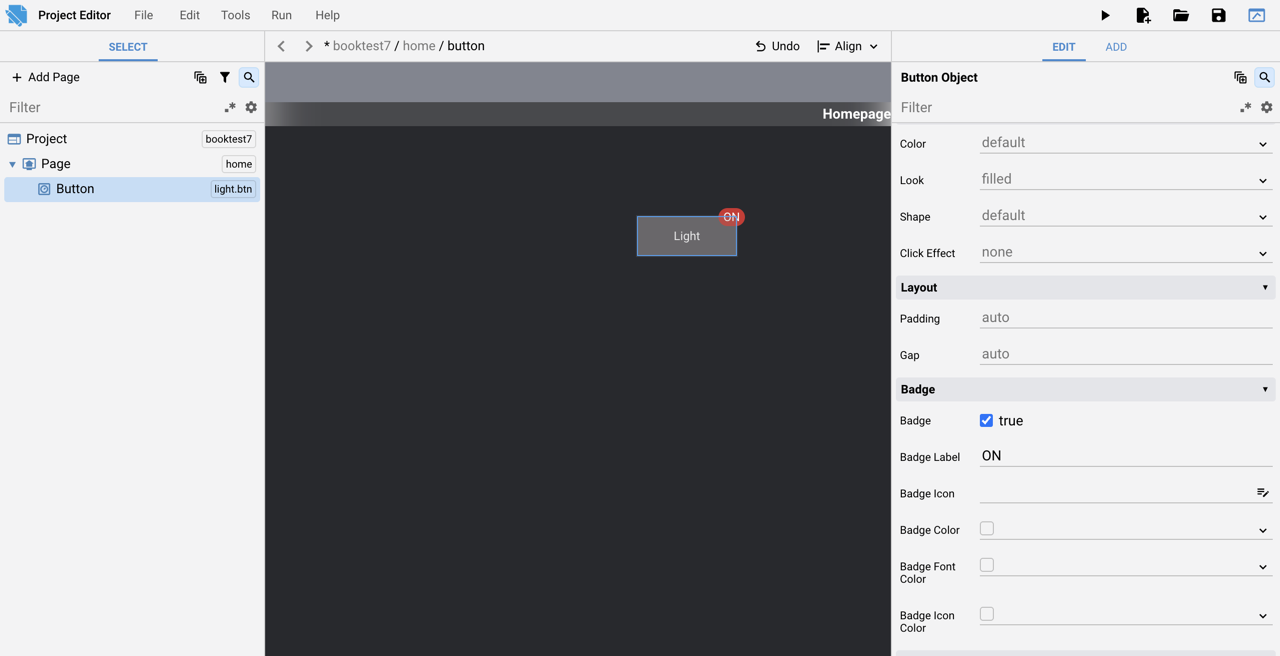
A Button object's Badge, Badge Label, and Badge Color attributes in the Project Editor
7.4 Other UI-Related Events
The USER event and UISET action are the primary tools for UI integration, but EVENTS provides three additional events that fire in response to user activity in the interface, PAGE, LOGIN, and LOGOUT, and one event related to startup behavior: IOSTART.
All of these are transient events. They fire once when the condition occurs and do not have an ongoing state.
7.4.1 PAGE: When a Client Loads a Page
The PAGE event fires when a web client initially loads a project and when navigating between pages. Popup and overlay pages do not trigger it. There is no guarantee that the event fires at the exact moment the page loads; network delays may cause a slight delay.
PAGE project = page
project is the name of the project. page is the page ID, with a #landscape or #portrait suffix if the page has separate orientation versions.
PAGE "myproject" = "menu#landscape" : $landscape_counter + 1
PAGE "myproject" = "menu#portrait" : $portrait_counter + 1
PAGE is also noted in the documentation as the event where you can use UISESSIONSET. This means you can use a PAGE event to set up the UI for a specific client the moment they arrive on a page, for example, customising a label to show their username, without affecting other connected clients.
7.4.2 LOGIN: When a User Authenticates
The LOGIN event fires when a user authenticates with a valid PIN or PIN/ PUK.
LOGIN userid
LOGIN "staff" : $login_counter_staff + 1
You can use LOGIN to log the event, adjust automation modes, or prepare a personalized interface when a specific user arrives.
7.4.3 LOGOUT: When a User Logs Out or Locks the Interface
The LOGOUT event fires when a user logs out or locks the user interface.
LOGOUT userid
LOGOUT "staff" : $logout_counter_staff + 1
LOGOUT fires both on explicit logout and when the user locks the interface. You can use it to restore defaults, log the session end, or trigger any cleanup actions needed when a user leaves.
7.4.4 IOSTART: When an I/O Server Connection Is Established
IOSTART fires when the communication thread of an I/O Server starts, once at HSYCO startup for each configured server, and again after any communication error that causes the server to reconnect.
IOSTART id
id is the I/O server number, starting from 0, based on the order in which servers are listed in hsyco.ini. If only one I/O server is configured, the ID can be omitted.
IOSTART: IO contacts.c1 = 1
IOSTART 2: IO relays.door = 1
A common pattern in I/O server integrations combines INIT and IOSTART to ensure a command runs both at system startup and every time the server reconnects after a failure:
INIT or IOSTART 0 : IO mb.0A.02F91F.0.13 = chg.state
The id here is a position index, not the I/O Server's name: 0 is the first server listed in hsyco.ini. Because it is positional, inserting a new I/O Server above an existing one shifts every index below it, so review any IOSTART <n> rules whenever you reorder servers.