Chapter 6: Introduction to EVENTS Programming
In Chapter 4, you connected HSYCO to its first I/O Servers and worked with real datapoints. You could read device states in Status Browser and send commands manually. Now it's time to make HSYCO respond on its own, to watch what's happening in your building and act without anyone pressing a button.
EVENTS is the programming environment that makes this possible. It's not a general-purpose language with abstract concepts and complex syntax. It's a purpose-built tool for describing automation behavior: when something happens, do something in response. You write rules in plain, readable text. HSYCO evaluates them continuously and executes the matching actions the moment conditions are met.
This chapter covers the fundamentals: the format of EVENTS rules, how to create and edit EVENTS files using the Code Editor, how to test your rules using Status Browser and Log Viewer, and the core event and action keywords you'll use in nearly every installation. You'll work with the DUMMY I/O Server datapoints from Chapter 4, so you can test everything without any hardware. By the end, you'll have a working set of automation rules and the skills to write more on your own.
6.1 What is EVENTS?
EVENTS is HSYCO's programming environment for automation. It connects what happens in your building to what HSYCO should do in response. The environment associates one or more actions to a field event or combination of conditions. An event refers to the persistent status or transient event of devices, conditions applied to variables, and various internal system events. An action is a control command sent to a device, or other internal functions like setting variables and program timers.
If your automation is simple, one button controlling one light, a pair of buttons on a blind, a scene on a timer, you may not need EVENTS at all: the Wiring Editor (Chapter 14) builds those connections visually. This chapter is for the cases that need conditions, timers, calculations, or coordination across several devices.
Here's a basic example:
IO dummy.light.1 = 1 : IO dummy.light.2 = 1
When the light with datapoint name dummy.light.1 turns on (value becomes 1), HSYCO automatically turns on the light with datapoint name dummy.light.2. The colon separates what you're watching for from what you want to happen.
A single event can also control multiple devices at once:
DAY : IO dummy.light.1 dummy.light.2 dummy.light.3 = 0
At sunrise, all three lights are turned off. You can list multiple datapoints before the = sign rather than writing a separate rule for each one.
EVENTS files take effect the moment you save them. There's no compilation process, no build step, no waiting. When you save an EVENTS file, HSYCO automatically reloads it and your rules become active immediately. Write a rule, save it, test it. Make a change, save again, test again.
If HSYCO finds errors when you save, a warning icon appears in the Code Editor's top bar. Click it to see the details. Errors are also written to the log file. Lines containing errors are ignored.
6.1.1 Where EVENTS Code Lives
You can write EVENTS in multiple text files. The main file is events.txt in HSYCO's main directory. You can also create additional text files, any filename with the .txt suffix, inside the events subdirectory. HSYCO loads all of them and evaluates all rules regardless of which file they live in.
Tip: As your automation grows, consider splitting rules across multiple files by system area. A separate file for lighting, one for HVAC, one for security makes large installations easier to navigate and maintain.
6.1.2 What EVENTS Can Do
EVENTS handles the automation tasks most installations need: responding to device changes, controlling lights and blinds and temperatures, scheduling actions at specific times or at sunrise and sunset, combining multiple conditions with logical operators (AND, OR, NOT), working with variables, updating user interfaces dynamically, and controlling cameras.
The event-driven model maps directly to how automation is naturally described. You write when this happens, do that: you describe the desired behavior rather than the steps for achieving it. HSYCO evaluates your rules whenever any datapoint value changes, whenever time advances, or whenever a system event occurs, and executes the matching actions automatically.
6.2 The event:action Syntax Explained
Every rule you write in EVENTS follows the same pattern:
event : actions
The event is what HSYCO watches for. The colon is the separator. The actions are what HSYCO does when the event occurs.
6.2.1 The Event Side
The event side describes a condition. It can be as simple as a single datapoint changing value, or as complex as a combination of several conditions joined by logical operators. HSYCO continuously monitors the system and evaluates event expressions whenever something changes. When the condition becomes true, the actions on the right side of the colon execute.
The most common event in building automation is an IO event; a change in a datapoint. Written alone, with just a name and no comparison, IO is a transient event. It fires only at the moment the datapoint changes, regardless of what it changes to:
IO dummy.light.1 : LOG = "light 1 changed"
Add a comparison operator and the IO event becomes a stable event; a condition that checks the current value:
IO dummy.light.1 = 1 : LOG = "light 1 is on"
The distinction matters. A transient event fires once, at the moment of change. A stable event is true as long as the condition holds. The available comparison operators are =, >, <, >=, <=, and *=. The *= operator checks if the left side contains the right side as a substring. These work with numeric values and with string values.
6.2.2 Combining Conditions
Several events can be combined into a single expression using AND, OR, and NOT:
IO dummy.light.1 = 1 AND IO dummy.light.2 = 1 : LOG = "both lights are on"
IO dummy.light.1 = 1 OR IO dummy.light.2 = 1 : LOG = "at least one light is on"
NOT IO dummy.light.1 = 1 : LOG = "light 1 is not on"
When you combine operators without brackets, AND and OR are evaluated left to right. NOT has priority and applies to the first expression immediately after it, before any AND or OR. Use brackets to make the order explicit when needed:
IO dummy.light.1 = 1 OR IO dummy.light.2 = 1 AND IO dummy.light.3 = 1
is equivalent to:
(IO dummy.light.1 = 1 OR IO dummy.light.2 = 1) AND IO dummy.light.3 = 1
One important rule about transient events: two transient events can never be simultaneously true, because they each fire at separate moments in time. So IO dummy.light.1 AND IO dummy.light.2, two plain IO events with no comparison, will never trigger. If you want a rule that responds to one change while checking the current state of another datapoint, combine a transient event with a stable condition, as in the examples above.
Excluding a datapoint's own changes.
When a rule writes a datapoint that also appears in its own event expression, the write re-evaluates the rule, which can make it fire again and again. Adding AND NOT IO <name> excludes that datapoint's change events from triggering the evaluation, while a separate stable condition still checks its value:
IO dummy.light.3 = 1 AND IO dummy.light.2 = 0 AND NOT IO dummy.light.2 :
IO dummy.light.2 = 1
This rule is evaluated only when the button dummy.light.3 changes, never when dummy.light.2 changes, so setting dummy.light.2 in the action cannot re-trigger it. It is the standard way to stop a rule from re-triggering itself or bouncing a value back and forth with another rule, and the Smart Room Controller recipe in Section 6.6 depends on it.
6.2.3 The Action Side
The action side is a list of one or more actions separated by commas. Actions can control devices, set variables, update user interfaces, send log messages, and more. The essential pattern is IO name = value to control a datapoint:
NIGHT : IO dummy.light.1 = 1, IO dummy.light.2 = 1,
IO dummy.light.3 = 1
When you need to send the same value to several datapoints at once, you can list multiple datapoint names before the = :
NIGHT : IO dummy.light.1 dummy.light.2 dummy.light.3 = 1
Both forms do the same thing. The second is shorter and easier to read when you have several targets.
Each event : action rule is normally written on a single line. When you have many actions, you can continue them on the next line by ending the preceding line with a comma. You can also write the event alone on the first line followed by the colon, then start the actions on the following line:
NIGHT :
IO dummy.light.1 dummy.light.2 dummy.light.3 = 1,
IO dummy.autom.1 dummy.autom.2 = down
The event expression itself cannot span more than one line.
6.2.4 One Event, Multiple Rules
You can write several rules that reference the same event. HSYCO evaluates all of them when the event occurs and executes every rule whose condition is true:
IO dummy.light.1 = 1 : IO dummy.light.2 = 1
IO dummy.light.1 = 1 : LOG = "light 1 turned on"
When dummy.light.1 turns on, both rules execute: light 2 turns on and a log message is written. HSYCO scans rules from top to bottom, but the execution order is not guaranteed, so don't write rules that depend on a specific order of execution.
6.2.5 Comments
Comments are identified by the # character. Everything after # on a line is ignored by HSYCO. Use them freely to describe what your rules do.
# turn on garden lights at sunset
NIGHT : IO dummy.light.1 dummy.light.2 = 1, # front lights
IO dummy.light.3 = 1 # back garden
A # character inside double quotes is not treated as a comment:
IO dummy.light.1 = 1 : LOG = "# this is not a comment"
A Few Rules to Know
HSYCO converts all datapoint IDs to lower case when it reads your EVENTS files. This means dummy.light.1 and DUMMY.LIGHT.1 refer to the same datapoint. Use lower case consistently throughout your files, in hsyco.ini, and in your user interface configuration.
The built-in constant values, ON, OFF, UP, DOWN, STOP, FLIP, RECON, RECOFF, MERGE, UNMERGE, PLAY, can be written in upper or lower case interchangeably. Your own custom text values retain their case exactly as you write them.
Spaces and tab characters are ignored in most places, so you can indent and align your rules freely for readability.
6.2.6 Variables
A variable is any name beginning with $. Variables need no declaration; one exists as soon as you assign to it. Names are case-insensitive ($mode and $MODE are the same variable) and may contain letters, digits, hyphens, and underscores.
INIT : $mode = "auto", $count = 0
IO dummy.light.1 = 1 : $count + 1
Written on the event side with no comparison, a variable is a transient event that fires whenever its value changes; written with a comparison ($count = 10) it is a stable condition.
Persistent variables
Every variable is cleared when HSYCO restarts. End the name with ! and the value is kept across restarts:
HSYCOSTART : $total! = 0
IO dummy.light.1 = 1 : $total! + 1
The ! is part of the name, so $total and $total! are two different variables. Use persistent variables only where a value genuinely has to survive a restart.
Predefined variables
HSYCO exposes a set of read-only built-in variables whose names also end in $: $TIME$, $DATE:DOW$ (day of week, 1 = Monday), $SUNRISE$, $SUNSET$, $SUNELEVATION$, and others; several accept a :modifier, such as $TIME:M$ for the current minute. You can read them anywhere, but they are not trigger keywords: their values change on their own without causing any rule to be evaluated. This rule never runs, because nothing triggers it:
$TIME:M$ > 30 : LOG = "second half of the hour"
Pair the predefined variable with a real trigger, here the TIME event, which fires every minute:
TIME AND $TIME:M$ > 30 : LOG = "second half of the hour"
6.2.7 Delays and Timers
Two actions let a rule act after a delay, and they behave differently.
WAIT = <seconds> pauses the current action list in place. The actions before it have already run; the actions after it run when the pause ends. Everything stays inside the one rule:
IO dummy.light.1 = 1 : IO dummy.light.2 = 1, WAIT = 2, IO dummy.light.2 = 0
Light 2 turns on, waits two seconds, then turns off, all as one response to light 1.
PROGRAMTIMER <name> = SET <seconds> instead schedules a separate event for later. When the time elapses a PROGRAMTIMER <name> event fires, and a different rule that watches it runs:
IO dummy.light.1 = 1 : PROGRAMTIMER off.delay = SET 600
PROGRAMTIMER off.delay : IO dummy.light.2 = 0
The first rule finishes immediately; ten minutes later the timer event triggers the second rule. RESET <seconds> is like SET but restarts a timer that is already running, and CLEAR cancels it. Use WAIT for a short pause within one action list; use PROGRAMTIMER when the delay is long, needs to be cancelled or restarted, or when other rules should react to it. The Smart Room Controller in Section 6.6 uses both.
6.2.8 Time-Based Events
Alongside IO, three built-in events let a rule react to the time of day rather than to a datapoint:
TIME, written alone, is a transient event that fires at the beginning of every minute, regardless of what time it is. Add a comparison and it becomes a stable event that checks the current time against a constant in 24-hour HHMM format:
TIME = 0700 : $business_hours = 1
DAY and NIGHT are stable events computed from your server's latitude and longitude (Section 3.1.1) and the Sunrise/Sunset Offset settings. DAY is true from sunrise to sunset; NIGHT is true from sunset to sunrise:
NIGHT : IO dummy.light.1 dummy.light.2 dummy.light.3 = 1
Because DAY and NIGHT are stable, they can be combined with AND, OR, and NOT just like any other condition, this is how the Smart Room Controller in Section 6.6 restricts an automation to nighttime or off-hours.
6.3 Recipe: Creating Your First EVENTS Rule
This recipe walks you through writing, saving, and testing your very first EVENTS rule. You'll use the DUMMY I/O Server datapoints from Chapter 4 to create a simple automation that turns on a virtual light when HSYCO starts or reloads your EVENTS code.
6.3.1 Understanding INIT
The INIT event fires every time HSYCO reloads EVENTS files, at startup and whenever you save any EVENTS file. This makes it useful for initialization: setting starting states, preparing variables, and establishing the conditions your other rules expect.
There's also HSYCOSTART, which fires only once when HSYCO first boots up, not on every EVENTS reload. INIT gives you immediate feedback every time you save your code, which makes it the right choice while learning.
Note that HSYCO takes a few seconds to reload files after they are changed. If multiple saves happen very closely in time, a single INIT event may be triggered for the batch.
6.3.2 The Steps
Step 1: Open Code Editor
Navigate to the Manager and click Code Editor. The welcome screen appears with options to open existing files or create new ones. Click EVENTS file. This opens events.txt, the main EVENTS file.
Step 2: Write Your First Rule
Click at the end of the file to position your cursor, then type:
INIT : IO dummy.light.1 = 1
Step 3: Add a Comment
Good practice means commenting your code. Add a comment above your rule to describe what it does:
# Turn on light 1 when EVENTS loads
INIT : IO dummy.light.1 = 1
The # character marks everything after it as a comment. HSYCO ignores comments when executing rules, but they help you and others understand what each rule does (Figure 23).
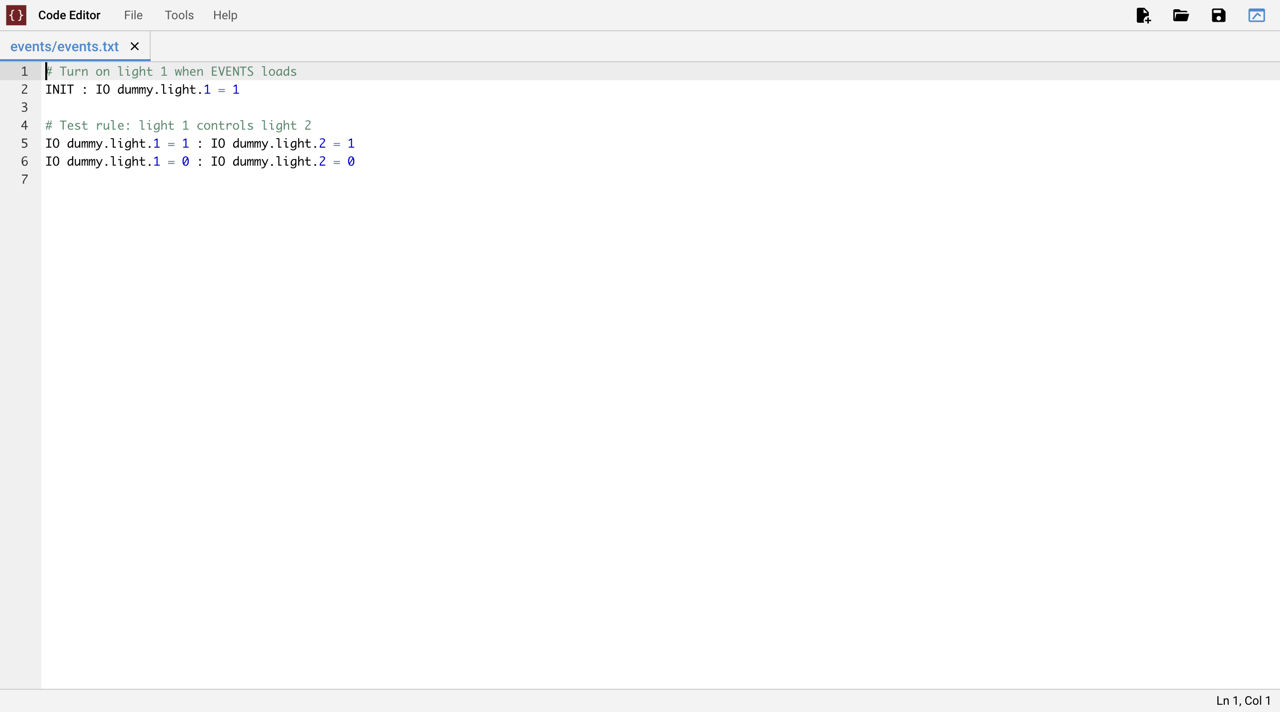
Code Editor with an EVENTS rule ready to save
Step 4: Save the File
Click Save in the Code Editor. The file saves immediately. Within a few seconds, HSYCO detects the change and reloads all EVENTS files. When it reloads, the INIT event fires and your rule executes, setting dummy.light.1 to 1.
After saving, look at the top bar in Code Editor. If you see a warning icon, click it to see error messages and check the log file for details.
Tip: Common first-time errors include typing I0 (letter O) instead of IO (letter I, letter O), forgetting the colon between event and action, or misspelling the datapoint name.
Step 5: Verify in Status Browser
Open Status Browser from the Manager. In the search field, type dummy to filter for DUMMY datapoints. Look for dummy.light.1 in the list, the Value column should show 1, and the timestamp should show when you saved the EVENTS file.
Tip: If dummy.light.1 doesn't appear in the list at all, rather than just showing the wrong value, the datapoint hasn't been registered yet. Open Catalog from the Manager and click Save; this is required once after configuring DUMMY's device counts, before its datapoints show up anywhere (see Section 4.5.2).
How the Workflow Works
When you save an EVENTS file, HSYCO detects the file change within seconds and reloads all EVENTS files (events.txt and any .txt files in the events subdirectory). The reload triggers the INIT event, HSYCO evaluates all rules with INIT as their event, and your rule's action executes: IO dummy.light.1 = 1. The DUMMY I/O Server updates the dummy.light.1 datapoint to 1, and Status Browser shows the new value.
What Else You Can Do With INIT
Initialize variables:
INIT : $mode = "auto", $counter = 0
Set multiple datapoints to known states:
INIT : IO dummy.light.1 dummy.light.2 dummy.light.3 = 0
Prepare your system for operation:
INIT : IO dummy.dimmer.1 = 25%, IO dummy.autom.1 = down
Every time EVENTS reloads, these initialization rules establish the starting conditions your other rules expect.
Try These Variations
Now that you've written and tested a working rule, try these variations:
Turn on multiple lights:
INIT : IO dummy.light.1 dummy.light.2 = 1
Set different lights to different values:
INIT : IO dummy.light.1 = 1, IO dummy.light.2 = 0
Initialize a dimmer instead of a light:
INIT : IO dummy.dimmer.1 = 50%
6.4 Recipe: Testing EVENTS Code
This recipe shows you how to test EVENTS rules to verify they work correctly. You'll learn to use Status Browser and Log Viewer to confirm that your automation executes as expected.
6.4.1 Testing EVENTS Rules
Testing EVENTS code means confirming that rules execute when conditions are met and that actions produce the expected results. Simple rules are straightforward, but rules with multiple conditions or time-based triggers need systematic testing to prevent surprises.
Step 1: Write a Test Rule
Open Code Editor and add these rule:
# Test rule: light 1 controls light 2
IO dummy.light.1 = 1 : IO dummy.light.2 = 1
IO dummy.light.1 = 0 : IO dummy.light.2 = 0
These rules create a dependency: whenever dummy.light.1 turns on, dummy.light.2 turns on. When dummy.light.1 turns off, dummy.light.2 turns off.
Save the file.
Step 2: Set Initial Conditions in Status Browser
Open Status Browser and search for dummy. Verify the starting state of your datapoints:
-
dummy.light.1should be 0 (off) -
dummy.light.2should be 0 (off)
If either light is already on, use an INIT rule to reset them:
INIT : IO dummy.light.1 dummy.light.2 = 0
Save, then remove this INIT rule after the lights reset (or leave it if you want them to always start off).
Step 3: Enable Events Logging
Open Log Viewer from the Manager. Enable the Events log level and disable Verbose, User, and Http to reduce noise.
Note: Changing log levels in Log Viewer affects what other users see and what is written to the log file. Settings return to the preset configuration when you leave Log Viewer.
Step 4: Trigger the Event
Return to Code Editor and add a manual trigger to turn on dummy.light.1:
INIT : IO dummy.light.1 = 1
Save the file. This INIT rule executes immediately, setting dummy.light.1 to 1.
Step 5: Verify in Status Browser
Switch to Status Browser. Both dummy.light.1 and dummy.light.2 should show 1, and their timestamps should be nearly identical, confirming that the INIT action executed and that the rule IO dummy.light.1 = 1 : IO dummy.light.2 = 1 triggered and ran (Figure 24).
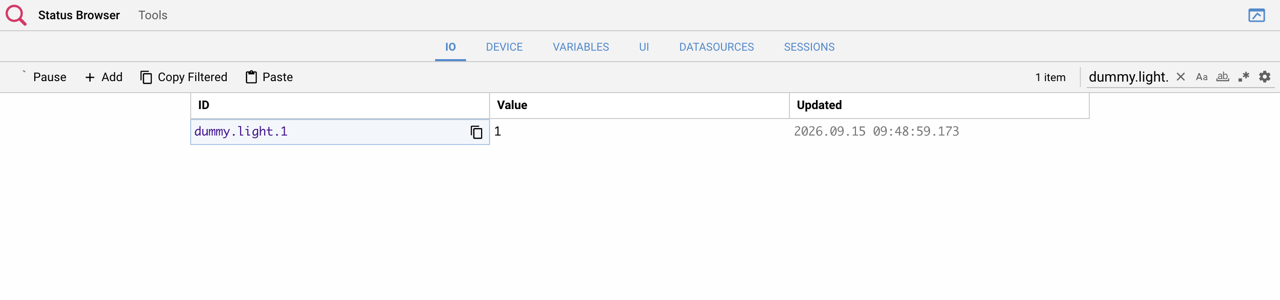
Status Browser showing a DUMMY datapoint's live value
Step 6: Check the Log Viewer
Switch to Log Viewer. You should see log entries showing rule execution (Figure 25):
IO dummy.light.1 = 1
IO dummy.light.2 = 1
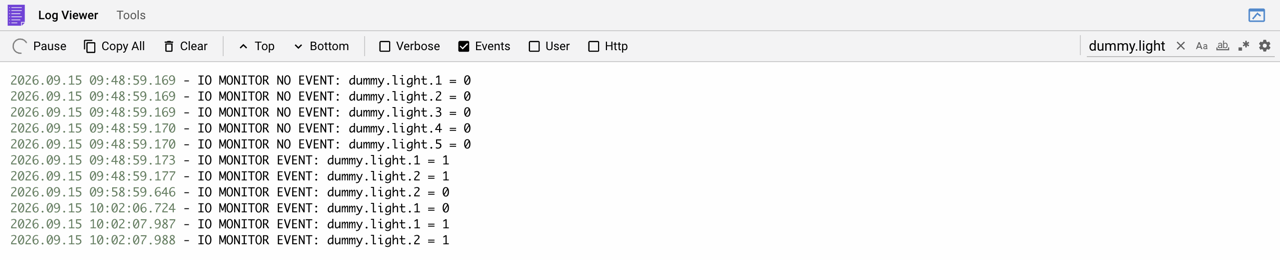
Log Viewer showing an EVENTS rule firing
Step 7: Test the Opposite Condition
Modify your INIT rule to turn the light off:
INIT : IO dummy.light.1 = 0
Save and check Status Browser again. Both lights should now show 0, confirming the second rule also works correctly.
Step 8: Remove the Test Trigger
Delete the INIT rule you added for testing. Your working rules remain:
# Test rule: light 1 controls light 2
IO dummy.light.1 = 1 : IO dummy.light.2 = 1
IO dummy.light.1 = 0 : IO dummy.light.2 = 0
Save the file. These rules are now active and will respond whenever dummy.light.1 changes state.
6.4.2 Using Log Viewer Effectively
Log Viewer is your primary tool for understanding what EVENTS is doing. When testing complex rules with multiple conditions, watch Log Viewer as you trigger events, you'll see which rules fire and which don't.
If a rule should trigger but doesn't, check your syntax, verify datapoint names, and ensure the values in your rule match what the datapoint actually reports.
6.4.3 Testing Time-Based Rules
Time-based rules like TIME, DAY, and NIGHT are harder to test because you can't trigger them on demand. Two approaches work:
Temporary Test Times: Change a TIME rule to trigger in the next minute:
TIME = 1423 : IO dummy.light.1 = 1
This rule will trigger at 14:23:00. Watch Status Browser and Log Viewer to confirm execution. After testing, change the time to the actual desired value.
INIT Substitution: Temporarily replace the time event with INIT to test the actions immediately:
INIT : IO dummy.light.1 dummy.light.2 dummy.light.3 = 1
Test the actions, verify they work, then restore the original TIME event.
6.4.4 Testing Multi-Condition Rules
Rules with AND, OR, and NOT require careful testing because multiple conditions must align. Test each condition independently first, then test the combination. For example, this rule requires two lights to be on simultaneously:
IO dummy.light.1 = 1 AND IO dummy.light.2 = 1 : IO dummy.light.3 = 1
Test it by:
-
Turning on
dummy.light.1(light 3 should stay off). -
Turning on
dummy.light.2while light 1 is on (light 3 should turn on). -
Turning off either light 1 or 2 (light 3 will turn off).
Watch Status Browser and Log Viewer during each step to confirm the rule behaves as expected.
6.5 Recipe: Debugging Common Errors
This recipe shows you how to identify and fix common EVENTS programming errors. You'll learn to interpret error messages, use Code Editor's error viewer, and systematically troubleshoot problems when rules don't work as expected.
Step 1: Check the Error Viewer
When you save an EVENTS file, Code Editor checks for syntax errors immediately. If errors exist, a warning icon appears in the top bar. Click it to open the error viewer, which shows each error with its line number and a description of the problem.
Lines with syntax errors are ignored when HSYCO loads the file, those rules won't execute until you fix them. Other lines without errors load and execute normally.
Step 2: Read Error Messages Carefully
Navigate to the line number shown in the error viewer. Common mistakes to look for:
Typos in keywords: I0 dummy.light.1 instead of IO dummy.light.1 (letter O instead of letter I). Keywords must be spelled exactly.
Missing colon: IO dummy.light.1 = 1 IO dummy.light.2 = 1 instead of IO dummy.light.1 = 1 : IO dummy.light.2 = 1. The colon separates event from actions.
Wrong comparison operator: IO dummy.light.1 == 1 instead of IO dummy.light.1 = 1. EVENTS uses a single = for comparison.
Unbalanced parentheses: (IO dummy.light.1 = 1 AND IO dummy.light.2 = 1 missing the closing ). Every opening parenthesis needs a closing one.
Uppercase datapoint names: HSYCO converts all datapoint IDs to lower case. A datapoint named in mixed case in your rule will be lowercased before matching.
Step 3: Check the Log File
Errors also appear in the log file. Open Log Viewer and look for recent error messages. The log shows which file has the error, the line number, and a description of what went wrong.
Step 4: Test After Fixing Errors
After fixing syntax errors and confirming the warning icon is gone, test your rules using the methods from the recipe "Testing EVENTS Code": use Status Browser to verify datapoint values, enable Events logging in Log Viewer to see rule execution, and trigger the event to confirm the actions execute.
If the rule loads without syntax errors but doesn't trigger, you have a logic error, not a syntax error.
6.5.1 Debugging Logic Errors
A logic error occurs when your rule loads successfully but doesn't trigger when you expect it to.
The rule never triggers: Check your event expression. Are you watching the right datapoint? Is the comparison correct? Use Status Browser to verify the datapoint has the value you think it does.
For example: you wrote IO dummy.light.1 = 0 expecting it to trigger when the light turns off, but the light is already off when HSYCO starts. A stable condition that is already true at load time will not fire; there is no change event to trigger it. Use IO dummy.light.1 (transient) to see all changes, or use an INIT rule to set a known starting state so you can observe the transition.
The rule triggers at the wrong time: Check your conditions. Are you using AND when you meant OR? Are parentheses grouping conditions as intended?
For example: IO dummy.light.1 = 1 OR IO dummy.light.2 = 1 AND IO dummy.light.3 = 1 evaluates as (IO dummy.light.1 = 1 OR IO dummy.light.2 = 1) AND IO dummy.light.3 = 1, which may not be what you intended. Add explicit parentheses to make the grouping clear.
The rule triggers but actions don't work: Check datapoint names in your actions. A typo on the action side won't cause a syntax error, but the action won't execute correctly.
For example: IO dummy.light.1 = 1 : IO dummy.ligt.2 = 1 (misspelled light as ligt). The rule loads and triggers, but nothing happens because dummy.ligt.2 doesn't exist.
6.5.2 Debugging Transient vs Stable Event Issues
Misunderstanding transient and stable events causes many logic errors:
-
Transient event:
IO dummy.light.1fires only at the moment of change. It doesn't matter what the new value is, any change triggers it. -
Stable event:
IO dummy.light.1 = 1is true whenever the datapoint value is1, not just when it changes to1.
A common mistake: writing IO dummy.light.1 AND IO dummy.light.2 expecting it to fire when both lights are on. This never triggers because two transient events can never be simultaneously true.
The solutions are IO dummy.light.1 = 1 AND IO dummy.light.2 = 1 (both stable) or IO dummy.light.1 AND IO dummy.light.2 = 1 (one transient, one stable — fires at the moment dummy.light.1 changes, but only if dummy.light.2 is already 1).
Step 5: Verify Datapoints Exist
If rules don't execute as expected, verify that all referenced datapoints actually exist. Open Status Browser and search for each datapoint name used in your rule. If a datapoint doesn't appear, it doesn't exist, either the I/O Server isn't configured, the I/O Server ID prefix is wrong, or the datapoint name has a typo.
For example: using knx.light.1 when your I/O Server ID is knxserver, the correct datapoint is knxserver.light.1. Or dummy.ligt.1 instead of dummy.light.1. Check spelling carefully and confirm the I/O Server connection status shows as online.
6.6 Recipe: Building a Smart Room Controller
This recipe shows how EVENTS concepts combine into a practical working system. You'll build a room controller with motion-based lighting, manual override, and automatic timeout, using DUMMY datapoints to simulate real devices.
Note: This recipe uses DUMMY light datapoints to simulate sensor inputs. In a real installation, dummy.light.1 would be replaced with an actual motion sensor datapoint from your I/O Server. The automation logic remains identical, only the datapoint names change.
6.6.1 The Scenario
Requirements:
-
Lights turn on when motion is detected (after hours or at night)
-
Lights turn off 10 minutes after the last motion
-
A manual button can also turn the lights on or off directly, with a longer 30-minute timeout — but motion always takes priority: if it fires while the lights are on, it resets the timer back to the normal 10 minutes, however they were turned on
-
Don't turn on lights during daytime business hours
DUMMY Devices:
-
dummy.light.1 = Motion sensor
-
dummy.light.2 = Room lights
-
dummy.light.3 = Override button
Variables:
- $business_hours = Business hours (1 or 0)
6.6.2 The Complete Code
# Initialize
INIT : $business_hours = 0, IO dummy.light.2 = 0
# Business hours schedule
TIME = 0700 : $business_hours = 1
TIME = 1900 : $business_hours = 0
# Motion at night or after-hours: lights on, 10-minute timer
IO dummy.light.1 = 1 AND (NIGHT OR $business_hours = 0) :
PROGRAMTIMER timeout = RESET 600, IO dummy.light.2 = 1
# Motion during daytime business hours: start timer only, no lights
IO dummy.light.1 = 1 AND $business_hours = 1 AND DAY : PROGRAMTIMER timeout = RESET 600
# Timer expired: lights off
PROGRAMTIMER timeout : IO dummy.light.2 = 0
# Keep the override button momentary: DUMMY lights latch, so reset it after each press
IO dummy.light.3 = 1 : WAIT = 1, IO dummy.light.3 = 0
# Manual on: button pressed when lights are off
IO dummy.light.3 = 1 AND IO dummy.light.2 = 0 AND NOT IO dummy.light.2 :
IO dummy.light.2 = 1, PROGRAMTIMER timeout = RESET 1800
# Manual off: button pressed when lights are on
IO dummy.light.3 = 1 AND IO dummy.light.2 = 1 AND NOT IO dummy.light.2 :
IO dummy.light.2 = 0, PROGRAMTIMER timeout = CLEAR
6.6.3 How It Works
Motion detection: When motion triggers (dummy.light.1 = 1), HSYCO starts a 10-minute timer with PROGRAMTIMER timeout = RESET 600. If motion occurs again before the timer expires, RESET restarts it from 600 seconds. This prevents lights from turning off while the room is still occupied.
Timer expiry: When the timer expires, the PROGRAMTIMER timeout event fires and turns the lights off. A manual switch-on arms a longer 30-minute timer instead (RESET 1800 rather than RESET 600), so a manually lit room stays lit longer before the same expiry rule turns it off. If motion fires while the room is already lit, though, it resets the shared timer back down to 10 minutes regardless of how the light was turned on — motion always has the final say.
Manual override: Pressing the button (dummy.light.3 = 1) when the lights are off turns them on and starts a 30-minute timer. Pressing it again while they're on turns them off immediately and cancels the timer with PROGRAMTIMER timeout = CLEAR. Both button rules end in AND NOT IO dummy.light.2, which restricts each rule to the button's own change, so that the light being switched on or off by these very rules can't re-trigger them. Neither rule needs to track who last turned the light on: motion and the button write the same dummy.light.2 datapoint and reset the same timeout timer, so whichever event happens most recently decides what the room does next. That's also why no separate "was this manual?" flag is needed: a flag that multiple rules both read and write is exactly the kind of shared state that can make one rule's action silently re-trigger another. Sharing the datapoint and the timer directly, with the NOT IO guard, avoids that entirely.
Momentary button: dummy.light.3 is a DUMMY light, and a DUMMY light latches, once set to 1 it stays there. The rule IO dummy.light.3 = 1 : WAIT = 1, IO dummy.light.3 = 0 writes it back to 0 a second after each press, so the next press is a fresh 0 to 1 change that the manual rules can see. A real wall button or a UI button (Chapter 7) already sends a momentary signal and needs no such rule.
Business hours: Two separate motion rules handle different scenarios. At night or after hours, motion turns lights on. During daytime business hours, motion only starts the timer; natural light makes artificial lighting unnecessary.
Note: If HSYCO restarts during business hours, $business_hours is reset to 0 by the INIT rule and only returns to 1 at the next TIME = 0700 event. To carry the value across restarts, make it a persistent variable, $business_hours! (see Section 6.2.6), and remove it from the INIT rule. Because the ! is part of the name, every rule must then refer to $business_hours! consistently.
6.6.4 Testing
Test Motion Detection:
INIT : IO dummy.light.1 = 1
Lights should turn on (if after hours or nighttime). Check Status Browser: dummy.light.2 = 1.
Test Timer: Change RESET 600 to RESET 10 temporarily for faster testing. Lights should turn off automatically after 10 seconds. Restore the original value after testing.
Test Manual Override:
INIT : IO dummy.light.3 = 1
With lights off, this turns them on for 30 minutes. The button-reset rule writes dummy.light.3 back to 0 a second later (watch it in Status Browser), so running the same INIT again, or toggling dummy.light.3 from Status Browser, acts as a second press and turns the lights off immediately. Note that motion (dummy.light.1 = 1) firing during those 30 minutes resets the timer back down to the normal 10 minutes — try it, and confirm in Status Browser that the light stays on rather than flickering off.
Test Business Hours: Set the TIME rules to the next minute to trigger the business hours change. Verify $business_hours changes in Status Browser.
Key Concepts Demonstrated
-
PROGRAMTIMER RESET: Extends timeout on repeated events (motion keeps resetting the 10-minute timer). -
PROGRAMTIMER CLEAR: Cancels a timer (manual off cancels auto-off). -
WAIT: Pauses an action list in place (dummy.light.3is written back to0one second after each press). -
Shared State, Not Separate Flags: motion and the manual button both act on the same
dummy.light.2datapoint and the sametimeouttimer, so neither needs to know how the other last changed the room. -
Multi-Condition Logic:
AND (NIGHT OR $business_hours = 0)combines time conditions. -
TIME Events: TIME = 0700 triggers at specific times daily
Adapting to Real Systems
Replace DUMMY devices with real I/O Server datapoints:
-
dummy.light.1 → knx.1/2/3 (KNX motion sensor)
-
dummy.light.2 → knx.light.1 (KNX light)
-
dummy.light.3 → knx.1/1/1 (KNX button)
The logic remains identical, only datapoint names change, with one exception: a real KNX button (or a UI button) already sends a momentary signal, so you can delete the button-reset rule IO dummy.light.3 = 1 : WAIT = 1, IO dummy.light.3 = 0.