Chapter 3: The Manager Interface
In Chapter 2, you completed HSYCO's initial setup: you created an administrator account, configured network settings, and secured your installation. You also got your first look at the Manager splash screen. Now it's time to go deeper: understand what each tool actually does, configure the system parameters your installation needs, and prepare for connecting devices and building automation.
The Manager is a collection of specialized tools, each designed for a specific task. You've already used Settings and Backup/Restore/Update in Chapter 2. This chapter introduces the full toolkit and shows you how to use it for practical work.
Each tool in the Manager opens in its own browser window or tab, so you can work with multiple tools at the same time: configure an I/O Server in Settings, then immediately check Status Browser to verify the connection, or edit code in Code Editor while watching Log Viewer for errors.
Here is what each tool does:
Settings: every system parameter lives here: I/O Servers, geographic location, automatic backups, users, network interfaces.
Status Browser: shows real-time values for all datapoints, variables, and user interface attributes. Use it to verify that devices are communicating and that your automation logic is working.
File Manager: web-based access to all HSYCO's files. Upload images, edit configuration files, download logs, manage project resources. Use the File Manager with caution, as there are system files that, if deleted, could affect the proper functioning of HSYCO. The entire HSYCO configuration process can be carried out without accessing the File Manager, which nonetheless remains a useful tool for browsing files and performing other file system operations.
Code Editor: write EVENTS automation code with syntax highlighting, code assist, and an integrated log preview panel. This is where automation rules live.
Log Viewer: a real-time view of HSYCO's daily log file. Use it to diagnose problems and verify that commands are being executed.
Backup/Restore/Update: create configuration backups, restore from a previous backup, and update the HSYCO software. You used this in Chapter 2.
Project Editor: the visual editor for building user interfaces. Covered in detail in Chapter 5.
System Monitor: monitors hardware and operating system parameters of the HSYCO server.
Wiring Editor: an end-user logic and scenario builder for creating simple automations without writing code. Covered in detail in Chapter 14.
Catalog: your project's device registry, organizing raw I/O Server datapoints into named devices and groups. Changes here don't take effect until you click Save, this is also why newly created datapoints (such as those from a DUMMY I/O Server's device-count options, Section 4.5.2) don't appear elsewhere until you open Catalog and save once. Covered in detail in Chapter 12.
Docs: opens HSYCO's official documentation at docs.hsyco.com in a new tab.
Tunnel Utility: configures secure reverse SSH tunnels to a remote server.
The rest of this chapter covers practical configuration through Settings, geographic location, automatic backups, and introduces each tool so you know when to reach for it.
3.1 Settings Application
Settings is HSYCO's configuration center. Every system parameter, from geographic coordinates to I/O Server connections to backup schedules, lives in Settings. You used Settings in Chapter 2 to configure network interfaces and manage users. Now you'll configure two essential settings: geographic location (for sunrise/sunset calculations) and automatic backups (for data protection).
Open Settings from the Manager (Figure 12). Parameters are grouped into sections in the left navigation menu: General, Clock, Backup, Network, I/O Servers, Users, and others. Click a section to view and edit its parameters. When you press Save, HSYCO writes your changes to hsyco.ini and automatically restarts within a few seconds. The Revert button reloads the current configuration if you've made changes you haven't yet saved.
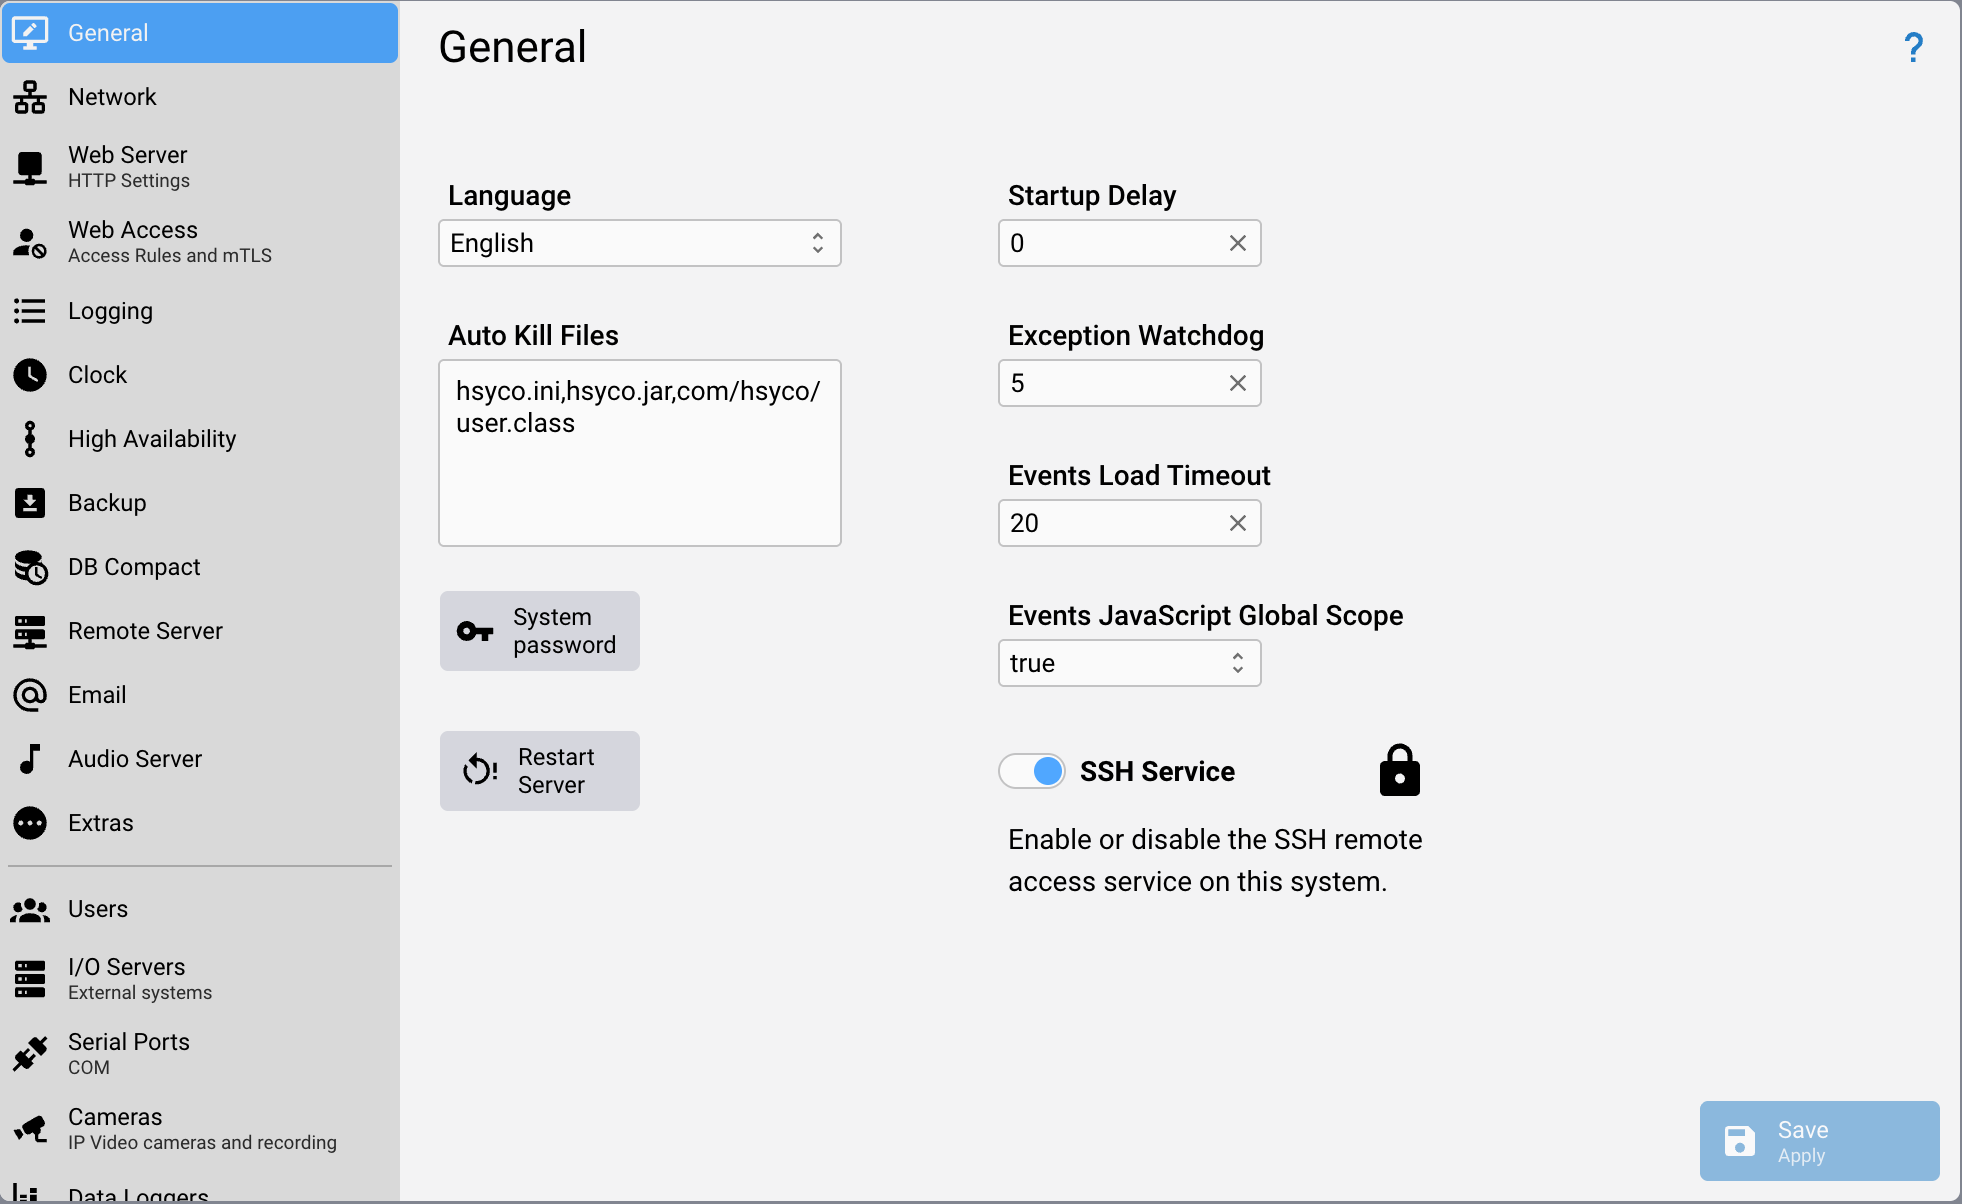
The Settings application in the Manager
You can also edit hsyco.ini directly with a text editor; it uses a simple parameter=value format. If you do, reopen Settings afterwards to ensure it reflects your manual changes.
3.1.1 Recipe: Configuring Location Settings
Your HSYCO installation needs to know where it's located to calculate sunrise and sunset times. Many automation scenarios depend on these calculations: turning on outdoor lights at sunset, opening blinds at sunrise, adjusting schedules based on day length.
Steps:
-
Open the Manager and click Settings.
-
In the left navigation menu, click Clock.
-
Set Latitude to your location's latitude in decimal degrees:
- North is positive, south is negative
- Set Longitude to your location's longitude in decimal degrees:
- East is positive, west is negative
-
Set Sunrise Offset Minutes to +20 (the default is 0).
-
Set Sunset Offset Minutes to -20 (the default is 0).
-
Click Save then Apply & restart.
Enter coordinates as decimal degrees: 45.46, not 45° 27' 36". The Sunrise Offset and Sunset Offset parameters let you fine-tune when automations trigger relative to actual sunrise and sunset. The typical values are +20 minutes for Sunrise Offset (turn off lights 20 minutes after sunrise when natural light is sufficient) and -20 minutes for Sunset Offset (turn on lights 20 minutes before sunset while there's still twilight).
Tip: Use an online mapping service to find your exact decimal coordinates.
3.1.2 Recipe: Setting Up Automatic Scheduled Backups
HSYCO can create backups automatically on monthly, weekly, daily, or hourly schedules. You configure this through Settings → Backup.
Steps:
-
Navigate to the Manager interface and click Settings.
-
Click Backup in the left navigation menu.
-
Set RootBackupDay:
-
Use
*for every day -
Use
mon,tue,wed,thu,fri,sat, orsunfor a specific weekday -
Use a number from 1 to 31 for a specific day of the month
- Set RootBackupHour:
-
Use
*for every hour -
Use a number from 0 to 23 for a specific hour
- Set RootBackupMinute (Figure 13):
- Use a number from 0 to 59
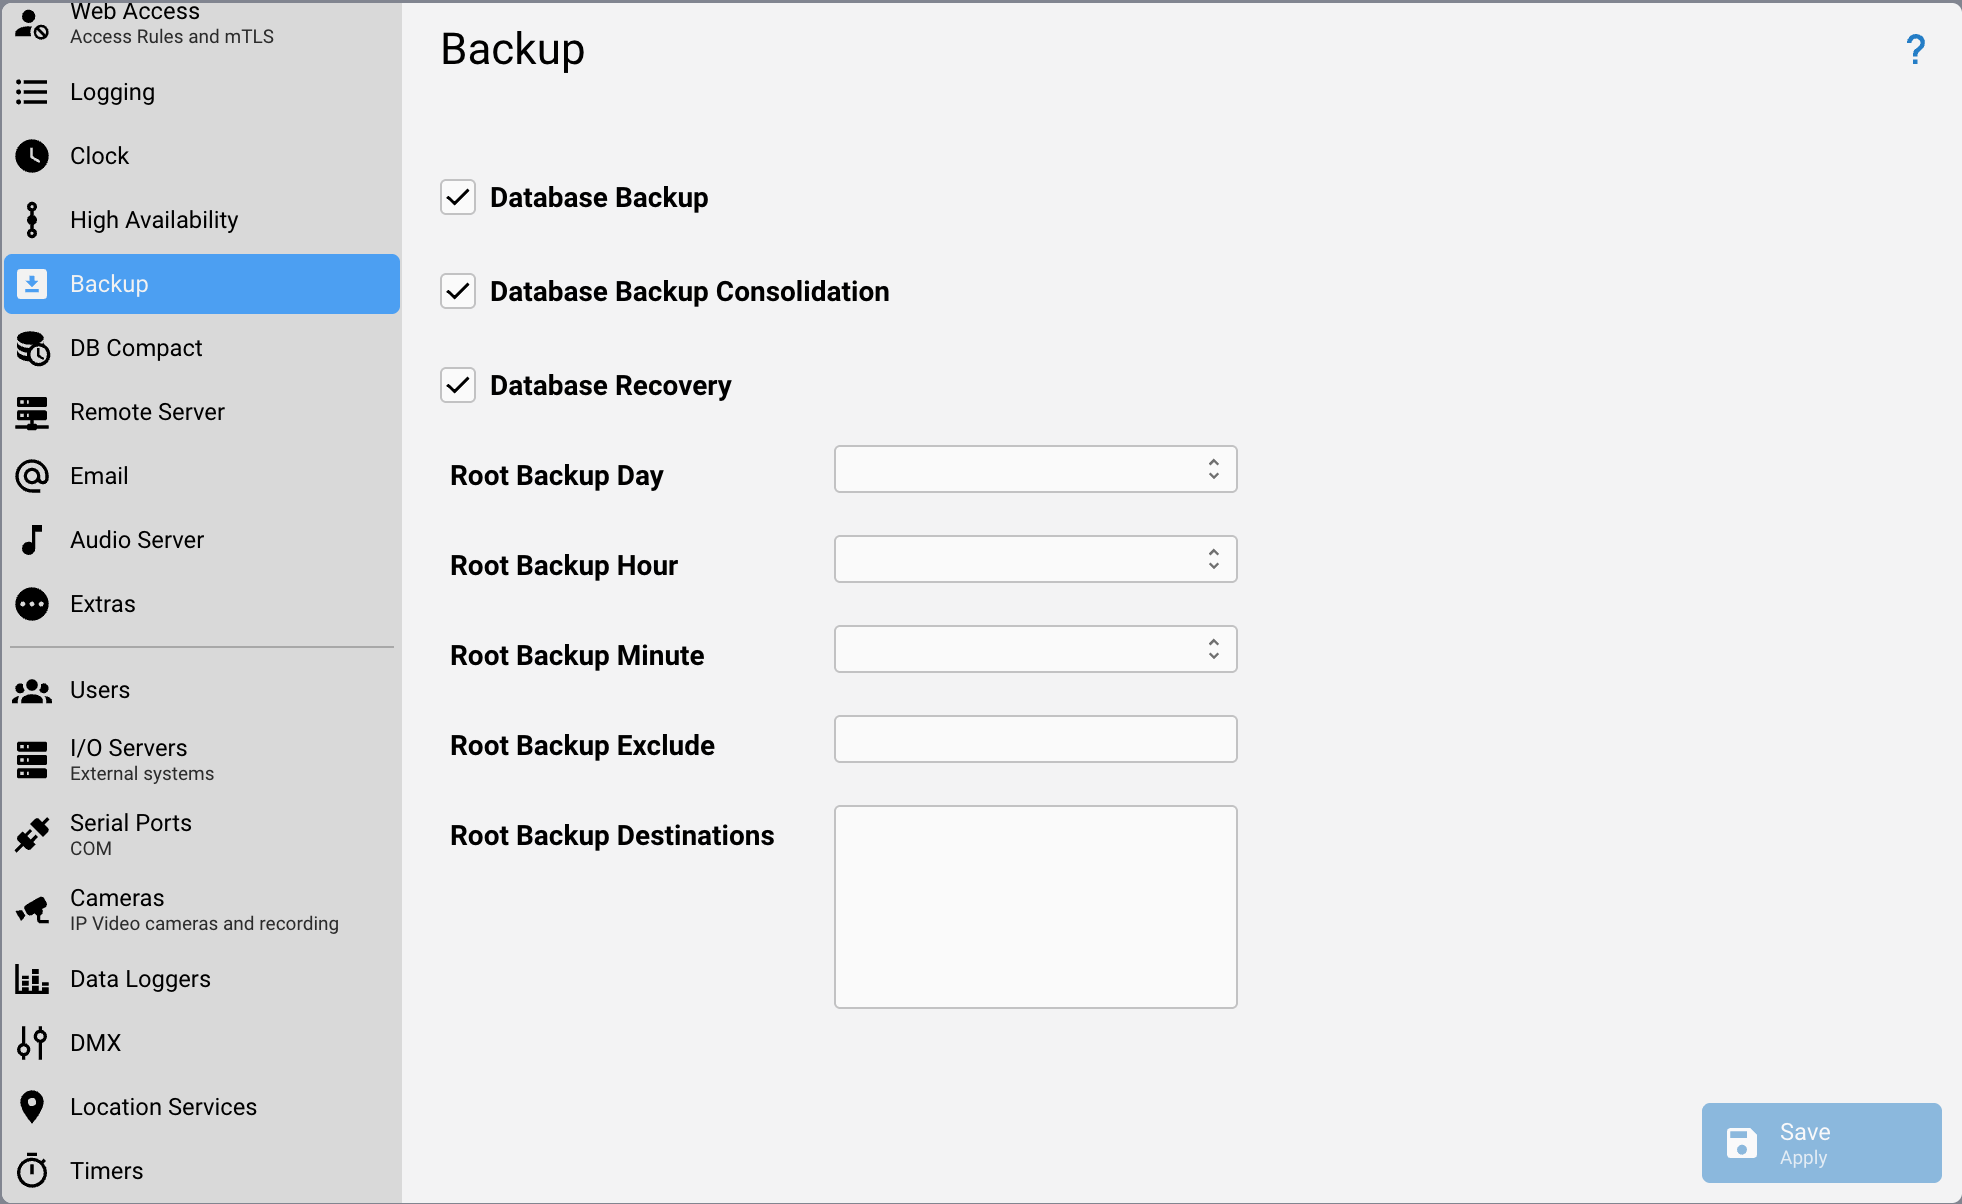
Settings → Backup: the automatic backup schedule fields
- Set RootBackupDestinations (where backups are saved):
-
For local storage: provide the absolute path (e.g.,
/backup/mybackup.zip) -
For remote SSH storage: use
scp:<login>:<password>@<host>:<port>:<path> -
You can specify multiple destinations separated by commas
-
(Optional) Set RootBackupExclude to skip certain files.
-
Check the Database Backup checkbox.
-
(Recommended) Check the Database Backup Consolidation checkbox.
-
(Optional) Check the Database Recovery checkbox for automatic recovery.
-
Click Save.
Schedule examples:
-
Daily at 1:00 AM:
RootBackupDay=*,RootBackupHour=1,RootBackupMinute=0 -
Weekly on Sunday at 3:30 AM:
RootBackupDay=sun,RootBackupHour=3,RootBackupMinute=30 -
First of each month at 2:00 AM:
RootBackupDay=1,RootBackupHour=2,RootBackupMinute=0 -
Every hour at 15 minutes past:
RootBackupDay=*,RootBackupHour=*,RootBackupMinute=15
Backup destinations (RootBackupDestinations):
HSYCO creates a single ZIP file and saves copies to all destinations you specify, separated by commas.
For local storage: use the absolute path of the destination file, for example /mnt/usb/hsyco_backup/hsyco.zip.
For remote SSH servers: scp:<login>:<password>@<host>:<port>:<path> You can use dynamic name parameters in the path:
-
%date: replaced by date and time asyyyyMMddHHmm(creates unique permanent files) -
%day: day of the month,01to31 -
%dow: day of week,mon–sun -
%hour: hour of day,00to23
Using %day, %dow, or %hour creates rolling backups where each run overwrites the previous file for that slot.
Example destination string: scp:john:mypassword1@192.168.1.201:/hsyco_backup/hsyco-office-%dow.zip,/mnt/usb/hsyco_backup/hsyco-office.zip. This saves to two locations: a remote server with day-of-week rolling filenames, and a local path that is overwritten at every backup.
Excluding files (RootBackupExclude): By default HSYCO excludes logs, motion, and hsyco.jar. If you set this parameter explicitly, include those three in your list unless you specifically want them backed up.
3.1.3 Database Backups
DatabaseBackup: when enabled, HSYCO backs up the embedded database once per day to the data_backup directory. Each backup overwrites the previous one. Don't manually copy or download the data directory while HSYCO is running, the files could be corrupted and unusable for restoration.
If the System Monitor I/O Server is enabled, the datapoints database.backup.elapsed and database.backup.time allow you to monitor the backup process and alert administrators of potential issues.
DatabaseBackupConsolidation: when enabled, HSYCO runs a separate integrity check after each backup. Only if the check passes does it zip the backup files into a single hsyco.zip in data_backup. The main advantage is protection against corruption: without consolidation, a corrupted database could produce a corrupted backup that silently overwrites the previous clean copy. The trade-off is disk space; the consolidation process needs up to four times the database size in free storage, and it is processor and I/O intensive.
If the System Monitor I/O Server is enabled, the datapoints database.backup.consolidation.elapsed, database.backup.consolidation.status, and database.backup.consolidation.time allow you to monitor the consolidation process and detect failures. database.backup.consolidation.status reports one of the following values:
| Value | Meaning |
|---|---|
done | Backup consolidation completed successfully |
error=1 | Generic execution error |
error=2 | Execution aborted, backup file not found |
error=3 | Execution aborted, not enough space available |
exception | Generic execution exception |
nospace | Not started, not enough space available |
runaway | Aborted due to a runaway script or data file |
runaway.zip | Aborted due to a runaway zip file |
stalled.post | Aborted due to a stalled script file (postprocessing) |
stalled.pre | Aborted due to a stalled script file (preprocessing) |
stalled.scripting | Aborted due to a stalled script file (scripting) |
stalled.zip | Aborted due to a stalled script file (zipping) |
Any value other than done means the consolidation failed.
DatabaseRecovery: when enabled alongside DatabaseBackup, HSYCO automatically recovers from database corruption at startup. If it detects an unrecoverable error, it renames the corrupted directory to data_original and restores from the last backup. When both DatabaseRecovery and DatabaseBackupConsolidation are enabled, an integrity failure during consolidation triggers an automatic restart to recover from the last consolidated backup.
Database Compact (DatabaseCompactDay, DatabaseCompactHour, DatabaseCompactMinute): during normal use, the database storage files slowly become fragmented with unused space and less optimized indexing. The Database Compact procedure re-optimizes both space and indexing at a scheduled time. Configure it using the same day/hour/minute format as the root backup schedule. HSYCO stops and restarts automatically at the scheduled time to run the procedure, so schedule it during low-usage hours. Don't schedule it at the same time as Root Backup.
DatabaseCompactEnable: an optional variable name. When set, the compact procedure (and the restart it triggers) only runs if that variable exists and equals 1, letting you gate it on application conditions instead of running it unconditionally on schedule.
If Database Compact is not configured, a defragmentation process still runs automatically every 24 hours, but its timing is not configurable and may temporarily degrade performance on heavily loaded systems. For this reason, if your database is heavily used, configuring Database Compact to run at least once a month at a convenient time is recommended.
If the System Monitor I/O Server is enabled and Database Compact is not configured, the datapoints database.defrag.time and database.defrag.elapsed report how long defragmentation takes and when it was last executed.
3.1.4 What Else Is in Settings:
Settings is organized into the following sections. You've already worked with several of them in Chapters 2 and 3; the rest are covered as each capability becomes relevant.
General: system-wide parameters: Language, StartupDelay, ExceptionWatchdog, EventsLoadTimeout, and the SSH system password.
Logging: log file behavior and destinations: persistentLog, userLog, eventsLog, verboseLog, LogMaxAge, securityLogDailyFiles, SysLogServerPort, DatabaseTransactionLog.
Clock: time zone, NTP configuration, and geographic coordinates (Latitude, Longitude, SunriseOffsetMinutes, SunsetOffsetMinutes). Configured in this chapter.
Backup: automatic root backup schedule and destinations (RootBackupDay, RootBackupHour, RootBackupMinute, RootBackupDestinations, RootBackupExclude) and database backup settings (DatabaseBackup, DatabaseBackupConsolidation, DatabaseRecovery). Configured in this chapter.
DB Compact: scheduled database compaction (DatabaseCompactDay, DatabaseCompactHour, DatabaseCompactMinute). Configured in this chapter.
High Availability: configuration for redundant master/slave HSYCO server pairs.
Network: Ethernet and Wi-Fi interface configuration. Configured in Chapter 2.
Web Server: HTTP/HTTPS port settings, URLKey, SSL certificate configuration including ZeroSSL automatic renewal.
Web Access: trusted network ranges, authentication timeouts, access control.
I/O Servers: enable and configure I/O Servers to connect HSYCO to field devices. Each protocol (KNX, Modbus, BACnet, and others) has its own entry. Covered in the I/O Servers chapters.
Users: user accounts, PINs, PUKs, and project access permissions. Configured in Chapter 2.
Serial Ports: configure serial communication ports for devices connected via RS-232 or RS-485.
Cameras: IP camera integration, recording settings, and camera grids. Covered in Chapter 13.
DMX: DMX-512 gateway configuration.
Data Loggers: historical data recording for trend charts and CSV export.
Location Services: Wi-Fi access point zones, iBeacon proximity, and geographic location zones.
Timers: define named timers that can be referenced in EVENTS rules.
Email: SMTP settings for email notifications and alerts.
Audio Server: text-to-speech engine and audio playback defaults (AudioServerTTS, AudioServerVolume, AudioServerQuality, AudioServerSpeed).
Remote Server: configuration for HSYCO server-to-server communication via the HSYCO Remote I/O Server.
Extras: non-standard, application-specific parameters saved in hsyco.ini.
3.2 Status Browser
Status Browser shows the real-time status of data points, user interface attributes, variables, UI sessions, and data sources from your HSYCO system.
Open the Manager and click Status Browser (Figure 14). The application opens with tabs for Data Points, Devices, UI Attributes, and Variables.
Data Points Tab
The Data Points tab displays real-time values from all connected I/O Servers. Each device state or sensor reading becomes a datapoint in HSYCO: a KNX light switch, a Modbus temperature sensor, a BACnet thermostat. Status Browser shows these datapoints with their current values and timestamps indicating when each value last changed.
The list updates in real time as devices change state. You can pause the real-time update and filter the list by datapoint name. When you configure I/O Servers in Chapter 4, you'll use this tab constantly to verify communication is working.
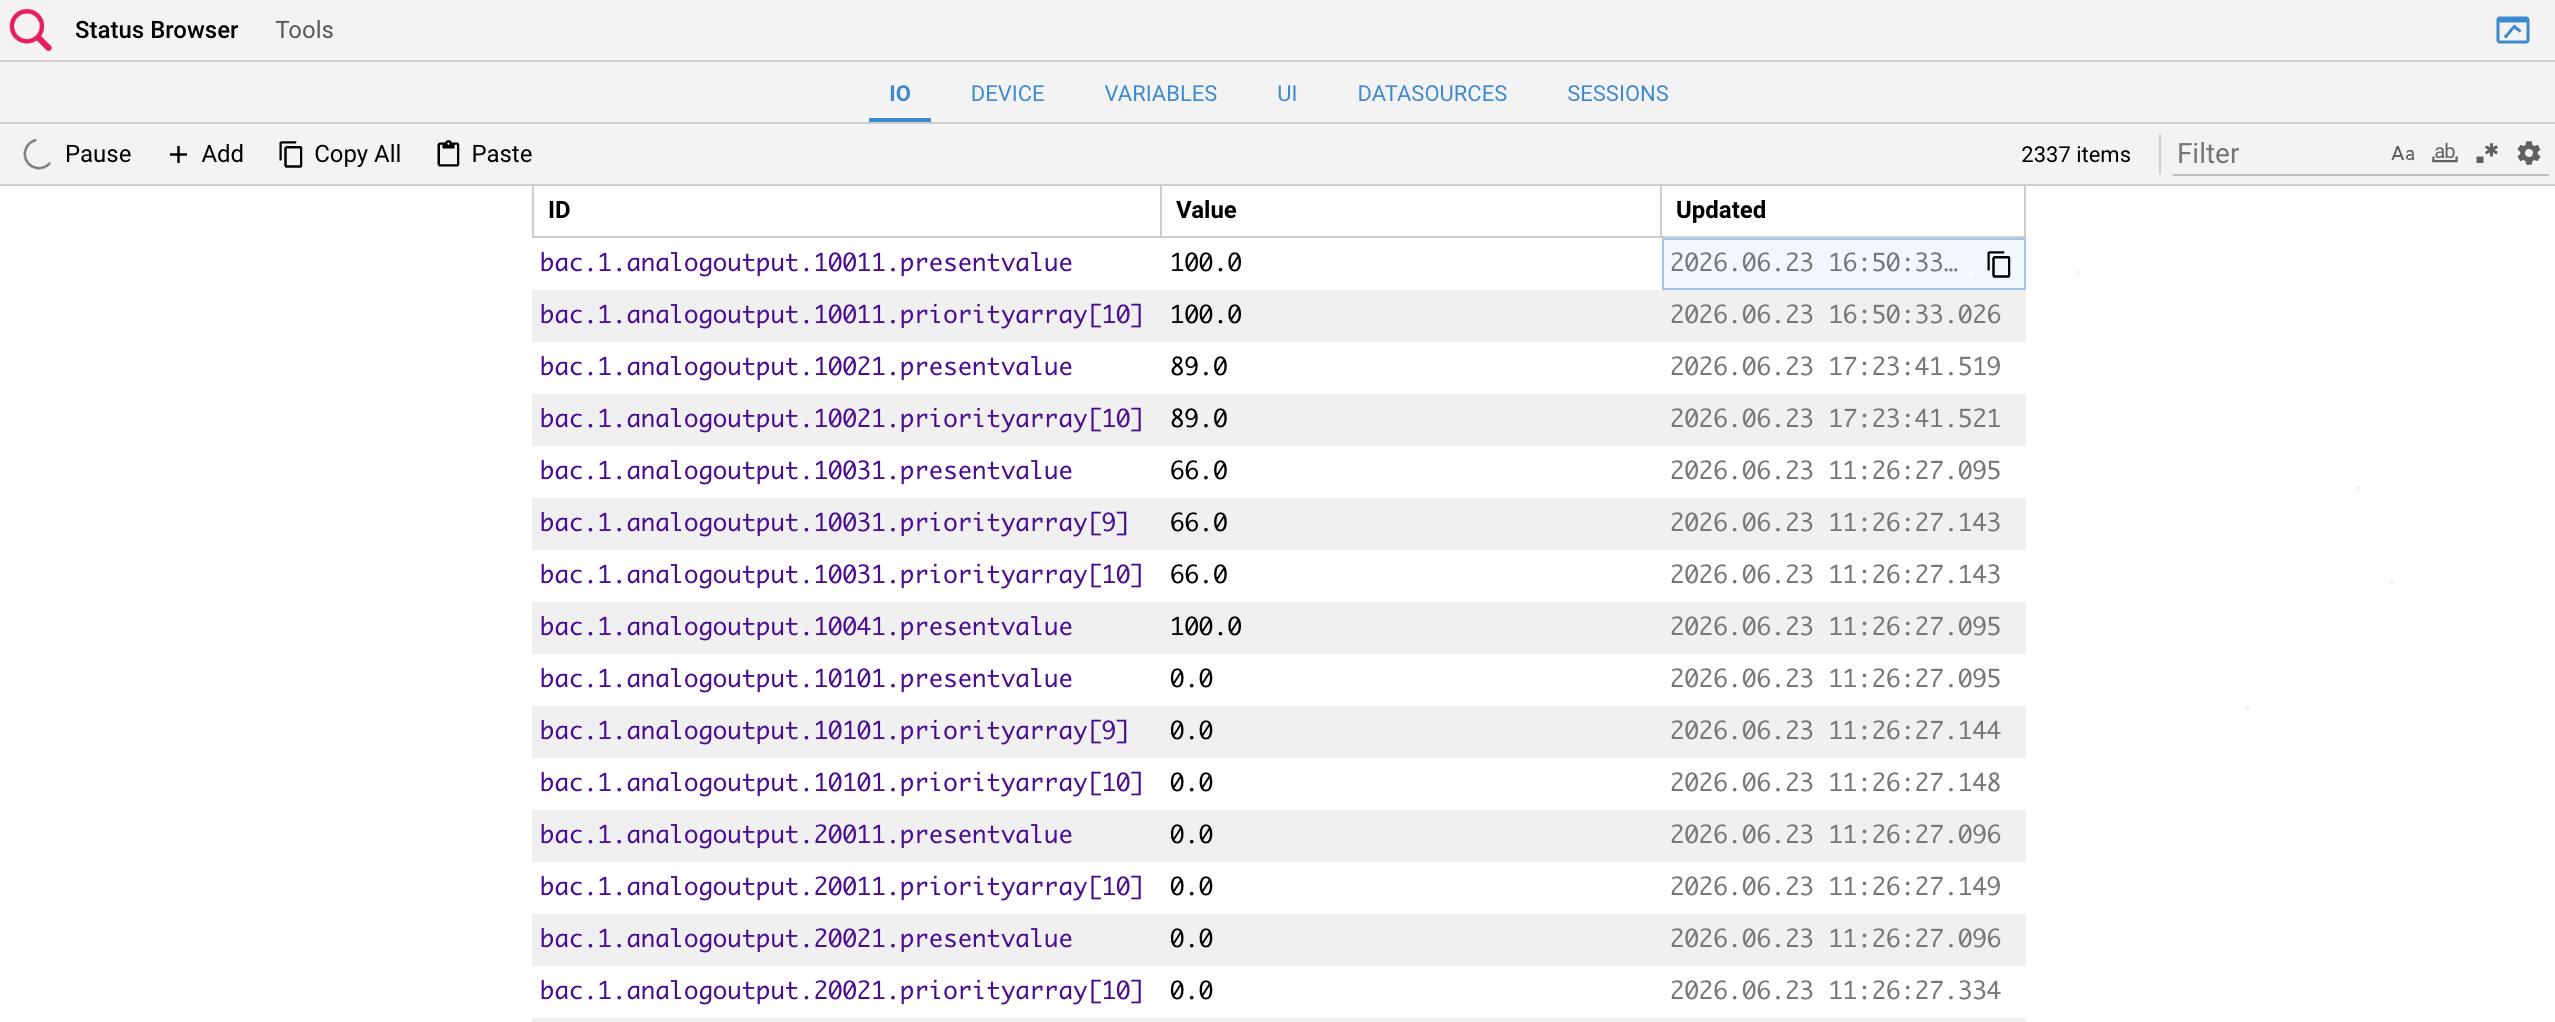
The Status Browser showing the Data Points tab
Variables Tab
The Variables tab shows all volatile and persistent variables used by EVENTS, JavaScript, and Java. When you write automation rules in Chapter 6, you'll check this tab to verify variables have the values you expect. If an automation rule isn't working, checking variable values often reveals the problem.
UI Attributes Tab
The UI Attributes tab displays all user interface IDs and attributes with values that have been set with UISET commands. When you build user interfaces in Chapter 5, you'll use this tab to troubleshoot display problems: if something shows the wrong value on screen, check here to see what value HSYCO is actually sending.
To view session-specific attributes, open a tab or window in the same browser where you are using the Manager, then enable the Show session data checkbox in Status Browser. This shows both global and session data for that tab.
Devices Tab
The Devices tab shows the status of all UI objects managed by I/O Servers: lights, dimmers, shutters, and automation devices. Many I/O Servers automatically populate this tab by calling deviceSet() for each device they discover.
3.3 File Manager
File Manager gives you access to HSYCO's file system through your web browser, upload images, edit configuration files, download logs, organize project resources, all without leaving the Manager or using SSH.
Working with Files
You can download individual files or entire directories as ZIP files. The built-in text editor opens directly when you click any text file, letting you edit hsyco.ini, EVENTS code, or configuration files without downloading them.
Note: If HSYCO updates a file you're editing, File Manager warns you. Don't reload the new version if you have unsaved changes; you'll lose your edits.
Files and directories starting with the ~ character are skipped when downloading directories or creating backups. Use ~ as a prefix for temporary files or work-in-progress files you don't want included in backups.
Live Log View
File Manager includes a small live log view window. Activate it while editing files to watch log messages in real time, extremely useful when modifying EVENTS code or configuration files and you want immediate feedback.
Upgrading HSYCO
Upload a new hsyco.jar file to the root directory, and HSYCO automatically restarts with the new version. You can also manually restart HSYCO by selecting the hsyco.jar file and pressing the restart hsyco button in the right panel.
Searching Files
The search tool finds text within file contents and file names. Use case-sensitive search for exact matches. Enable regular expressions for advanced pattern matching. Options include searching for any word, exact phrase, or all words in any order.
3.4 Code Editor
Code Editor is where you write EVENTS automation code, JavaScript, and any other text-based file in your HSYCO installation (Figure 15). Open the Manager and click Code Editor. A welcome screen lets you open an existing file or create a new one.
Supported File Types
Code Editor works with text-based files: .txt, .ini, .xml, .json, .hsm, .log, .js, .java, .csv, .html, .md, and .css. Use it for EVENTS code (the events file), JavaScript, configuration files like hsyco.ini, and any text file in your project. While File Manager can edit text files, Code Editor provides features specifically for code: syntax highlighting, code assist, find/replace, integrated log preview.
Editor Features
The tool menu in the upper right corner provides features that make writing code easier:
Toggle Comment: Comment or uncomment selected lines. Useful when testing code by temporarily disabling sections without deleting them.
Code Assist: Shows documentation and real-time status of variables and datapoints as you type. When you reference a datapoint in your code, Code Assist shows its current value. When you use an EVENTS function, Code Assist displays documentation.
Find/Replace: Search for text and replace it with different text. Essential when renaming datapoints or variables throughout your code.
Log Previews: Opens Log Viewer on the right side of the screen. Watch log messages appear in real time as you edit code: you see immediately if your changes cause errors.
Show in File Manager: Opens File Manager to the folder containing the current file. Quick access to related files or resources.
Help: Opens HSYCO documentation.
The EVENTS Files
EVENTS code can be written in multiple text files. The primary file is events.txt in the main HSYCO directory. You can also place any .txt file in the events subdirectory, all files there are loaded as EVENTS. Plugins have their own events subdirectory and can define additional EVENTS files independently.
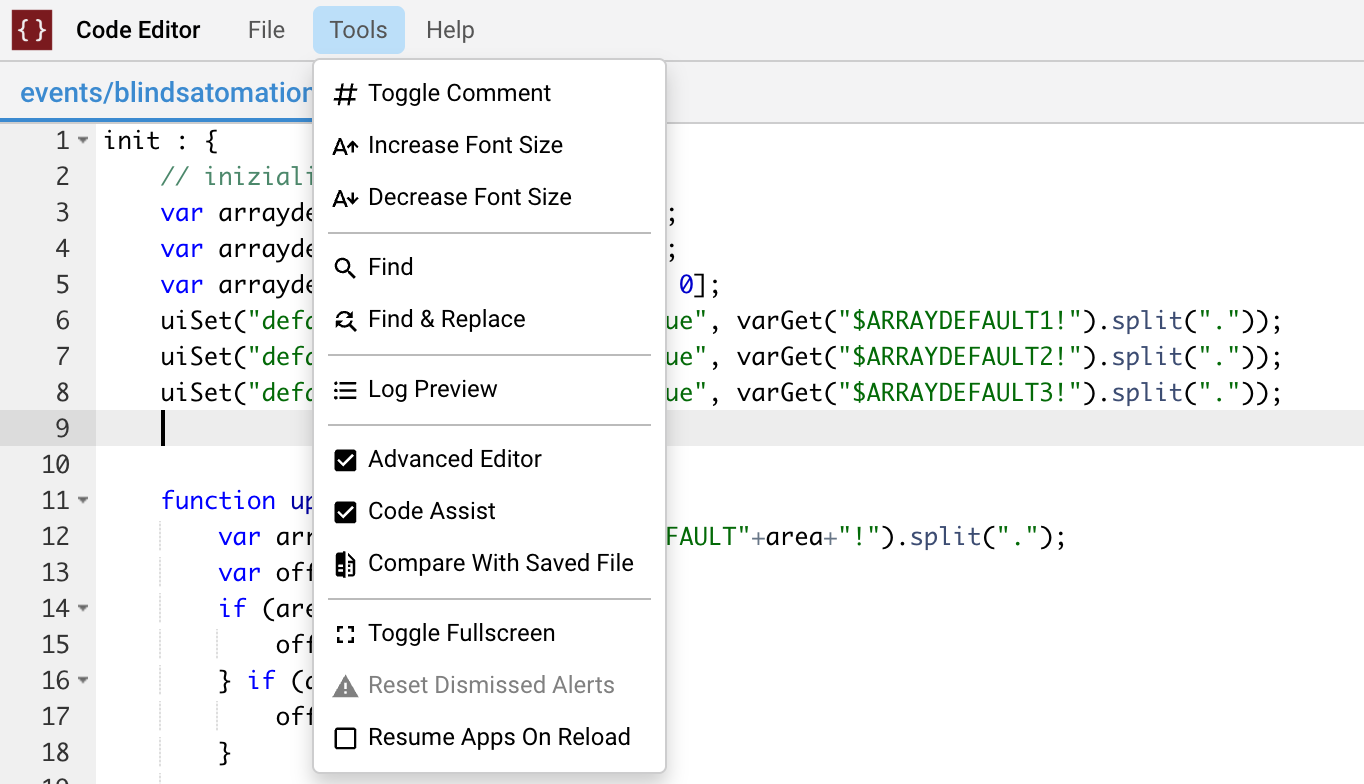
The Code Editor
When you save an EVENTS file, HSYCO automatically checks it and, if errors are found, a warning icon appears in the top bar. Errors are also written to the log file. Lines containing errors are ignored.
Chapter 6 covers EVENTS syntax, structure, and programming in detail. This section introduces Code Editor so you understand where automation code lives and what the editor provides when you're ready to start programming.
3.5 Log Viewer
Log Viewer shows a scrollable live view of the last 1000 lines from today's log file, updating in real time as new messages appear (Figure 16). Open the Manager and click Log Viewer.
3.5.1 Log Levels
Four log level buttons control which types of messages appear: Verbose, Events, User, and Http. Toggle them on or off to show only the message types you need. You can temporarily change log levels here without modifying hsyco.ini.
Note: Changing log levels in Log Viewer also affects what other users see in their Log Viewer, and what is actually written to the log file. Log level settings return to the preset configuration when you leave Log Viewer.
3.5.2 Controls
Pause: stops updating the viewer so you can read messages. New messages are still written to the log file; they just don't appear until you unpause.
Copy All: copies all visible log lines to your clipboard as plain text.
Clear: clears the log window. The log file itself is not affected.
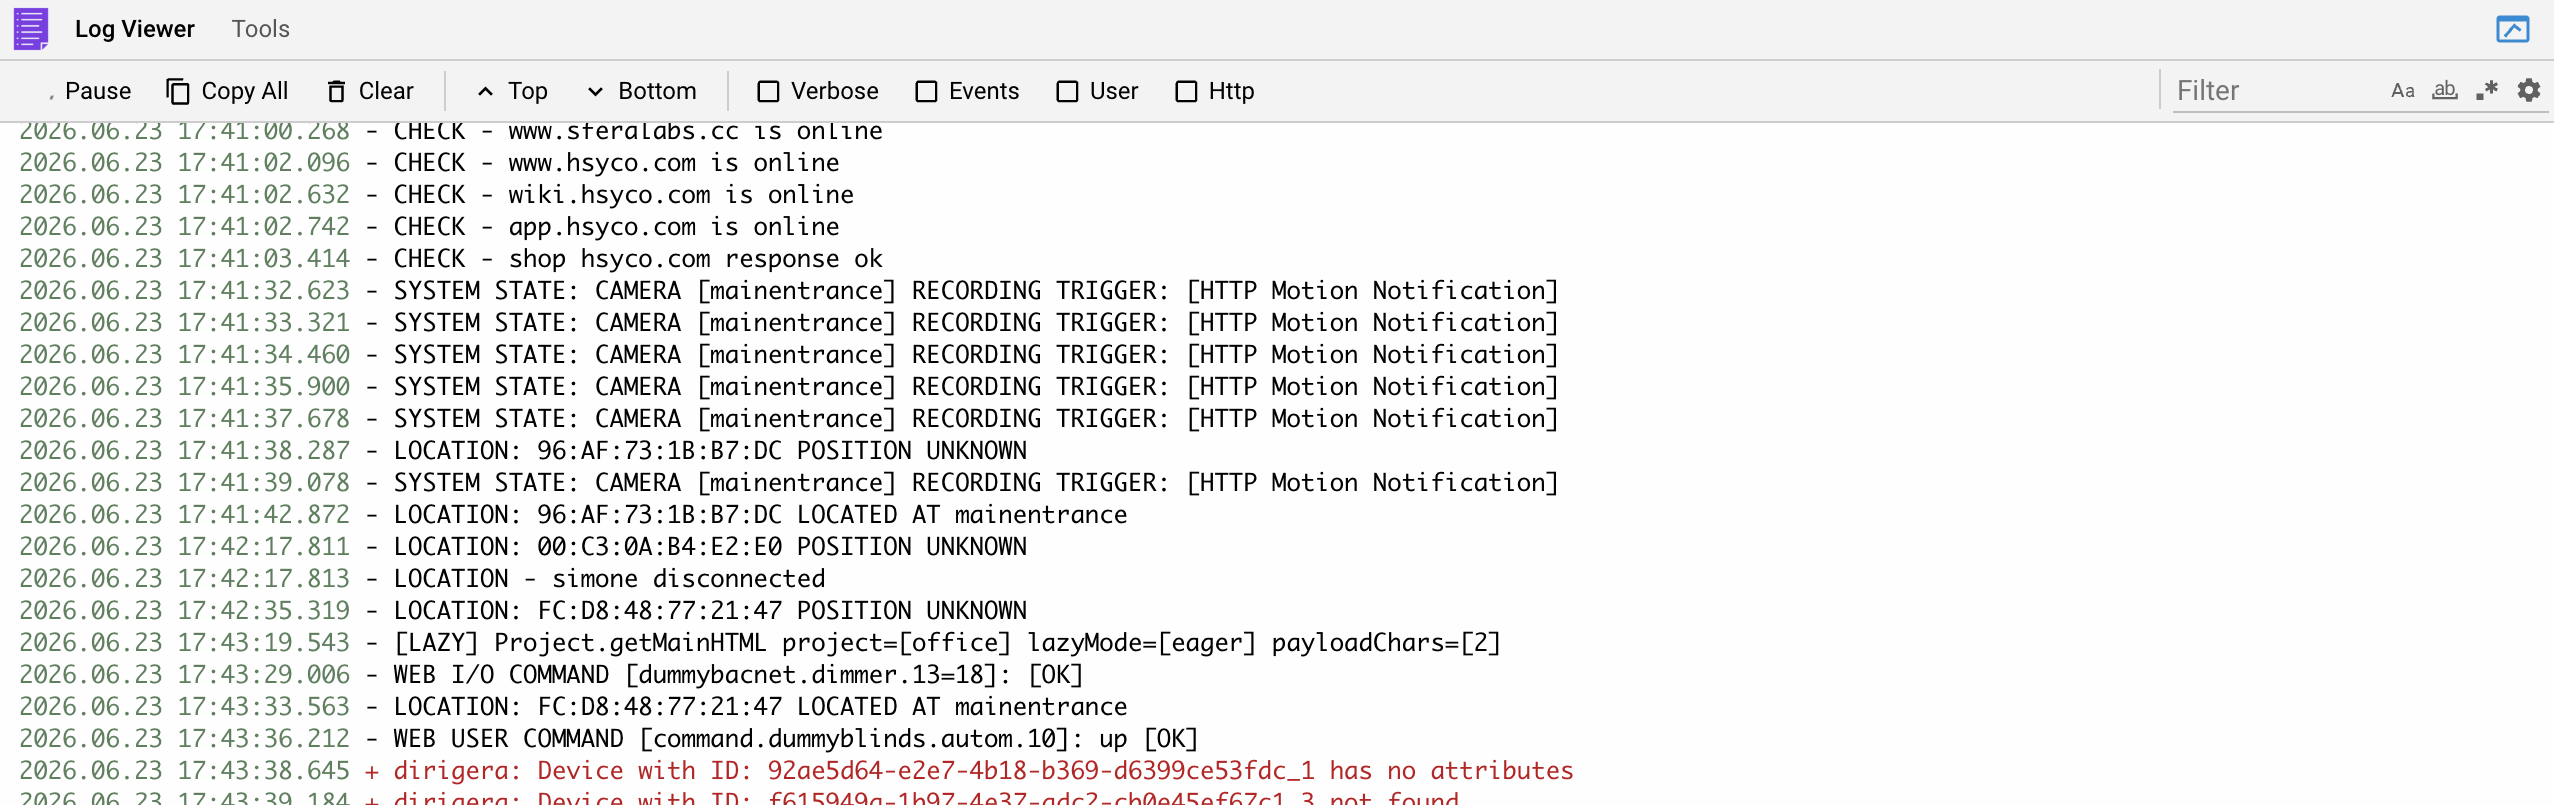
The Log Viewer
Top: scrolls to the first log line.
Bottom: scrolls to the last log line.
3.5.3 Filtering Messages
Type text in the filter field to show only matching log lines. Type multiple words to show lines containing at least one of those words. Enclose words in quotes to match the complete phrase, quotes can be escaped with a backslash.
Aa: case-sensitive filtering.
ab: match whole word only.
.*: enables regular expressions for advanced pattern matching.
Any Word: toggles between searching for any individual word and searching for the complete phrase.
Inverse: shows every log line except those matching your filter.
Search In: specifies whether to search in Date and Time, Message, or Error logs.
Reset options: clears all filter settings.
3.5.4 Logging Configuration
By default, HSYCO writes a daily log file to the logs/ directory. On servers with limited storage, or SSD storage with limited write cycles, you may prefer to keep logs in memory only, visible through Log Viewer but never written to disk.
You control this through Settings → Logging:
persistentLog (default: true): when set to false, message and error logs are not written to files and are only visible in Log Viewer. Set to true to write daily log files to the logs/ directory.
userLog (default: false): when set to true, logs commands and events from the EVENTS programming environment and Java.
eventsLog (default: false): when set to true, logs events received from field devices, such as I/O Server events.
verboseLog (default: false): when set to true, enables extended logging useful for debugging and development. Because verbose logging writes a high volume of data to disk, enable it only when needed and disable it again once you've finished debugging.
LogMaxAge (default: 0): when set to a positive integer, log files older than that number of days are automatically deleted. When 0 or not set, log files are never automatically deleted.
Tip: If your HSYCO server uses flash or SSD storage, consider setting persistentLog = false to reduce write cycles. Enable userLog, eventsLog, or verboseLog temporarily when troubleshooting, then disable them once you're done. verboseLog in particular writes a high volume of data and should not be left on permanently.