Chapter 1: Introduction
Building automation systems have traditionally required extensive programming knowledge and specialized technical expertise; HSYCO changes that equation by providing a unified platform that integrates diverse systems while remaining accessible to users without programming backgrounds. This chapter introduces you to what HSYCO is, how it works, and what you can accomplish with it.
1.1 What is HSYCO
HSYCO is a building automation framework that runs on a dedicated server, serving as the central integration point for lighting, HVAC, security, blinds, cameras, and other building systems. Beyond building automation, HSYCO can integrate with external software and enterprise systems, ERPs, databases, custom applications, through its API, making it a flexible integration platform for complex installations. Despite its name suggesting residential use, HSYCO is deployed across both residential and commercial installations, from single-family homes to office buildings, hotels, and industrial facilities.
HSYCO distinguished itself from traditional building management systems through its flexibility and accessibility. Rather than locking you into proprietary hardware or requiring extensive programming for customization, HSYCO provides a platform that works with existing industry-standard protocols while offering tools that don’t require coding expertise.
1.1.1 Three Primary Use Cases
HSYCO operates in three distinct modes, which can be used independently or in combination:
Supervisory Interface: HSYCO monitors and controls field devices across multiple systems, presenting a unified view of building status and providing centralized control through custom interfaces accessible from any web browser or mobile device.
Protocol Gateway: HSYCO translates between different automation protocols, enabling systems that normally cannot communicate to work together. A KNX button can control a Modbus device, a BACnet sensor can trigger Z-Wave actions, and so on.
A Development Environment (With or Without an End-User Interface): HSYCO provides visual tools and a simplified programming language (EVENTS) for creating custom automation logic and user interfaces tailored to specific installation requirements. Advanced developers can also use JavaScript or Java for complex logic, though this book focuses exclusively on EVENTS programming.
1.1.2 The HSYCO Approach
HSYCO works with existing field systems through protocol-specific I/O servers, software drivers that handle communication with different automation standards. These standards include protocols like KNX (lighting and building controls), Modbus (industrial equipment), BACnet (building automation) and many proprietary systems. Each protocol is simply a set of rules for how devices communicate; you'll learn about the most common protocols in Chapter 10. You don't replace existing equipment; rather, you add HSYCO as a supervisory layer that integrates and extends functionality.
The platform emphasizes accessibility through two key tools: the Project Editor (a visual, drag-and-drop interface designer) and EVENTS (a simple, declarative programming language designed specifically for building automation logic in HSYCO). Creating a button to control a light requires dragging a button object onto a page and setting its data point property. Writing an automation rule to turn on lights when motion is detected is one line:
IO knx.1/1/1 = 1: IO knx.light.1 = 1
1.1.3 A practical Integration Scenario
Consider an office building with these existing systems:
-
A lighting control system
-
HVAC (heating and cooling) controllers
-
IP cameras for security
-
A building management system monitoring energy and environmental conditions
Without integration, facilities managers interact with four separate interfaces, each with distinct interaction patterns and capabilities. Cross-system automation, such as preparing a conference room when it’s booked, requires custom programming across multiple platforms, if it’s possible at all.
HSYCO integrates these systems by:
-
Adding I/O Servers for each protocol, as in software modules that translate between HSYCO and each system type.
-
Automatically discovering devices or configuring them through simple settings.
-
Creating a unified interface presenting all systems on one screen.
-
Implementing cross-system automation with straightforward EVENTS rules.
The resulting interface runs in standard web browsers, accessible from desktop computers, tablets, smartphones, and wearable devices (Apple Watch). Changes to interfaces or automation logic take effect immediately without requiring application updates or software installation on client devices.
1.2 HSYCO Architecture Overview
Think of HSYCO as a stack of layers and services, each handling a different part of the system. You work at whatever level makes sense for what you're trying to do, and the layers below take care of themselves.
1.2.1 The Three-Layer Architecture
HSYCO’s architecture consists of three primary layers, each with distinct responsibilities:
The Drivers Layer manages all communication with external systems. This layer contains I/O Servers, protocol-specific drivers that handle low-level communication with field devices. Each I/O Server implements a specific protocol: the KNX I/O Server communicates using the KNX protocol (an open, international standard for building automation), the Modbus I/O Server implements Modbus TCP/IP or RTU (widespread in industrial controls), and so on. The specific protocols are covered in detail in Chapter 10.
When a device changes state, a light is pressed or a temperature sensor reports a new reading, the appropriate I/O Server detects this change and passes it to the core layer. Similarly, when HSYCO needs to control a device, commands flow down through the I/O Server, which translates them into protocol-specific messages.
The Core Services Layer is HSYCO’s central processing engine. It maintains the current state of all systems through the State Data Engine, which stores real-time values for all data points. The Events Engine monitors for state changes and triggers configured automation rules when conditions are met.
The core also provides essential services including:
-
Timers and schedulers for time-based automation
-
Database services for data logging and historical analysis
-
Clock and astronomical calculations (sunrise, sunset, sun position)
See the architecture diagram below for a complete overview of all core services (Figure 1).
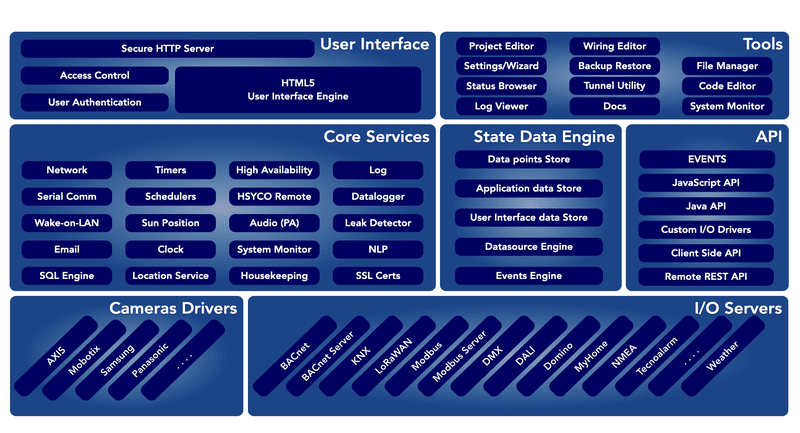
HSYCO's three-layer architecture: Drivers, Core Services, and User Interface
The User Interface Layer encompasses all user-facing components: web-based interfaces created with the Project Editor, mobile applications and any custom interfaces. The UI layer reads data from the core to display current states and sends commands to the core in response to user interactions. All connected interfaces receive real-time updates when device states change.
1.2.2 Data Points and State Representation
HSYCO represents devices states and values through data points; each data point has a name and a value. The naming convention typically reflects the protocol and device type.
Examples of data point naming:
-
A light actuator:
k.light.33with value1(on) or0(off) -
Temperature sensor:
temp.officewith value21.5(degrees Celsius) -
Blind controller:
blind.mainwith valuesup,down, orstop
Data point names follow protocol-specific conventions. For example, devices using the KNX protocol typically use the prefix k. followed by addressing information (thus k.light.33 for a KNX light). Modbus devices use the I/O Server name as a prefix. You’ll learn the specific naming conventions for each protocol when we cover I/O servers in detail.
When you create user interfaces or write automation rules, you reference these data point names. The system automatically updates displays and evaluates rules when data point values change.
1.2.3 Information Flow Example
Tracing a typical operation illustrates how the layers interact. When someone presses a physical light switch (in this example, we'll use a KNX system, one of the protocols you'll learn about in Chapter 10):
-
The device transmits a message on the communication bus.
-
The appropriate I/O Server (Drivers Layer) receives and interprets the message.
-
The I/O Server updates the corresponding data point (e.g.,
k.light.33) to value1. -
The State Data Engine (Core Layer) records this state change.
-
The Events Engine evaluates all EVENTS rules to determine if any respond to this change.
-
If a rule exists (e.g.,
IO k.light.33 = 1 : IO k.light.34 = 1), the Events Engine executes the specified action. -
The command flows back through the Drivers Layer via the I/O Server.
-
The target device (data point
k.light.34) receives the command and responds. -
All connected user interfaces automatically update to reflect both state changes.
This entire sequence completes in milliseconds, providing users with effectively instantaneous response.
1.2.4 The Manager Toolkit
System configuration and administration occurs through the Manager, a web-based toolkit accessible at https://192.168.1.50/hsycoserver/manager (or your server’s actual IP address). The Manager requires authentication with an administrator PIN and PUK.
The Manager provides several key applications:
Settings: Configure I/O Servers, network parameters, user accounts, and system-wide options. This is where you establish connections to field systems.
Backup/Restore/Update: Create complete system backups, restore from previous backups, and install HSYCO software updates.
Project Editor: Visual interface designer using drag-and-drop paradigm for creating user interface projects.
File Manager: Direct file system access for uploading resources, downloading backups, and managing files.
Code Editor: Text editor with syntax highlighting for editing EVENTS files and other configuration files.
Status Browser: Real-time monitor showing current values for all data points, essential for testing and troubleshooting.
Initial work typically focuses on Settings (configuring I/O Servers and system parameters) and the Project Editor (building user interfaces). As familiarity develops, the Code Editor becomes the primary tool for automation logic development.
1.3 Event-Driven Architecture Explained
HSYCO’s event-driven architecture responds to changes in state rather than continuously polling devices for status updates. This approach provides both efficiency and responsiveness.
1.3.1 Understanding Events
An event represents a change in system state. Events occur when lights turn on or off, temperature sensors report new readings, the sun rises or sets, timers expire, or users interact with interfaces. Any change that HSYCO can detect generates an event.
HSYCO maintains complete awareness of building state through the State Data Engine. When any data point value changes, HSYCO generates an event. The Events Engine immediately evaluates all confirmed automation rules to determine if any respond to this specific change.
When a rule’s conditions match the current state, HSYCO executes the associated actions automatically. This evaluation and execution occurs continuously in real-time, typically completing within milliseconds of the triggering event.
1.3.2 The EVENTS Programming Language
EVENTS provides a declarative language for defining automation behavior. The fundamental syntax is straightforward:
Event : action
This format describes what to monitor (the event) and what to do when it occurs (the action).
Basic Examples: - Activate a light at sunset:
NIGHT : IO k.light.3 = 1
- Deactivate multiple lights at sunrise:
DAY : IO k.light.3 k.light.4 k.light.5 k.light.6 = 0
- Respond to motion detection:
IO motion.hallway = 1 : IO lights.hallway = 1
Conditional Logic: EVENTS supports logical operators (AND, OR, NOT) for complex conditions:
IO motion.detected = 1 AND IO daylight.sensor < 50 : IO lights.entrance = 1
This rule activates entrance lights only when motion is detected AND ambient light levels fall below 50.
Multiple Actions: Single events can trigger multiple actions:
NIGHT : IO k.light.3 = 1, IO k.light.4 = 1, IO k.light.5 = 1
At sunset, this rule activates three separate lighting circuits.
1.3.3 Event Types
HSYCO recognizes multiple event categories:
Time-Based Events:
-
DAY:sunrise (calculated based on geographic coordinates) -
NIGHT:sunset -
TIME:specific clock times or intervals
System Events:
-
INIT:HSYCO startup completion, and every time you save an EVENTS file -
HSYCOSTART:HSYCO initialization (occurs once at startup)
User Interface Events:
-
Button presses
-
Slider adjustments
-
Custom user commands
Automation Events:
-
Timer expirations
-
Scheduler activations
-
Variable value changes
-
Data point state changes
This variety enables automation based on virtually any detectable condition or combination of conditions.
1.3.4 Practical Implications
The event-driven model aligns with natural thinking about automation: when this happens, do that. Rather than writing programs with loops, conditional branches, and state management, you describe desired behavior in declarative terms.
EVENTS files reload automatically when saved; there’s no compilation step, no server restart required (in most cases), no deployment process. The development cycle is: edit, save, test. This rapid iteration facilitates experimentation and refinement.
1.4 What You Can Do Without Programming
HSYCO provides substantial functionality without requiring traditional programming knowledge. The visual tools and EVENTS language handle the majority of automation and interface requirements for typical installations.
1.4.1 Visual User Interface Development
The Project Editor operates as a drag-and-drop tool running in your web browser. Interface development follows this workflow:
-
Create a new project in the Project Editor.
-
Add pages (landscape or portrait orientation).
-
Drag UI objects from the palette onto pages.
-
Position and resize objects visually.
-
Configure object properties through forms in the right panel.
-
Save and test the interface in a browser.
Common UI Objects:
Button: Flexible control object that can be configured multiple ways:
-
Connect to a datapoint for On/Off device control (button displays state, sends commands)
-
Send a USER event to trigger automation rules and EVENTS actions
-
Act as a link to navigate to pages or popups
Slider: Continuous value control for dimmers and analog devices. User adjustments translate directly to device commands.
Thermostat: Temperature display and set point adjustment with built-in control logic for HVAC systems.
Chart: Historical data visualization showing trends over time for any logged data point.
Camera: Live video feed embedding with support for recording and playback (Chapter 13).
Text and Label: Information display, status indicators, and current value presentation.
Each object has configurable properties, data point associations, colors, sizes, labels, behaviors, all set through simple forms without coding.
1.4.2 EVENTS-Based Automation
The EVENTS language handles common automation scenarios with straightforward syntax:
Occupancy-Based Lighting:
IO sensors.motion = 1 : IO lights.hallway = 1,
PROGRAMTIMER hallway.off = RESET 600
PROGRAMTIMER hallway.off : IO lights.hallway = 0
Lights activate on motion detection and automatically deactivate after 10 minutes (600 seconds).
Temperature Management:
IO sensors.occupied = 0 : IO hvac.setpoint = 16
IO sensors.occupied = 1 : IO hvac.setpoint = 21
HVAC setback when spaces are unoccupied, normal operation when occupied.
Solar Control:
IO sensors.brightness > 5000 : IO k.autom.1 = DOWN
DAY : IO k.autom.1 k.autom.2 = UP
Automated blind control based on brightness levels and time of day.
Scene Activation:
IO contacts.leaving = 1 : IO k.light.1 = 0,
IO hvac.setpoint = 16, IO alarm.system = 1
Single button press executes a complete “leaving home” sequence.
1.4.3 I/O Server Configuration
Connecting HSYCO to field systems requires configuration rather than programming:
-
Access Manager → Settings → I/O Servers.
-
Click the add button.
-
Select the appropriate I/O Server type.
-
Complete the configuration form (IP addresses, port numbers, device IDs).
-
Save the configuration.
The Manager provides protocol-specific forms with labeled fields explaining each parameter. Once configured and connected, HSYCO either automatically discovers devices (if supported by protocol) or you define data points through simple configuration files.
1.4.4 Included Functionality
HSYCO includes built-in features requiring no additional software or licensing.
Automation and scheduling — features that control your building over time:
Schedulers: Define time-based schedules using a calendar-based interface for lighting control, HVAC setback, and automated scene activation.
Timers: Delay action execution or trigger events after specified intervals using simple EVENTS syntax.
Data Logging: Automatic logging of datapoint values to the embedded database, with historical data accessible through chart objects.
System and administration — features for managing the server itself:
User Management: Create user accounts, define access levels, and specify page visibility per user.
Camera Integration: Video feed integration through configuration settings, supporting live view, motion detection, and scheduled recording. Cameras have their own chapter, Chapter 13.
Backup and Restore: One-click backup creation through the Manager, with straightforward restoration when needed.
1.5 Hardware Requirements and Licensing
HSYCO runs on dedicated server hardware. Understanding the options and their capabilities helps you select the right server for your installation requirements.
HSYCO is fully supported on Linux with a Java 8 or Java 11 Virtual Machine. Microsoft Windows is not supported for production use; it runs with limitations only in development environments, through Eclipse.
1.5.1 HSYCO SERVER Product Line
HSYCO Srl offers pre-configured servers with HSYCO pre-installed on industrial-grade hardware. These systems ship ready for deployment, connect power and networks access the Manager interface, and begin configuration.
HSYCO Pi Family
The Pi family uses Raspberry Pi hardware in industrial DIN-rail enclosures suitable for residential and small commercial installations:
Pi Base: Entry-level server with Raspberry Pi 3 Model B+ (1GB RAM) or Raspberry Pi 4 (2GB/4GB/8GB RAM), industrial microSD card storage, RS-232/RS-485 serial port (either RS-232 or RS-485, not both simultaneously).
Pi UPS: Pi Base specification with integrated battery backup for power failure protection.
Pi CM: Pi CM: Compact Raspberry Pi Compute Module-based design with only 2 DIN rail modules. Ideal for space-constrained installations.
Pi CM Duo: Dual Compute Module with 2 industrial SD cards. If one card fails, the second automatically assumes operation.
All Pi models include:
-
Pre-installed Raspberry Pi OS
-
HSYCO software pre-configured
-
Ethernet networking and WiFi
-
Industrial microSD card storage
Serial port system identifier: /dev/ttyAMA0.
Startup procedure: Connect power supply. HSYCO starts automatically. Three consecutive high-pitch beeps signal successful initialization.
HSYCO PRO, ENTERPRISE, and CORE
These models use Raspberry Pi Compute Module 4 or 5 hardware in Strato Pi Max enclosures, designed for larger commercial installations:
PRO: Raspberry Pi CM4 with 8GB RAM, 32GB eMMC, 480GB NVMe SSD storage.
ENTERPRISE: Raspberry Pi CM5 with 16GB RAM, 64GB eMMC, 960GB NVMe SSD storage.
CORE: Compact version of PRO optimized for smaller commercial deployments.
These models provide:
-
Significantly increased storage capacity for video recording and data logging
-
Higher processing power for complex automation and multiple concurrent users
-
Dual Ethernet ports
-
Multiple expansion slots supporting RS-485, RS-232, and other interfaces
-
Watchdog functionality
-
UPS integration options
-
NVMe SSD for high-speed storage operations
The USR LED provides operational status indication:
-
Blinking green: Operating from NVMe (normal operation)
-
Blinking red: Operating from eMMC (fallback mode)
The PWR LED (blue) indicates power supply presence. The ACT LED replicates Raspberry Pi status, flashing to indicate storage access.
I/O SERVER Models
HSYCO I/O Base and I/O Max integrate HSYCO software with direct hardware I/O capabilities: relays, digital inputs, analog inputs, RS-232, RS-485, CAN bus. These units combine software intelligence with hardware interfacing in single packages, suitable for installations requiring local I/O without external modules.
Note: HSYCO can be also installed on Linux servers running Debian, Ubuntu, or RedHat distributions. Other Linux distributions may work but are not officially tested or supported.
1.5.2 Software Licensing
HSYCO requires a valid license file for full functionality. Without a license, the web server operates (allowing Manager access) but device control and I/O Server communication are disabled.
Licensing Process:
-
First HSYCO startup generates a
license.txtfile containing a hardware-specific identification code. -
Submit this file to HSYCO Srl.
-
HSYCO Srl provides a license file containing the unlock key specific to your hardware.
-
Replace the generated
license.txtwith the provided licensed version. -
HSYCO automatically detects the change and unlocks functionality (no restart required).
The hardware identification code is based on the hardware components installed on the server. For example, replacing or adding network cards changes the code and therefore the software license key will no longer be valid for the new configuration.
1.5.3 Network Configuration
Network settings are configurable through Manager → Settings → Network. HSYCO implements a safety mechanism: if network connectivity is lost after changing network settings, the system automatically reverts to the previous configuration after 5 minutes. This prevents configuration errors from causing permanent loss of access.
1.5.4 Backup, Updates, and Documentation
Backup: The Manager provides one-click backup functionality, creating compressed archives containing all configuration files, EVENTS files, UI projects, and settings. Store backups securely, they contain everything needed to restore your HSYCO configuration.
Updates: HSYCO updates are distributed as hsyco.jar files. Upload through Manager → Backup/Restore/Update. HSYCO automatically installs the update and restarts. Always create a backup before updating.
Documentation: Complete technical reference documentation is available at docs.hsyco.com, covering all features in detail.