Data Loggers
Data loggers allow to gather, process and visualize statistical data on the variations of a data set.
They can be used to automatically generate periodic charts of its trend and/or to log data as CSV files.
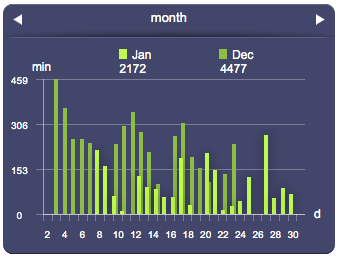
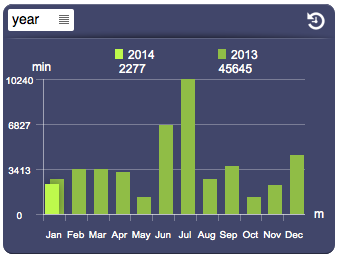
Data loggers collect data and group them in order to visualize the trends in charts for each hour (or group of hours) of the current and past day, each day of the current and past month, and each month of the current and past year. It is also possible to have an higher resolution of a single minute, but this implies a notably higher disk space usage.
Further, they allows for the logging of every processed value.
There are two types of data logger:
- counter: suitable for the creation of statistics of an incremental value (e.g. energy consumption or production). It calculates the variation (delta) of the value for each time interval with respect to the previous one. Further, it is possible to specify time slots and the relative rates to calculate for instance the costs for energy consumption.
- range: aimed at the computation of the maximum, minimum, and average of a fluctuating value (e.g. a measured temperature or humidity) for each time interval.
Once a data logger is defined in HSYCO's Settings, you can easily pass data to it using a simple action in EVENTS, a JavaScript function or Java method, and display statistical data using the Datalogger UI object.
Counter Data Loggers
The first step to create a counter data logger is to define it in the HSYCO configuration.
Refer to the Data Loggers section in the Settings chapter for a complete description of all the available parameters and options.
In the following examples we have defined a counter data logger named energy with default parameters.
Now, we need to provide the data logger with the incremental value we want to process.
Assuming we have an I/O datapoint named elektro.kwh which provides the energy consumption value, we write the following lines in EVENTS:
IO elektro.kwh : DATALOGGER energy = IO elektro.kwh, DATALOGGER energy = FILE LOG energy.csv
Whenever the I/O datapoint will provide a new value, the data logger will be updated and a log entry will be added to the file energy.csv.
Finally, in order to display the data logger’s charts, we should use the Datalogger object and set its ID to "energy"
For a complete reference of all the available actions on data loggers refer to the relative section in the Events programming chapter.
The same actions can be performed using JavaScript or Java code.
We could also create a data logger to monitor the expenses relative to energy consumption, initializing a new counter data logger and declaring the time slot rates in the file dataloggers.ini located in the config folder of HSYCO's root folder.
We add a new data logger with ID "cost" in Settings, then, we set the "elektro.kwh" I/O datapoint to update the data logger. In EVENTS we add this line:
IO elektro.kwh OR TIME : DATALOGGER cost = IO elektro.kwh
Note that this time we are updating the data logger not only when a new value is available, but also every minute. This is necessary to have an accurate calculation of the expenses.
Now we need to declare our time slots in the file dataloggers.ini, for instance:
cost; 0; 00:00-11:59; *; *; 0.3
cost; 1; 12:00-16:59; *; *; 1.4
cost; 2; 17:00-23:59; *; *; 0.8
These rules state that every day from midnight to 11:59:59 we are in slot 0 and the rate to be applied is 0.3, from 12:00:00 until 16:59:59 we are in slot 1 and the applicable rate is 1.4, later on slot 2 applies with a rate of 0.8.
We can include some exceptions by adding some lines before these rules:
cost; 0; *; *; 2000/12/10-2000/12/31; 0.3
cost; 2; *; 67; *; 0.8
cost; 0; 00:00-11:59; *; *; 0.3
cost; 1; 12:00-16:59; *; *; 1.4
cost; 2; 17:00-23:59; *; *; 0.8
The previous rules will still apply, except on Saturdays (6) and Sundays (7) when during all day slot 2 will apply.
Further, during the period between December 10th and December 31st of 2000, slot 0 will always apply despite the day of the week or the time.
Refer to the section about the dataloggers.ini file for a complete reference on how to write time slots rules.
At this point we should add the Datalogger object to the user interface to display the charts. The user interface also allows you to filter data by rate.
Further, we can have a detailed report of all the processed data by specifying the path of a log file using the "Rates Log File" option in the data logger's settings:
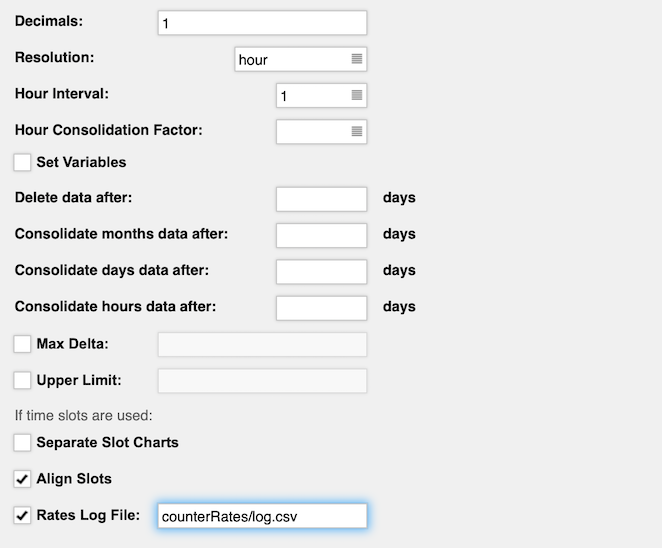
This will create a CSV file listing a row for each update of the data logger divided in the following columns:
data_logger_name, update_time, provided_value, calculated_cost, slot_id, applied_rate
Range Data Loggers
In the following examples we define a range data logger, named temperature, with default parameters.
We set the data logger to follow the temperature measured by a probe identified by the I/O datapoint termo.temp.
We specify in events that every minute it must be updated, plus we log the measured value in the file temp.csv:
TIME : DATALOGGER temperature = IO termo.temp, DATALOGGER temperature = FILE LOG temp.csv
The created charts will automatically be scaled to range from the lowest measured value to the highest and charts belonging to the same period will be aligned.
The average is calculated as the sum of the values divided by the number of records. It is therefore advised to provide the data logger with periodical values so to have a correct calculation.
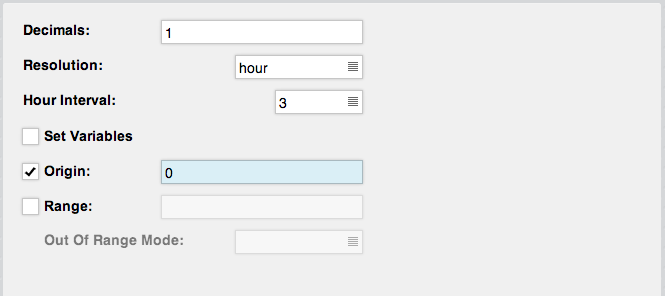
By default, the origin of the charts is set to correspond to the lowest measured value.
One might prefer to set the origin to a specified value (for instance zero) so to highlight the difference between values below and above it.
We can achieve this by setting the Origin option in the data logger settings:
Finally, in order to display the data logger’s charts, we should add the Datalogger object to our interface.
CSV Import/Export
Using the HSYCO's development API, in Events, JavaScript and Java, you can export a full dump of all data underlying each data logger.
The CSV file uses \r\n as line separator and ';' as field separator.
This is an example of the CSV file for a counter data logger.
ts;delta;cost;locked
20160129130000;2.0830569986031082;0.0;1
20160129140000;3.464736775902562;0.0;1
20160129150000;0.04146936782360733;0.0;1
20160220120100;0.005090918751661816;0.0;0
20160220120200;0.039745587753242655;0.0;0
The record format has the following four fields:
- ts: the timestamp as YYYYMMDDhhmmss
- delta: a double precision floating point of the accumulated values for the period between this record's timestamp and the next
- cost: a double precision floating point of the cost value for the period
- locked: a boolean, represented as 1 for locked records, and 0 for unlocked records. A record is marked as locked when its cost value is permanently set, and will not change if the rates rules are changed in the future.
This is an example of the CSV file for a range data logger.
ts;vmin;vmax;vavg;vcount
20170114150100;3.607471109385042;4.694435324229342;4.241931611566256;15
20170114150200;3.8066206378643987;5.446351986025894;4.575574507553171;16
20170114150300;2.398800160049782;5.2533792997638775;3.6368449963207854;17
20170114150400;1.5474068317929874;3.1531099637853406;2.290833667227986;10
The record format has the following four fields:
- ts: the timestamp as YYYYMMDDhhmmss
- vmin: a double precision floating point for the minimum value logged in the period
- vmax: a double precision floating point for the maximum value logged in the period
- vavg: a double precision floating point for the average value logged in the period
- vcount: a positive integer counter of the number of values logged in the period; this is used to compute a weighted average when new values are passed to the data logger.
Export API
Use the following event action to create a CSV file for a data logger. The file, named <data logger id>.csv is written in the <path> directory:
DATALOGGER name = FILE CSVWRITE path
You can also use the equivalent JavaScript command API:
dataLoggerSave("csvwrite", names, path, timestamp)
And the Java command API (setting action to "csvwrite"):
static boolean dataLoggerSave(String action, String[] names, String path, boolean timestamp)
Import API
Raw data, using the same CSV format of the export APIs, can be imported to a data logger.
You can selectively update existing records, delete records, but also completely wipe existing data and replace them with the data from a the CSV file or a string. To delete records, leave just the timestamp value in the CSV file for the records you want to delete, for example:
ts;vmin;vmax;vavg;vcount
20170114150200;3.8066206378643987;5.446351986025894;4.575574507553171;16
20170114150300
20170114150400
This file will update record with update the values of one record, and delete two records.
Note that the first record in the CSV file is assumed to be the header, and not considered as valid data.
At the end of the import process, one or two files are generated, with the same name of the import file, with the "-ok" and "-err" suffixes to the data logger id, before the .csv extension. The ok file contains a copy of all records that have been successfully processed, while the err file will contain all records that were discarded due to format errors or other error conditions. If no errors are detected, only the ok file is created during the import process.
Use the following event action to upload a CSV file to insert, update or delete records of a data logger. The file, named <data logger id>.csv, is read from the <path> directory:
DATALOGGER name = FILE CSVREAD path
Use the following event action to upload a CSV file that will replace all records of a data logger:
DATALOGGER name = FILE CSVREADOVER path
You can upload a CSV line directly from a string instead of from a file, just replace the file path with the complete CSV string:
DATALOGGER name = FILE CSVREAD "20170114150200;3.8066206378643987;5.446351986025894;4.575574507553171;16"
DATALOGGER name = FILE CSVREAD "20170114150300"
You can also use the equivalent JavaScript command API:
dataLoggerSave("csvread", names, path, timestamp)
dataLoggerSave("csvreadover", names, path, timestamp)
And the Java command API (setting action to "csvread" or "csvreadover"):
static boolean dataLoggerSave(String action, String[] names, String path, boolean timestamp)
Custom Data Loggers
The Datalogger UI object can also display data that is not stored by an HSYCO data logger, for example consumption data read from an external meter's cloud service, or statistics computed from your own SQL tables.
When the Datalogger object requests a data logger id that is not defined in Settings, HSYCO calls the userSubmit() callback, in Java plugins and in JavaScript, with:
- name:
userdatalogger:<id>, where<id>is the data logger name exactly as written in the object's configuration - fields: the parameters of the request sent by the Datalogger object
The callback must return a string with the JSON data to display. If all callbacks return null or an empty string, the object receives {"datalogger":"notfound"} and shows empty charts.
See the Java userSubmit() and JavaScript userSubmit() callbacks. As userSubmit() is also called for the Submit buttons, always check the name before returning data.
To show a custom data logger, add its name to the Dataloggers attribute of the Datalogger object, for example [{"name":"myenergy","label":"Energy","unit":"kWh"}]. A custom data logger that is not listed in this attribute is not requested. The data logger type, counter or range, is not part of the object's configuration, but is taken from the type key of the returned data.
Use lowercase names for custom data loggers. Change notifications, described below, are always sent with lowercase names, and would not reach a data logger whose name in the object's configuration has uppercase letters.
Request Fields
The Datalogger object sends two kinds of requests, identified by the mode field:
dashboard: the live charts of the current and past hour, day, month and year. The object repeats this request periodically while it is in live mode, and also once when it is opened in browser mode, so the callback must always support itbrowse: the charts of a period selected in browser mode
| Field | Mode | Description |
|---|---|---|
name | all | The data logger name |
mode | all | dashboard or browse |
ts | dashboard | The timestamp value returned by the previous dashboard response for this data logger, or 0 for the first request |
resolution | browse | The resolution of the requested values: year, month, day, hour or minute |
from | browse | The start of the requested period, as yyyyMMddHHmm |
to | browse | The end of the requested period, as yyyyMMddHHmm |
For example, the values of each day of October 2025 are requested with mode=browse, resolution=day, from=202510010000 and to=202510312359.
Response Format
The response is a JSON object with the following keys:
datalogger: object - the chart data, as described below. Return the string"null"in a dashboard response to keep the data already displayed by the objecttimestamp: number - optional, dashboard only. A time stamp in milliseconds, that is sent back in thetsfield of the next dashboard request. Use it to return"datalogger":"null"when your data has not changed since the previous request. The first request, withtsset to0, must always return the datastart: string - optional. The time stamp of the oldest available data, asyyyyMMddHHmmss. In browser mode, it sets the oldest date that can be selected. If omitted, only the current year can be selectedmaxresolution: string - optional. The highest resolution of the available data:minute,hour,dayormonth. Higher resolutions are not offered by the object. If omitted, all resolutions are offered
The datalogger object always has a type key, set to counter or range. Counter values are summed when the object groups them, while range data loggers have separate minimum, maximum and average values.
Each set of values is an object with these keys:
values: array - the values, as numbers ornullfor missing valuestotal: string - optional. The total for the period, shown in the chart legend. For range data loggers, use the maximum of the maximum values, the minimum of the minimum values and the average of the average values
Dashboard Responses
A counter data logger returns the hour, day, month and year keys, each with the values of the current period in present, and of the previous period in past:
hour: 60 values, one for each minute of the hour, shown at minute resolutionday: 24 values, one for each hour of the day, shown at hour resolutionmonth: 31 values, one for each day of the month, shown at day resolutionyear: 12 values, one for each month of the year, shown at month resolution
Arrays are shortened in the following examples:
{
  "start": "20250101000000",
  "maxresolution": "hour",
  "timestamp": 1760961600000,
  "datalogger": {
    "type": "counter",
    "hour": {
      "present": { "values": [0.1, 0.2, null, ...], "total": "1.5" },
      "past": { "values": [0.3, 0.1, 0.2, ...], "total": "6.2" }
    },
    "day": {
      "present": { "values": [1.2, 0.9, ...], "total": "14.3" },
      "past": { "values": [1.1, 1.4, ...], "total": "22.0" }
    },
    "month": {
      "present": { "values": [20.1, 18.4, ...], "total": "402" },
      "past": { "values": [19.7, 21.2, ...], "total": "610" }
    },
    "year": {
      "present": { "values": [650, 590, ...], "total": "5400" },
      "past": { "values": [720, 640, ...], "total": "7100" }
    }
  }
}
A range data logger has max, min and avg keys within each period, each with present and past values. The optional origin key sets the origin of the charts, as the Origin option of range data loggers:
{
  "start": "20250101000000",
  "maxresolution": "hour",
  "timestamp": 1760961600000,
  "datalogger": {
    "type": "range",
    "origin": "0",
    "hour": {
      "max": {
        "present": { "values": [22.4, 22.3, ...], "total": "22.4" },
        "past": { "values": [22.9, 22.8, ...], "total": "22.9" }
      },
      "min": {
        "present": { "values": [21.0, 21.1, ...], "total": "21.0" },
        "past": { "values": [21.3, 21.2, ...], "total": "21.2" }
      },
      "avg": {
        "present": { "values": [21.7, 21.6, ...], "total": "21.7" },
        "past": { "values": [22.0, 21.9, ...], "total": "22.0" }
      }
    },
    "day": { ... },
    "month": { ... },
    "year": { ... }
  }
}
The periods you don't return are displayed as empty charts.
Browse Responses
Browse responses have the values of the requested period in the browser key, with one value for each resolution step from from to to. For example, 31 values for the days of October, or 24 values for the hours of a day.
A counter data logger returns a single set of values:
{
  "start": "20250101000000",
  "maxresolution": "hour",
  "datalogger": {
    "type": "counter",
    "browser": {
      "data": { "values": [12.5, 11.8, null, 9.1, ...], "total": "402" }
    }
  }
}
A range data logger returns the max, min and avg values:
{
  "start": "20250101000000",
  "maxresolution": "hour",
  "datalogger": {
    "type": "range",
    "browser": {
      "max": { "data": { "values": [24.1, 23.8, ...], "total": "26.0" } },
      "min": { "data": { "values": [18.2, 17.9, ...], "total": "15.1" } },
      "avg": { "data": { "values": [21.0, 20.7, ...], "total": "20.9" } }
    }
  }
}
Slots
Counter data loggers can return more charts, for example the costs, in a slots array that replaces the period or browser keys. Each slot has a label, shown in the object's slot selector, and the same keys of a counter response:
{
  "datalogger": {
    "type": "counter",
    "slots": [
      { "label": "Energy", "hour": { ... }, "day": { ... }, "month": { ... }, "year": { ... } },
      { "label": "Cost", "hour": { ... }, "day": { ... }, "month": { ... }, "year": { ... } }
    ]
  }
}
The Slot Labels attribute of the object's configuration overrides the labels returned by the callback.
Refreshing the Charts
In live mode, the Datalogger object repeats the dashboard request every 5 seconds.
You can notify the object when your data changes, by calling dataLoggerUpdate() in Java or JavaScript, or using the DATALOGGER action in EVENTS, with the custom data logger name. The value is ignored, as the data logger is not defined in HSYCO, but the notification triggers a new dashboard request. Once a data logger has received a notification, the object stops repeating the dashboard request every 5 seconds, and only requests new data for a few seconds after each notification. Therefore, if you use notifications, send one every time your data changes.
Notifications are only sent when at least one data logger is defined in Settings. Without HSYCO data loggers, the object keeps repeating the dashboard request every 5 seconds.
Example
The following JavaScript callback returns a custom counter data logger named myenergy. The getEnergyValues() function, not shown here, reads the values from your data source.
function userSubmit(session, userid, name, fields) : {
  if (name != "userdatalogger:myenergy") return null;

  var response = { start: "20250101000000", maxresolution: "hour" };
  if (fields.get("mode") == "dashboard") {
    response.timestamp = new Date().getTime();
    response.datalogger = {
      type: "counter",
      day: {
        present: { values: getEnergyValues("today"), total: "14.3" },
        past: { values: getEnergyValues("yesterday"), total: "22.0" }
      }
    };
  } else {
    response.datalogger = {
      type: "counter",
      browser: {
        data: { values: getEnergyValues(fields.get("resolution"), fields.get("from"), fields.get("to")) }
      }
    };
  }
  return JSON.stringify(response);
}
Always return the JSON data as a string, using JSON.stringify() in JavaScript.
In a Java plugin, the equivalent callback is:
public static String userSubmit(String session, String userid, String name, HashMap<String, String> fields) {
  if (!name.equals("userdatalogger:myenergy")) return null;

  JSONObject response = new JSONObject();
  response.put("start", "20250101000000");
  response.put("maxresolution", "hour");
  JSONObject datalogger = new JSONObject();
  datalogger.put("type", "counter");
  if ("dashboard".equals(fields.get("mode"))) {
    response.put("timestamp", System.currentTimeMillis());
    JSONObject day = new JSONObject();
    day.put("present", new JSONObject().put("values", getEnergyValues("today")).put("total", "14.3"));
    day.put("past", new JSONObject().put("values", getEnergyValues("yesterday")).put("total", "22.0"));
    datalogger.put("day", day);
  } else {
    JSONObject data = new JSONObject().put("values", getEnergyValues(fields.get("resolution"), fields.get("from"), fields.get("to")));
    datalogger.put("browser", new JSONObject().put("data", data));
  }
  response.put("datalogger", datalogger);
  return response.toString();
}
This example only returns the day period in live mode, so only the hour resolution charts are filled.